This subject comes up so often on the DPReview site that there should be a sticky post at the top level explaining the issues with commenting on tone or color when your monitor sucks. It’s just silly to tell someone they have bad tone or color when your monitor is cheap and you don’t calibrate.
A particularly vocal (and often obnoxious) “dude” on the Fuji Talk Forum has again brought this specter to the fore, so I thought it time to add my $0.02.
A 10 year old cathode-ray tube (CRT) is asking for problems as they lose their ability to retain focus after some years and people end up posting terribly over-sharpened images. Yuck. I also found that it was pretty hard to adjust the white and black points unless the monitor was fairly expensive. Perhaps a hardware calibrator can take care of that, but I suggest amateurs just bite the bullet and get a good LCD panel.
Now we need to define “good:” where LCD panels are concerned. A panel in use for gaming can be of any quality … every panel made today is probably excellent for that task. They are all lightning fast and most are bright and vibrant and of course accept a HDMI port and sport full HD panels.
Unfortunately, most panels got good and fast and cheap by using TN technology, which is the lowest form of panels … 6 bits of color information and some fancy dithering algorithms to fake out a 32bit color space. The angle of view is so narrow that you can see color changes at the edges without moving your head. It is impossible to see uniform color across a TN panel from normal working distance. And they do not calibrate well at all in my experience. So, for photography the typical panel available today is a very bad choice. If you are using a TN panel, I assert that you have no right whatsoever to comment on someone else’s colors or tones because you have no clue what they really are.
So if 98% of panels are unsuitable for photography, are we not lost?
No … there are still many panels around that can do the job. But they will definitely cost you more than the el-cheapos. There are three technologies that are vastly better than TN for photographic editing. They are (in order from lowest to highest quality overall) MVA, PVA and IPS. I use an older NEC MVA panel and can tell you that it calibrates beautifully. Colors and tones are uniform across the screen and I can hold me head anywhere and still see them accurately.
IPS is the best technology and happens to be the technology used for most Apple panels, which makes sense since Apple has a strong niche in the arts. There is a newer and cheaper variant that is apparently also good for photography – eIPS. Seen in some cheaper monitors … but still not cheap like TN panels.
Here is an example of how my two panels render colors and tones … note that you may or may not see these as I see them, after all you are seeing them on your own monitor. But you will be able to easily assess the *relative* differences between these two panels as seen by my D700, and that’s the point of this demonstration. The TN panel is on the left and the MVA panel is on the right.
![TN_MVA_diff[1]](https://blogger.googleusercontent.com/img/b/R29vZ2xl/AVvXsEjzmdrFTV1_rk1RFObx0-FawD6VfgEX_VL1hGg_hlh6xNmwRmdFwqRmlLsxf65E0XaWXPJQYBLuLlZVip5S7m7ZB9jzW8RQjdQbxL1p4MHBJRIUl1VqkcejKA-VDb7D9LsS1CXJ-edzKTvO/?imgmax=800 "TN_MVA_diff[1]")
So how can you tell how well your panel is doing?
I use the lagom.nl site, which provides the best LCD monitor test images I have yet seen.
You can verify that your contrast is set correctly … here is their explanation:
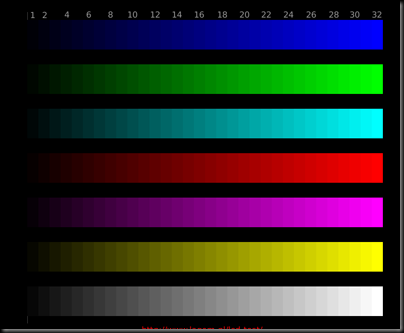
The following image shows scales of linearly increasing RGB values. On a good monitor, you should see roughly equal steps in brightness over the full range from 1 to 32, and in all colors. Bar 1 should be visible. A bad monitor will not show the leftmost few rectangles, will not show a difference between the rightmost few, or shows a relatively large jump between numbers 31 and 32.
And here is a small snapshot of the step-wedges on the page:
There are pages to aid in gamma calibration (but please, do yourself a favor and get a hardware calibrator) and to verify white and black points. Here is a snippet from the black point page so you can see you your monitor is doing in the lowest tones. On my MVA panel I can see every tone from1 and upwards.

But what about white point? Can you see the top shades or are they pure white, indistinguishable form the surrounding 255?

So go to the site and check every aspect of your monitor. If you can’t see all tones or if your gamma is way off, then get yourself a hardware calibrator. It’s just too hard to guess … your eye compensates too easily.
I use the Huey Pro calibrator and it works well for multiple monitors. It reads the ambient light and can change the brightness of the monitor to compensate. There is no reason to go up in price as there are plenty of article that suggest that the accuracy of all the consumer colorimeters is similar and that a real step up requires serious money in both the monitor and the colorimeter (the name of the device used for calibration.)
Click on the following to see the Huey Pro for just over 80 bucks at the time of writing. The Spider Express 3 is not much more but does not do dual monitors, so watch out for that!
And here are some very good IPS panels in order by increasing cost that start quite inexpensive to help you in your search …

![DSC_8908_boots[1]](http://letkeman.net/Photos/albums/witw07_1/DSC_8908_boots.jpg "DSC_8908_boots[1]")
![DSC_8909_boots_draganizer_800[1]](http://letkeman.net/Photos/albums/witw07_1/DSC_8909_boots_draganizer_800.jpg "DSC_8909_boots_draganizer_800[1]")

![TN_MVA_diff[1]](http://letkeman.net/Photos/invisiblephotos/TN_MVA_diff.jpg "TN_MVA_diff[1]")


![DSC_3865_wabbit[1]](http://letkeman.net/Photos/albums/mygarden2010/DSC_3865_wabbit.jpg "DSC_3865_wabbit[1]")
![DSC_3869_wabbit[1]](http://letkeman.net/Photos/albums/mygarden2010/DSC_3869_wabbit.jpg "DSC_3869_wabbit[1]")
![DSC_3872_wabbit_tongue[1]](http://letkeman.net/Photos/albums/mygarden2010/DSC_3872_wabbit_tongue.jpg "DSC_3872_wabbit_tongue[1]")
![DSC_3882_wabbit_leaving[1]](http://letkeman.net/Photos/albums/mygarden2010/DSC_3882_wabbit_leaving.jpg "DSC_3882_wabbit_leaving[1]")
![DSCF1872_macro_setup[1]](http://letkeman.net/Photos/albums/HowToShootMacro/DSCF1872_macro_setup.jpg "DSCF1872_macro_setup[1]")
![DSC_0508_dragonfly_face2[1]](http://letkeman.net/Photos/albums/beaverswamptrail26aug06/DSC_0508_dragonfly_face2.jpg "DSC_0508_dragonfly_face2[1]")
![DSC_0508_eyes[1]](http://letkeman.net/Photos/albums/beaverswamptrail26aug06/DSC_0508_eyes.jpg "DSC_0508_eyes[1]")
![DSCF4649_rails[1]](http://letkeman.net/Photos/albums/macro_tubes_vs_tcon_sig_vs_nik/DSCF4649_rails.jpg "DSCF4649_rails[1]")
![DSCF4643_sigma105_tubes_500d[1]](http://letkeman.net/Photos/albums/macro_tubes_vs_tcon_sig_vs_nik/DSCF4643_sigma105_tubes_500d.jpg "DSCF4643_sigma105_tubes_500d[1]")
![DSCF4648_500d[1]](http://letkeman.net/Photos/albums/macro_tubes_vs_tcon_sig_vs_nik/DSCF4648_500d.jpg "DSCF4648_500d[1]")
![DSC_3832_sigma105_tubes_500D[1]](http://letkeman.net/Photos/albums/macro_tubes_vs_tcon_sig_vs_nik/DSC_3832_sigma105_tubes_500D.jpg "DSC_3832_sigma105_tubes_500D[1]")
![DSCF4644_sigma105_tubes[1]](http://letkeman.net/Photos/albums/macro_tubes_vs_tcon_sig_vs_nik/DSCF4644_sigma105_tubes.jpg "DSCF4644_sigma105_tubes[1]")
![DSC_3833_sigma105_tubes[1]](http://letkeman.net/Photos/albums/macro_tubes_vs_tcon_sig_vs_nik/DSC_3833_sigma105_tubes.jpg "DSC_3833_sigma105_tubes[1]")
![DSCF4645_nikon105AI_tubes[1]](http://letkeman.net/Photos/albums/macro_tubes_vs_tcon_sig_vs_nik/DSCF4645_nikon105AI_tubes.jpg "DSCF4645_nikon105AI_tubes[1]")
![DSC_3834_nikon105AI_tubes[1]](http://letkeman.net/Photos/albums/macro_tubes_vs_tcon_sig_vs_nik/DSC_3834_nikon105AI_tubes.jpg "DSC_3834_nikon105AI_tubes[1]")
![DSCF4646_sigma105_kenko2x_500d[1]](http://letkeman.net/Photos/albums/macro_tubes_vs_tcon_sig_vs_nik/DSCF4646_sigma105_kenko2x_500d.jpg "DSCF4646_sigma105_kenko2x_500d[1]")
![DSC_3836_sigma105_kenko2x_500d[1]](http://letkeman.net/Photos/albums/macro_tubes_vs_tcon_sig_vs_nik/DSC_3836_sigma105_kenko2x_500d.jpg "DSC_3836_sigma105_kenko2x_500d[1]")
![DSC_3837_nikon105AI_kenko2x[1]](http://letkeman.net/Photos/albums/macro_tubes_vs_tcon_sig_vs_nik/DSC_3837_nikon105AI_kenko2x.jpg "DSC_3837_nikon105AI_kenko2x[1]")