Note: These settings should work very well for any EXR-based camera, which includes the Fuji X10, XF1, X-S1, F70EXR, F80EXR, F200EXR, F300EXR, F550EXR, F505EXR, F500EXR, F600EXR, F605EXR, F660EXR, F750EXR, F770EXR, F800EXR, HS20EXR, HS25EXR, HS30EXR, S200EXR, Z700EXR, Z800EXR, Z900EXR, Z1000EXR.
Updated on 3 January 2011 – A complete rewrite!
Updated on 26 March 2011 – Additional information in several sections, and a new section on technical limitations.
Updated on 22 April 2011 – A major update distilled from the 41 part (so far) series of user experience review articles on the F550EXR and the F200EXR.
Updated on 7 October 2011 – Some info on the new F600EXR and siblings plus the X10 and X-S1.
Updated in November 2011 – Some restructuring and an up front default set of settings as short cut.
Updated in December 2011 – Preliminary additions and adjustments after days of hands on experience with the Fuji X10.
Minor updates in January 2012 – Been working with the X10 for two weeks now.
5 January 2012 – Added shot to shot times for X10.
1 April 2012 – revisit initial settings based on my own experience. No, this is not a joke, despite the date of the update.
24 Jun 2012 – Add some thoughts regarding the HS25, F770 and X-S1. Correct a brain fart found by Olivier in Belgium.
20 Sep 2012 – Clarify initial settings. Update my thoughts on the X series of EXR cameras. Add a few thoughts about the XF1.
31 March 2013 – Add some preliminary thoughts on the F800EXR, F900EXR and HS50EXR. Significant revision, with more HS50 / F900 content to come soon.
November 2014 – Added truly dumbed-down settings.
FOR ABSOLUTE BEGINNERS!
If the next section is over your head (someone one DPReview said that very thing in November 2014), then this section outlines the way I would suggest you set up the camera. But first, you could always set the camera into EXR AUTO mode and just shoot it. I don't like the mode because it constantly focuses and meters and draws a lot of battery, but it is as foolproof as it gets.
But for those who are a tad more adventurous, here are the simplest settings that will get you great results and allow you some control.
- P mode
- Auto ISO 3200
- M size
- DR400
You can leave the rest of the settings at defaults, but again for slightly more adventurous people, here are a few more settings to play with.
- Standard (Provia) film mode
- Pattern metering (default)
- Center AF (standard)
I think that gives decent results in most circumstances. If you are adverse to blowing highlights on sunny days, you can dial in between -1/3ev and -1ev of exposure compensation to save the highlights. Try a shot at 0ev first though.
The next section is the original basic section, but was not really basic enough. I am leaving it intact, with the original introduction.
Recommended General Settings for All EXR Cameras
This section outlines how I think most people should shoot EXR cameras without telling you too much about why. These settings work on every EXR camera and they guarantee just about the best results that the camera is capable of. You should read the rest of the article with these settings in mind if you want to understand why they are so useful, and so you can see the alternative and additional settings that are helpful in certain circumstances.
All Shooters
- Program (P) Mode for 99% of day to day images …
- Aperture priority mode is a good alternate exposure mode for wider ranging apertures on the X10, X-S1 and the HS series cameras.
- Shutter priority mode should be used in cases where you want to control the shutter explicitly for flowing water, very fast action, and so on.
- Manual mode is best for concerts and other very challenging lighting …
Manual and shutter priority modes are a bit more advanced, and I touch on them later on if you need an incentive to read beyond this introduction :-)
JPEG Shooters
- Medium (M) Size (I don’t believe that L size is better under any but the most contrived situations)
- DR400% (this is controversial, but I maintain that this gives the best captures)
- Auto ISO (400), (800), (1600) for most older EXR cameras
- choose based on your tolerance for grain versus blur, I say grain can be handled while blur is fatal
- Auto ISO (3200) for F200EXR, S200EXR, X10 and successors and possibly for F550EXR and successors, this last one being your call depending on how much grain you can tolerate and how much processing you are willing to do
Note: I regularly shoot and process up to 3200 ISO even on the 1/2” sensor of the F550EXR / F770EXR and I get decent results. But I know what I am looking at when I pixel peep and I know what it will look like when printed, so my tolerance for grain is very high. Your mileage may vary.
- Provia film mode
- JPEG FINE
For JPEG shooters of the HS20 through HS50, I like setting the sharpening to low, the tone to low, and the color to medium high. That works really well in my opinion. Although do remember that I process my images in Lightroom 4 now, and that makes quite the difference on some images.
Update: In good light, the HS series works well at 0, 0, 0, 0 as in factory settings. Setting sharpness to hard ruins images in my opinion. Bad halos that create a “sparkle” effect in branches and foliage and ruins edges. NR is dangerous at default or high when the light is anything but idea. I prefer it off, but in good light the default setting appears to do little harm. Test it yourself though, as I have only tested it a lot on the HS50.
Note that Provia is Fuji’s softest tone curve, which helps to avoid blocked shadows and blown highlights. If you do not ever want to deal with processing of your images, and if you find Provia is too flat, then you can experiment with Astia and Velvia, but be careful with them in contrasty light. They work well on cloudy days but Velvia ruins images with too much black shadow blown out white for my taste.
RAW Shooters
If you like the very best output and are experienced enough to handle processing every image (ACR support exists for the F550, S200, X10 and most of their follow-ons – as of 1 April 2013 the HS50 and F900 are imminent, says Adobe:
- RAW + JPG allows you to shoot at 100ISO and DR400 together (I am no longer a fan of RAW only mode, as it forces L size, which forces 400 ISO at DR400. That alone kills it for me.)
I like to shoot ISO 100 in bright, high-contrast light, so I shoot RAW + JPG. Some say that the RAW is identical to that shot in RAW only mode. Even if true (I have not seen unequivocal tests), there is still the JPEG, which does have proper binning. And, of course, I can set M size which allows me to shoot DR400 at 100 ISO. So I eschew RAW only as a matter of course.
If you want to shoot RAW only anyway, then try to do it mainly in soft light situations (e.g. overcast) where DR100 is acceptable so that ISO 100 is useable.
Bottom line to keep things simple:
- Shoot DR400 and auto ISO at M size most of the time.
- If you want more control, manage ISO, size and DR level based on the quality of the light.
- Use exposure compensation to protect the highlights yourself. It’s a bit complex, but that’s photography.
And that’s that. If that’s all you came for, thanks for reading. But I encourage you to read the rest as there are tips scattered throughout and I have continued to augment the article as I have acquired more of the EXR family for testing. As of April 1 (tomorrow), this April fool is testing the HS50EXR and F900EXR. I have the cameras until the 19th. There are already 10 parts posted.
And now for something completely different: a Huge Caveat!
X series EXR shooters (X10, X-S1, XF1) should generally shoot JPEG. Fuji has an excellent JPEG engine and these cameras have issues with how their RAW output is treated by Adobe software. Fuji seems to have preferred to deal with Silkypix and has apparently ignored Adobe, which means that Photoshop and Lightroom users like myself have a lot of difficulty with these files. I am testing an X-S1 as I write this and I have set it to JPEG as there is no advantage at all to shooting RAW.
Note: The standard advice is to use the raw converter that Fuji ships, or the full blown version of Silkypix. And that is an option to explore by downloading the free trials or installing the one that comes with the camera. My personal feeling on these converters is that I dislike the interface intensely. Too twitchy, too unfamiliar a processing model. So I would just use the excellent JPEGs from the X series cameras.
Last word: Fuji is moving away from EXR sensors at the 2/3” size towards X-Trans. This will make people think that the little X20 is a baby X1-Pro. Don’t be fooled. It is nothing of the sort. But it does look like bright light shooting might get better results at higher resolution on the X20 than the X10. For now, what this means about EXR cameras is that the future looks like a 1/2” future. Which is fine by me … this sensor tests out as over-performing in relation to its peers, so it has real legs if Fuji keep making strides such as the very effective phase detect auto focus in the HS50EXR and F900EXR.
Detailed Information on Shooting EXR Cameras
I covered my thought processes on the various modes of this camera in a kind of gestalt back in 2009 in this post. But one thing about that post is that I covered everything and updated as I learned, so it is very hard to follow logically. This article documents the various ways to shoot EXR cameras in a hopefully logical progression.
Before you begin shooting, set your LCD brightness down one click. (Note: For the F550EXR, the LCD is so bright – excellent in bright sunshine – that I prefer it set down 2 clicks.) This keeps things looking accurate, else you will be tempted to make exposures that are slightly dark.
When shooting in the dark, it helps to set your LCD brightness up several clicks because Fuji don’t have proper amplification to help you out with framing. But please, you must remember to reset the brightness when you get into good light, else you will be seeing horrible blown out images that are not real. Fuji needs to fix their amplification algorithms so that, no matter the exposure, they properly display the predicted result.
I recommend that you set IMAGE DISP. on the SET-UP menu to the setting named ZOOM(CONTINUOUS) to help you confirm exposure and sharpness in real time. This really helps me and I think you should try to get used to seeing whether your images are coming out in focus or not. It will save you the need to shoot more images, and more importantly it will confirm for you that you might have got a keeper and allow you to try again if you missed focus.
Update: Years later, I still set this on every camera I own and test. Zoom Continuous is the chimper’s chimping tool, if you will.
My Style
This article has existed for several years now and it has been very popular. Over 105,000 page views and counting. But … one thing I originally failed to do is to outline my own style and allow you to map and then tweak things for your own style. So here goes …
I like a compact to be basically automatic when I am wandering about. I shoot big cams for serious control, but I just want to press the button on a compact and get a good result. (Caveat: The X10 and HS series shoot like a dSLR.) And with the newer EXR cameras with the dial, it is very easy to dislodge the aperture if you like semi-auto in A-Prio mode. So I used to recommend A-Prio quite a bit, but now I just go with P mode myself. It is too easy to get really low shutter speeds when shooting A-Prio.
RAW shooters note: If you are coming from older EXR cameras where DR400 was the norm, then watch out. You will end up in ISO 400 all the time if not careful, as RAW only forced DR100 or ISO400. And the last one you set usually wins, making a crap shoot out of the ISO you are using. As I mention earlier, just don’t both.
Caveat on P mode: concerts are very demanding, so I always shoot them in full manual mode. This style is covered later on, and in my tips for better photography article.
I process all of my displayed images in Lightroom. What this means for readers is that my settings are designed to obtain a perfect capture with minimal processing in the camera. Meaning that I don’t want the camera “bruising” the pixels overly much. This is the key to better looking final images if you so desire. To do this in JPEG, I invariably recommend shooting at the highest DR setting in hardware, which remains DR400 even in the latest generation (X10.)
This can lead to somewhat flat looking images, for which you may choose to compensate in camera using film modes or dynamic range settings. Basically, the short answer is that you might as well boost contrast using a film mode and get the nicer saturation while you are at it … Astia for slightly nicer color with a bit stronger contrast, and Velvia for very strong color and contrast.
DR200 can also be used to boost contrast somewhat, DR100 to have the tone at its highest But note: Any of these settings puts you more at risk for blown highlights and blocked shadows, so use at your own risk. (This topic is addressed again later.)
As I mentioned in the initial settings chapter, I have gone back to RAW+JPG and I do in fact use the JPEG now and again. The F770EXR and newer cameras have really nice JPEGs, as to the HS and X series cameras. Fuji is getting really good at JPEG. But I will use the RAW whenever I feel the detail in the scene benefits, which is often. Lightroom 4 is simply amazing, and if you use Lightroom, give RAW a go with these cameras. (CS6 / ACR 7 also of course.)
Introduction to the EXR Family
| The F200EXR was the first of the family. It sports a 1/1.6” sensor, the same size as the F30fd, but with 12mp. It can bin those pixels and thus have very low pixel densities. This is the best of the breed for street photography and especially at night. The F70EXR followed fairly quickly, sporting a smaller sensor at 1/2”. This sensor had 10mp, which turned out to be the sweet spot for that size. This is the best of the long zoom variants for detail at high ISO. | ||
| Six months later came the F80EXR, an updated F70EXR with 12mp instead of 10. This reduced the image quality somewhat, although daytime image quality is excellent. The F80EXR has more saturation in Provia than the F70. Also a warmer white balance. Great for flowers. The F80EXR is the first Fuji compact to have an orientation sensor. The F300EXR is a new body and very long lens with the F80’s sensor and a better jpeg engine. Saturation and tone is between the F70 and F80 and most agree it has the best white balance of all the Fujis. This camera is a joy to use. |
| The F550EXR and F500EXR were announced on 5 Jan 2011 and I bought one of the first to come into Ottawa. No regrets at all so far. These use the F300EXR body and lens with a new BiCMOS/EXR hybrid sensor! The 550 gets a GPS! The vast number of new features and differences is too much to discuss in the short space available in this article … so please pop over to my article contrasting them to the F300EXR and have your mind blown!. The prices seem excellent to me and are fast getting better at Amazon. Edit 7 Oct 2011: I have recently recorded the entire rock concert Tommy on the F550, as well as some excellent covers and Who hits by Daltrey. These can be found in posts in September and October 2011. The videos are on YouTube as well, but you will want to see the stills, along with those from The Lion King, all of which are shot at 1600 and 3200 an d are magnificent … this camera definitely has the high ISO chops! |
| The F600EXR and F605EXR were announced on 11 August 2011. Sadly, Fuji Canada has decided not to import these so it is not likely that I will get direct experience with them. On the other hand, they are very similar to the F500 series, so there is not much to test. Key features on these new cams include motion detection for better auto ISO control (raise it for faster shutter); improved lens consistency edge to edge (samples and early owners confirm this); and improved GPS (one early owner thinks this is probably true.) The kaleidoscopic flair is still present, but is less sloppy looking, so that’s something anyway. Most of the rest of the features are tweaks in software and none of the new owners discuss them at all. I suspect they are mainly fluff while we wait for the newest line to start up. All in all, you should buy this one instead of the F550 if the price difference is acceptable. But the F550 remains a great bargain today. There are no differences in general shooting for the F600, so all F550 comments on shooting parameters can be considered to apply to the F600 series as well. |
| The X10 was announced on 1 September 2011 and the X-S1 on 24 November 2011. The big news this year for Fuji is the more or less roaring success of the X100 fixed lens compact in the Leica mold. Fuji sold 300,000 of these, which was apparently more than they expected. This is good as they deserve a break. But that is not an EXR cam (despite the use of the term for its processing chip), whereas the new X10 short zoom compact is definitely an EXR camera. Moreover, this new camera has a 2/3” sensor and has been reduced to 12mp, which should help with chroma noise. All in all, this thing has high potential for excellent all round kid chasing. And the reason why it is great for kids is that, in addition to the excellent sensor, they have attached a very fast lens. The 28-112mm equivalent zoom is f/2 at the wide end and f/2.8 at the long end. Wow! So this camera has a 1 2/3 stops advantage over the F550 at the long and wide ends on aperture alone. Adding in a 1 stop advantage in high ISO prowess due to sensor size and you have a serious increase in low light capability. The camera has many other features as well, you can see the press release here. This camera shoots like a dSLR, but also works well when using the same settings as earlier EXR cameras. A smaller compact camera with a very unusual manual zoom feature is the XF1. It was introduced on 17 September 2012 at Photokina. It uses the same sensor as the X10 and X-S1, presumably the new non-ORBing one, and it sports very retro styling with aluminum body and faux-leather covering. Nice looking cam. It also sports a fast 1.8-4.9 lens for 25-100mm, an average reach for its class. All in all, shot as I document up top, the XF1 should make a lot of people very happy in JPEG. |
| The F660EXR, F750EXR and F770EXR were announced together on 5 Jan 2012. The 660 has the old lens from the 300, 550 and 600 but has the new flash that does not come up until you release it. It also have new firmware features that have begun creeping into the line with the X series. Two of my favorites are macro mode, which is now remembered across power cycles, and timer mode, which is now remembered across images. Note that the 660 does not shoot RAW. The F770EXR has an amazing rubberized body that fits the hand nicely. It also has an extremely long range zoom – from 25mm to 500mm. This is pretty stunning in use, although it takes some effort to learn how to shoot steady enough to let the stabilization work at full zoom. It does shoot RAW, and very well. Its RAW is supported by Adobe now, as are all the compacts. The 750 is the same camera minus RAW and GPS. I took the 770 to Stockholm with me, courtesy of MSL (Fuji’s marketing company here in Canada) and it performed very well. That blog entry has yet to be posted. I’m having a busy summer. Sorry. The follow on from the F770EXR is the F800EXR, which was introduced on 25 June 2012. It is mostly an F770EXR minus GPS plus WiFi, and it appears that the two will be sold together this year. |
| The HS20EXR was announced on 5 Jan 2011, and a year later Fuji followed up with the HS25EXR and the HS30EXR. These cameras have the same body and lens as the HS10, but the HS20 has the F550’s sensor and the two newer camera share a sensor with the F770EXR. Fuji has mentioned that the newer sensor is more efficient, but there is little evidence of that when you produce the RAW images. Sharing the HS10 lens has interesting implications. The range of the lens changes because the 1/2” sensor of the newer cameras is larger than the 1/2.3” sensor of the HS10. So the larger crop means that the lens is wider at both ends of the spectrum. Fuji advertise these cameras as having the HS10’s 24-720 effective focal length (EFL), but in fact the 5.45 crop factor of the new sensor makes the range closer to 23-687mm EFL. They have manual zoom and pretty good dSLR like controls, so they are worthy of your attention, especially if you shoot them in RAW. The EVF in the HS25 is poor, to say the least. But I used it in my tests to capture subjects that were otherwise difficult to capture with the LCD at high magnification. The HS30 has a better EVF. The HS25 uses AA batteries, which will be good news for those who like Eneloops and who really feel that access to batteries at a local drug store matters. The HS30 uses a proprietary rechargeable lithium ion battery. My personal feeling is that the HS20 is probably a good bargain over the HS25 just for its RAW capabilities. But the HS30 is almost certainly the best of these cameras. Caveat: I have not shot the HS20 or the HS30, but I shot the HS25, F550 and F770 extensively in my tests and am very familiar with the sensors. |
| The F800EXR came and went in the fall of 2012. It is basically a an F770EXR with the GPS removed and WiFi inserted. It performs two interesting tricks: -- It can jump onto your home network and transfer images wirelessly to your phone or PC (I think the latter is true.) -- It can connect to your phone and the phone (a Fuji Camera Application you download from their site) can send the current location to the camera. The camera remembers it for an hour I think, so you need to send it pretty much every time you move. The F800 also has the new revamped menu system, which breaks all settings into pages and adds more hierarchy by grouping complex settings such as WiFi. |
|
| The F900EXR and HS50EXR began shipping in the spring of 2013. They are based on the venerable (and excellent) 1/2” EXR CMOS sensor, but it appears that this new generation is an FSI design versus other previous generations’ BSI (back side illumination) design. At least, Fuji no longer calls out the BSI design in their literature. Further, Fuji have once again brought out a phase detect version of the sensor, which last appeared in the F300EXR. The F300 had superb close auto focus, but speed and accuracy never seemed any different from the F80 and F550 that bracket it as models. Not so with the F900EXR and HS50EXR. In bright light, the AF can be near-instantaneous. This is really nice on the HS especially, with its vast range to 1000mm. I have to say that I really like these as outdoor shooters, as they are both very sharp and very fast and responsive. The new menus continue with these two and the WiFi has been refined. There is little question in my mind that these are the best EXR cameras to date. An argument for the larger sensor in the X series can obviously be made. But I would shoot the F50EXR over an XS-1 and an F900EXR over an X10 without a lot of soul searching. YMMV and please make sure that you try them all before choosing. |
EXR Propaganda
This is actually a pretty decent movie about how EXR technology works, so it is worth watching to provide some background around what I am talking about here.
Shutter Speed Issues
Now that you’ve seen the movie and understand that the dynamic range extension mode relies on the two half sensors stopping at different times, you can imagine that the shutter speed must be tied to one of them. Fuji has correctly chosen the mid-tones and shadows as the determinant of the shutter speed. The highlights are shot at a faster speed in order to protect them – 2x for DR200 and 4x for DR400. Note: DR800 and DR1600 are software hacks that smear data and turn white to grey. these are best avoided.
So which half is limited by the “official” maximum shutter speed? Unfortunately, the fast half .. the highlights. Which means that, in DR400 mode, an F70EXR for example can only manage 1/500s in bright sunlight. Well, that really sucks. You will be shooting at max aperture all the time. And if you shoot in A-Prio mode all the time and forget to boost aperture, you will be wondering why your exposures are too bright.
So, the max shutter speeds in M size DR400 at 100 ISO for F200, F70, F80, F300 and their contemporaries is 1/500s. For the F550 and newer (the RAW ones) it is 1/1000s. Beware.
Update: Another issue to be aware of is that these lenses are all moderately slow at full zoom. The HS50EXR is f/5.6 at 1000mm, the F series are at 5.3 at 500mm. Thus, you will get mediocre shutter speed at base ISO on cloudy days. Under 1/100s if shooting dark subjects like foliage. What this means is that you are relying on IS to maintain sharpness, and you are probably about 3 stops or 4 stops down from where you want to be. For the HS, you want 1/1000s to maintain a sharp image hand held. at 1/70s you are 4 stops down from that (divide by 2 four times.) The F series are 3 stops down. The sensor shift IS is capable to giving you sharp images most of the time, but you need to be shooting more than one image to be sure you get one critically sharp I mage. So make sure you are shooting several at a time. I do that with individual shutter presses, but some do it with burst mode. Whatever floats your boat.
Recommended Settings in Detail
I recommend several settings as standard no matter what shooting mode you are in. These settings enable a quality capture and maximize both dynamic range and noise reduction:
- P Mode or A Prio Mode? I like P mode for the compacts and A-Prio mode for the HS and X series. Because of their shutter speed limitations, you can suffer real problems with slow shutter and some blurring if you accidentally set a higher aperture than you intended. P mode tries hard to avoid that. The F300 and later compacts all have a real aperture as their third aperture, with their second aperture being ND filter only. That’s when A-Prio can be very useful. But note that It is easy to exceed the 1/1000s shutter speed limitation in bright sunlight, so watch for the shutter speed to turn red on the LCD. If that happens, dial another stop or even two of aperture. This is the surest sign that you have accidentally dialed in a too-open aperture.
- M size at whatever ratio you favor. dSLR shooters often like 3:2 to match their main camera’s output. 4:3 is the standard for small cameras and crops well for display sizes like 8x10. The reason for always shooting M size is that the camera’s effective pixel density is cut in half and this removes the majority of destructive noise reduction effects. It makes a *huge* difference for fine, low contrast details like distant foliage, animal fur, human hair or feathers. I would simply not waste my time trying to find situations where L size is useful. Because the EXR sensor and the strong AA filter means that it really is not useful at all. High resolution also forces 400 ISO when you want the dynamic range protection offered by DR400, and this destroys any possible advantage L size might have given you.
- DR400. If you’ve got it, flaunt it. Kidding. These cameras have excellent dynamic range compression in hardware. This means that they are able to shoot two exposures on each half of the sensor and combine them to capture highlights and shadows with a lot of range. This mode preserves the largest amount of shadow and highlight detail, and I find it always gives me a great capture. Note: The images sometimes are a tad flat for some people. If you are one of those, try Astia film mode to add spice to the images. Or drop to DR200. Either way, you put highlights and shadows at more risk, but you get a bit more punch. That said, I still see no reason for most people to give up the protection of higher dynamic range. Far too many people are still blowing out highlights or blocking shadows by trying to shoot EXR cameras at anything but DR400. This is a waste of time in my opinion.
- Auto ISO 400 / 800 / 1600 / 3200. How much tolerance do you have for grain and smearing? How is the light? Are you shooting moving objects? Poor light and movement force higher ISO. But if you can, keep it to 400 or 800 max. With the F550EXR I am happy to say that I shoot auto ISO 1600 or 3200. It’s that good. I would shoot that way with the F200EXR as well, assuming I could get over the clunky body and lack of reach, which I can’t. The X10 is a no-brainer for 3200ISO.
- Matrix metering mode. The Fuji cameras have very good matrix meters, although there are differences between them. There have been reports of some of them being more sensitive and requiring –1/3EV compensation when compared with others. Watch for that. The F550EXR appears to be prone to higher level exposures at night. The meter is actually behaving more correctly than others in the series, so you need to set –1EV or more if the image is predominantly dark and you want to save some highlights. Note: Recent cameras like the F770EXR, HS25, HS30, X10 and X-S1 have wonky matrix meters at times. They seem overly sensitive to the composition and over exposures are common. Many people switch to average metering to tame this problem.
- Provia Film Mode. This is the default and it has the lowest contrast. The small sensors already have issues with tone and contrast, blown highlights, blocked (black) shadows and anything we can do to alleviate that can make a difference in the smoothness perceived in our images. DR400 is one such tool, and Provia is another.
- RAW. The new cameras shoot RAW at a tolerable pace. Use a UHS-1 card if you can, or at least a class 10 card and shave seconds off every image capture. As for converters, I find the Silkypix editor annoying and difficult, so I would choose JPEG instead of that. Luckily, ACR 7 now supports pretty much all of the RAW EXR cameras up to the X-S1. Consider getting Lightroom 4, which has droped to $149 list, a tremendous deal for anyone who take stheir photography even a little bit seriously. Make you you get the latest update of camera raw or Lighroom. I use RAW+JPG exclusively on the compacts as there is extra detail and flexibility in processing them yourself. But you need to practice and learn the various controls. The X series should simply be shot in JPEG as Fuji have not straightened out issues with RAW and Adobe converters. I have not actually heard of any converters that create JPEGs to match the in camera JPEGs.
The difference between JPEG detail and RAW detail is shown here for the F550EXR. Also shown in the reach difference from the F200EXR to the F550EXR.

General Purpose Shooting
F200EXR, F70EXR, F80EXR, Z700EXR, Z800EXR, Z900EXR – set to P mode on the dial
F300EXR, S200EXR, F550EXR and siblings, HS20 and siblings – I no longer prefer to set to Aperture Priority mode and am happy in P mode most of the time, because I don’t like constantly thinking about the settings with a compact. The exposure compensation button is where you should focus when you think you need to change the exposure.
X10, XS-1 – A-priority mode.
| When shooting in walk around style, you want to just be able to frame and shoot, and P mode allows that. I use aperture mode on the F300 because the dial makes it easy and the extra aperture (the other compact EXR cams have only two apertures while the F300 has three.) The S200EXR has a regular lens with many apertures and so would normally be shot in A-Prio mode. I use this mode for most shooting, indoors and out. I use it with auto ISO 800 on the F300, auto ISO 1600 on the F70 and auto ISO 3200 on the F550EXR, HS20, and X10. |  F300EXR 1/420s f/5.3 ISO 100 0EV Shot from moving car through glass. |
Extreme Harsh Lighting
 F70EXR 1/480s f/6.4 ISO 200 –.67EV | I used to recommend EXR DR mode with DR800. But it has been shown that this mode increases smearing of low contrast fine details such as distant foliage. This, coupled with its reliance on a fixed ISO at 200, makes this mode fairly specialized. Closer subjects (e.g. desert plants) seem to look acceptable at DR800, but I think this would have been as good at DR400. The cactus at left was shot in this mode on a scorching day in San Antonio, TX. I never use DR800. Since I process everything, I prefer to shoot P mode at DR400 with –EV compensation for skies and then lift shadows in ACR later. The size of the sensor in the X10 will make it even better for this style. Remember to set M size so you don’t end up at 400 ISO! And, of course, with the RAW available, that is all I shoot now. DR1600 mode on the F550EXR and HS20 is pretty gross. It requires 400 ISO, as I predicted in the earlier version of this article, and what it really does is flatten the whites to grey. This creates the illusion of saving the highlights, but does not really save them as the combination of higher ISO and the software algorithm simply flattens all details to nothing in JPEG. RAW is better, but again, raising ISO does more damage than good in my opinion. See below for an example of this in action. |
Damage done by DR1600 in JPEG

Long Exposures
| Set to Manual (M) mode on the dial. For long exposures, you should mount the camera on a tripod or rest it on something solid. Then, set the timer to 2 seconds, so your hands are off for a while when the shutter opens. This prevents vibrations from ruining the shot. Set your aperture to match your lighting … for example, if shooting flowing water during the day as shown to the right, you want the smallest aperture (highest number) so that you can shoot at 1/15s or slower to get the water to smooth out nicely. The shot at right was exposed both normally and at ISO 250 at 1/15s and f/32. Hand held but braced on a bridge railing. |  Nikon D700 (yes, that’s cheating) Nikon D700 (yes, that’s cheating)1/15s f/32 ISO 250 –.33EV 1/1600s f/7.1 ISO 1250 –.33EV |
Concerts and Shows
 F80EXR 1/80s f/5.6 ISO 1600 | Set M mode on the dial. Set the aperture wide open and leave it there. Set the shutter speed to approximately 1/100s to start with. You can vary this up or down depending on the movement of the players and on the brightness of the lighting. On the left, you see a puppeteer at a show called Puppets Up! The lighting was moderate to strong, so I used 1600 ISO at f/5.6 (full zoom) and 1/80s. The exposure is excellent with no burnt highlights. Note that strong lighting actually allows higher ISO, as high contrast details are handled very well by EXR cameras. And bright light makes high contrast. |
| For very well lit big money productions I much prefer to start at 800 ISO, as all the EXR cameras retain detail much better at 800 ISO and below. When shooting a concert, you should move ISO from 400 to 800 ISO if the images come out bright enough, and only lower the shutter speed when necessary. |  F70EXR 1/125s f/5.5 ISO 800 |
|
| 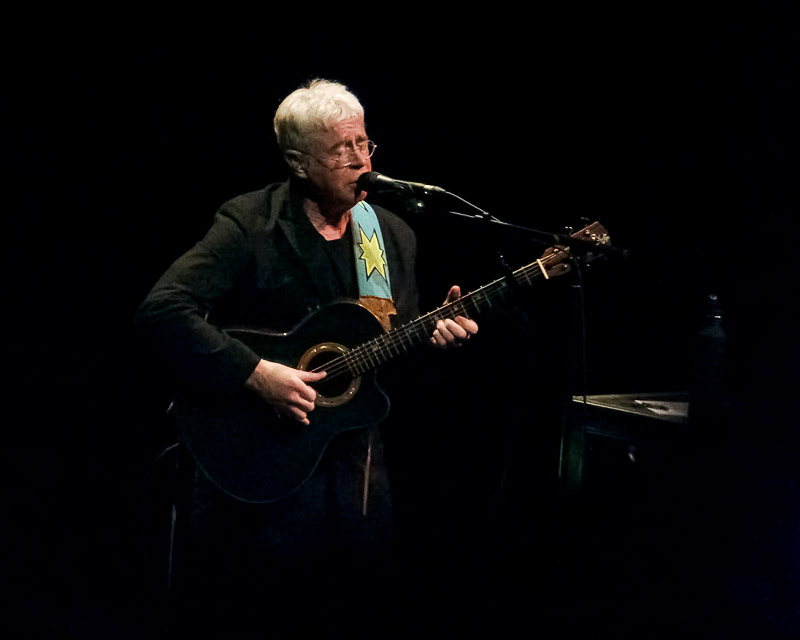 F550EXR 1/125s f/5.3 ISO 3200 RAW – Silkypix, ACR6, CS5 |

If you click through on the F500EXR images, you will see that RAW allows you to open shadows and retain slightly better detail in hair etc. at web sizes. However, the JPEG is quite excellent for such a high ISO.
Update: In late 2011, I attended a string of concerts and shows and photographed them all in RAW (one brain fart exception was photographing Prince in JPEG.) The results are at times breath taking, and this on the F550EXR and its 1/2” sensor.
Example 1: The Lion King – F550EXR, 1600 ISO, 1/80s, f/5.3
Example 2: Bob Seger and the Silver Bullet Band – F550EXR, 1600 ISO, 1/160s, f/5.3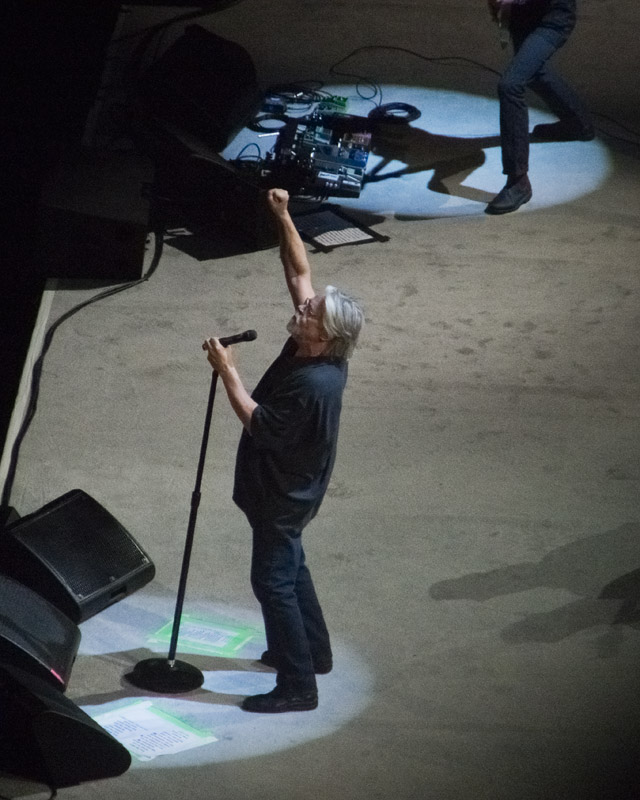
The balance you need to strike for shows and concerts works something like this:
- Start at ISO 800 and 1/100s
- If images look overexposed (easy to do if performers wear white shirts) then drop ISO to 400
- If images are very dark, then raise ISO to 1600 or 3200 for the F200 or F550 / HS20, X10 / XS-1.
- I have lately favored 1600 ISO at 1/125 or 1/160 …
- If images remain dark then drop shutter to 1/80 then 1/50 … possibly 1/30 if performers do not move much
Some concerts change lighting all the time, which makes them a nightmare to photograph. Move ISO back and forth to compensate.
If the venue is very dark you may need to turn your LCD up +2 clicks instead of the usual -1 click (-2 for F550.) This allows you to see and prevents you from overexposing highlights just to see something on the LCD.

Panasonic ZS3 1/50s f/4.7 ISO 200 (!!)People have written me that they've tried this technique and they get dark images.
Well, that's the problem with concert venues - the lighting is incredibly variable.
If you get great lighting, then you can shoot at 400 ISO at 1/125s all day long. The images will be quite nice.
Or how about this image, shot at 200 ISO and as crisp as you could ask for. This was a Panny, but a Fuji would have done just as well or better (DR400 would soften the shadows a bit.)
| If you get a hole in the wall venue with very dim light, you will be forced down to 1/50s and ISO 1600 or even ISO 3200 and you will still see fairly dim images on the LCD. 1/50s starts to risk much more blur. High ISO risks much more grain. You cannot win when the light is terrible. Remember that a sharp image with no blown areas that is grainy is still 10,000 times better than a bright image that is blurred or blown out. |  F70EXR 1/50s f/5.6 ISO 3200 No Processing |
You can always pull out the mid tone detail and either go B&W for heavy grain, or run Neat Image or Topaz DeNoise to clean out the grain. Concert shooting is an advanced mode ... just setting night mode will get you somewhere, but not with the control you need to prevent both blur and blow outs.
Also remember that there is a threshold in every camera below which images are almost noise free. You can shoot a dim image at 800 ISO with the F70EXR and pull it up to look terrific. Much better than a perfectly exposed 3200 ISO image. And you have protected your highlights perfectly. Advanced processing makes a big difference.
Soft Light – Cloudy Days, Morning, Evening
 F80EXR 1/110s f/5.6 ISO 200 -.33EV | Contrast flattens considerably as light levels fall. You may choose to boost contrast somewhat for images that require it. Certainly, cloudy days are by far the best days to shoot flowers and insects. The lack of shadows allows rich, vibrant color to be visible. Sunlight invariably leaches all the life from flowers. The image at left was shot in the late evening and the color is magnificent. Provia was used, but colors and tone were increased in post processing to bring out the rich colors. Those who prefer to avoid processing can try the ASTIA or VELVIA film modes |
Film modes can be a bit dangerous because they add contrast, and in sunlight this pushes your images closer to blown highlights and blocked shadows. I’ve seen many a harsh image posted obliviously that could have been far nicer shot in Provia.
But with soft light scenarios, you get a free pass to try these modes. Try both experimentally and see which you like for your nature shots on cloudy days. ASTIA seems to be useful at night as well as it buries noise deep in darkened shadows. However, I have observed that shooting light colored surfaces with ASTIA at high ISO can add a lot of unwanted chroma noise in the form of yellow blotching. This is to be avoided.
Exposure Compensation
Please learn and use Exposure Compensation. This is critical to getting good exposures. Meters are not nearly as smart as you are, so don't leave everything blindly in the camera's hands.
Suggestions for reading are John Shaw's Field Guide to Nature Photography and Bryan Peterson's Understanding Exposure. In fact, have a look at my list of favorite books in this article. Also read the Expose to the Right Article at Luminous Landscape.
For night shooting where you want to preserve the look of the lights (e.g. Christmas Lights) –1EV is a good starting point. (People on the forums manage to forget this obvious technique day in and day out as they complain the the F550EXR over exposes at night. What is really happening is that they got used to some other camera underexposing at night. Learn your meter!)
| General outdoor shooting often benefits from a slight underexposure of –1/3EV. This helps preserve highlights but it also helps increase color saturation. In strong sunlight and especially when there are white areas in frame, I often go with –2/3EV compensation. If you are unsure, you should bracket your exposures. Shot images at 0EV, –1/3EV, –2/3EV and even –1EV or more if the subject is white and in bright sunlight. Assuming you have time of course. As you get better at judging the light, you will be able to shoot fewer exposures to get what you want. Make sure that you confirm the exposure in the LCD. |  F300EXR 1/1000s f/5.3 ISO 100 -1.33EV |

F550EXR 1/220s f/11 ISO 100 –1EV A-priority DR400 M4:3 (RAW)
Still Life in Low Light
 F300EXR 1/10s f/3.5 ISO 1600 Pro Low Light Mode | For subjects that are not moving in low light, examples being food, a painting, a statue, a church interior and so on, consider using the Pro-Low-Light mode. In this mode, the camera will shoot 3 or 4 images at high ISO with fairly quick shutter speeds and combine the images into one very clean and detailed image. |
That is, assuming that the camera is held very steady. If one image is blurred, then you will see blur in the combined image. To help this work better, I always set the 2s timer and breathe out while the timer runs, then hold my breath while the images are shot. Seems to work well.
Depth of Field Control
Many people post questions asking how to get that nice background blur they see in dSLR images. Well, small sensors work against you in this regard because they increase rather dramatically the depth of field you get at all focal lengths.

For example, the depth of field you get from an HS10 at f/2.8 will be the same as the depth of field you get from the Nikon D700 at f/16 at any given focal length. That’s a huge disadvantage and is illustrated by the image above with my three EXR cameras pitted against the D700. Click on that image to go to the original and rather large comparison.
An interesting note on apertures and depth of field: The F300EXR has three apertures instead of two. And the third, i.e. smallest, aperture slightly affects depth of field. That makes this the only EXR camera to have more that one actual aperture, since the other EXR cameras simulate a second aperture with an inline neutral density filter. So you can use f/16 on the F300 to get a wee bit more depth whereas f/11 on the F70 and f/16 on the F80 do not affect depth of field. The same goes for the F200.
| So how do you get that dSLR look? You take advantage of the subject / background ratio and of longer focal lengths. Depth of field naturally gets shallower as you use longer focal lengths. It also gets shallower as your subject distance diminishes and as your background moves further away. This is why macro images often have smooth backgrounds. It is also why the F70 through F300 can get very nice flower shots at maximum zoom in macro mode, which reduces minimum subject distance to about 3 feet. (Sadly, F550EXR increases minimum focus distance to about 4 feet, reducing the effect a bit.) |  F300EXR 1/25s f/5.3 ISO 100 360mm |
Check out the Depth of Field Master site and explore their interactive DOF calculator to get a better field for this.
Pro Focus Mode
This is Fuji’s alternate to understanding depth of field. It will give you a blurred background through software in camera. I have never found it effective as it creates a lot of ugly edge artifacts, but of course your mileage may vary.
The following demonstration shows how pro focus has problems even with straight edges like the table edge. It mangles people pretty badly, although at web sizes it might not be a huge issue.
 F70EXR P Mode |  F70EXR Pro Focus |
Scene Modes
I’m not a big fan of scene modes, however they do the job and should be explored. I always try to get the best exposure through my own knowledge, so I won’t go into any depth with scene modes.
I have experimented some with TEXT mode. It has the advantage of assuming white paper so that it can get a nice crisp image with great contrast in any light.
Flash
Flash photography with these cameras is tricky because Fuji have been shipping really weak flashes in their cameras since the F10. No doubt they do this because they made 800 ISO look pretty great in pretty much every one of their F series compacts since then, so the camera defaults to 800 ISO for flash imagery.
I suggest that you let the camera shoot at 800 ISO for two reasons:
- The flash will go much further than it would at 100 ISO … 2.8 times further in fact. Or it will use 1/8th the power, which means longer battery life and faster recycling.
- Generally speaking, the cave look makes for horrid flash images. So shooting at 800 will improve your images by bringing more ambient light into your images. This makes a great deal of difference.
 F70EXR 1/15s f/5.3 ISO 800 24mm Flash Fired | Obviously, I favor P mode for general indoor shooting. And P mode offers the slow synchro flash mode, which lets in as much ambient light as possible while tuning the flash to light only the subject. Matrix metering allows the camera to balance the exposure perfectly. This is something that Fuji are really good at. Try some ROSCOE CTO Orange gel (or equivalent – try Google), taping it over the flash to balance with indoor light colors. Window Green gel for fluorescent lights. Else you may have to switch images to black and white to get the lights the same color. As I did with the shot at the left. But notice the nice bright background and perfectly exposed face. He was backlit by that section of the restaurant and this turned out far better than the ambient only exposures. |
Technical Limitations
Aperture: The compacts tend to have only two apertures, and the second one is implemented using a neutral density filter, which makes it useless for depth of field control. The F300 introduced a third – real – aperture, which does allow additional depth. So in A-prio or M modes, you now have that extra control.
Shutter: The maximum shutter speeds on the compacts is 1/2000s (1/1500s for the F200EXR.) This is a more severe limitation than it seems because of how the sensor split with blend is implemented for high dynamic range. One half of the sensor is stopped early. 1/2 the exposure for DR200 and 1/4 the exposure for DR400. (DR800 is additional software with boosted ISO and so does not participate in the shutter limitation.)
So when the shutter speed is 1/2000s for the shorter half of the exposure, the real shutter speed is either 1/1000s or 1/500s for DR200 and DR400 respectively. This is for base ISO. As ISO rises, so does the maximum shutter speed. Fuji still plays a lot of dirty tricks in firmware.
I have tested this in M mode (pointing at sunlit snow on my pool) and it continues to hold true for the F300EXR and the F550EXR. Note that the camera reports the lower half of the sensor, as that determines the amount of blur you get and shutter speed is all about blur. So just watch for that. BUT: With aperture priority mode in the F300EXR and F550EXR (and now the X10), the limitation is raised to 1/1000s even at base ISO. Which makes us all wonder what sort of nasty tricks Fuji is up to in firmware for the A prio mode …
Flash: The flashes on Fuji cameras have been weak ever since the F10 came out. They have always recommended that these cameras shoot flash at 800 ISO because all these cameras are quite good at 800 ISO. So you should allow your camera to shoot at 800 ISO as well. Dropping ISO to 100 or 200 to get perfect details trades away good lighting for the cave look. That’s not acceptable in my opinion. YMMV.
Shot to Shot Times with Various SD Cards

Here is a new matrix specifically for the Fuji X10.

My analysis of these times:
- The cheap Ultra 2GB SD card is surprisingly fast
- The Sandisk Extreme Pro is ultra quick, and that’s in cameras that are not designed to take advantage of the UHS-1 speeds
- EXR cameras do not write all that fast
- Shooting M size is much faster shot to shot than L size
- The X10 has much better JPEG writes speeds than previous EXR cameras
So I recommend that you start looking at the new Sandisk Extreme Pro line, or any of the other UHS-1 cards. They are quicker even in cameras that are not designed for them. And in the card reader, they fly. Newer cameras like the D7000 and X10 are designed to use them, so they are more future proof than older cards (obvious, I know.)
141 comments:
Thanks Kim! I just got mine today, set it up according to your instructions, and will see how it performs tomorrow.
Excellent, Stephen. Please post back and let us know how it shoots for you.
Why program over say EXR-DR?
I AM gonna try your suggestions but was curious how P Mode helps
Ahhh you can adjust exposure which one cannot in EXR-anymode
Question answered
Kim, I've tried the camera in several situations, and am not pleased with the results. Yes, the dynamic range is wonderful, really amazing when it hits the right exposure, but sometimes it does not, and I can't tell until I get back to the PC. My major problem is the lack of detail, which looks like aggressive noise reduction, even at forced low iso, or a poor lens, or maybe both.
This isn't an argument against your recommended settings. I'm just not happy with the image quality. And I really wanted to like this camera.
I'll try again this weekend, but so far it isn't looking good.
Another observation about 5MP vs. 10MP: In P-mode, in bright light, the camera will select ISO 100 when image size is set to M, but selects ISO 400 when image size is set to L. Strange, but I switched back and forth to confirm (same lighting, same scene). The camera either speeds up the shutter or stops down the aperture to compensate for the increased sensitivity. Guess what? A 10MP picture at ISO 400 looks much worse than a 5MP picture at ISO 100.
Lili, P mode is more flexible. I believe that in EXR modes ISO cannot be directly specified, it must use an auto mode. Also, it's the only mode for which 800DR is available, so P mode is used for ISO's other than 200.
Stephen, the ISO 400 issue in "L" size is caused by setting to DR400. In L size, DR400 must revert to the software solution used in older Fujis like the F100fd and S100fs. In M size, it can use hardware and thus ISO is not fixed at the higher value. I documented that behavior in my settings.
Kim
New F200exr user here. You mention the P-mode is desirable because of specific ISO choices. Also Lilli mentions you cannot adjust exposure in EXR mode as another advantage. Seems I can adjust comp in EXR DR mode so that's doesn't seem to be an issue.
Can you also expand on this statement:
Also, it's the only mode for which 800DR is available, so P mode is used for ISO's other than 200.
Being a relative novice, this is a bit hard for me to interpret.
Thanks, and keep up the good work on helping us get the most out of these cams.
Sorry, A paragraph got dropped from my last comment which makes it disjointed -
My main question is: In your experience, is avoiding the EXR DR mode technology "worth" being able to specifically adjust the ISO in P-mode- especially since you do have some measure of ISO control by setting the maximum ISO in AUTO?
Fudji: in the end, I prefer the automatic ISO myself, so I could spend most of my time in EXR DR. However, P mode seems to give identical results (i.e. hardware DR compression appears to be active) so I leave EXR DR set to 800DR, which fixes ISO at 200. That way, I can pop between P and EXR on the dial (and they are next to each other) without any effort at all. I switch to EXR when there is significant contrast, else I shoot on P mode. M mode, which is next to P mode, is used for special circumstances, like stopping motion at concerts etc ...
OK I think I get it.
Your process assumes that whatever the camera is doing in EXR mode, it is doing the same in P-mode at 5MP. So "EXR mode" may be more of a marketing distinction than anything else in your view. The addition of the 800% DR suggests that either something is different, or Fuji had to add something to the EXR mode to make it "different".
I was actually a little cautious about fixing the DR at 800% because in the manual (p62 f200exr) Fuji warns in their DR setting page that that "mottling may occur in pictures taken with higher [DR] values.
Yes, I think Fuji have made the camera exceedingly complex for no reason. Too bad in my opinion. I have not seen any difference between images shot at M size in P mode and images in EXR DR mode, assuming DR400 in both. And so I am happy to use DR800 for brutal sunlight and contrast. A number of images in my San Antonio series of posts are shot at DR800 ... you can check the bright sun images that are also ISO 200 to see how you feel about them. Use a plugin like OPANDA to see the EXIF info in the large versions of the images (click on an image to see the large version.)
Thanks for all of the info regarding the F70EXR. I just picked one up today, and it was directly because of your site. Very helpful, and a bunch of info that applied to specifically what I was looking for in a camera. Thanks again, looking forward to putting the suggestions you've made to good use.
Glad the information was helpful Todd, good luck with the cam. I still like it as my general purpose shooter.
Kim,
I have my F70 now. You recommend setting the picture size to M in all of your suggested settings above. Is there ever a time when L is remotely usable on this camera (or any compact camera for that matter)? What are the advantages/disadvantages of shooting 4:3, 3:2, and 16:9?
SlowRain: L size / HR mode is a personal thing. You might like it for certain subjects. This camera's sensor is so small that it definitely uses heavy NR at L size, so the subject must be very sharp and well defined to have even half a chance. But see my post at the following location to see why even that makes no real difference ... this cam is very sharp and detailed at 5mp: http://kimletkeman.blogspot.com/2009/12/f70exr-high-resolution-versus-half.html
Hi Kim,
I also got the camera after reading many positive comments from you (and others) on the dpreview fuji forum. I have taken the camera out and about in the past weeks and was impressed with the results.
However, today I took it to a concert where I was about 15 feet away from the stage. I have tried to use your recommended settings, ie M-mode, 1/100 and 3.3 aperture, but I couldn't get the aperture to 3.3, I could only switch between 5. something and 10 something. Did I do something wrong? Pictures I took with the 5. aperture were too dark.
I experimented a bit and ended up using P mode and I got some good pics but most were blurred.
Any suggestions? Thanks!
Hi Rick,
Concerts are shot wide open, which is 3.3 at wide angle and 5.6 at full zoom. You did not do anything wrong from your description.
What ISO were you shooting? When using M mode, I would tend to start at 800 and if the images were good (even if slightly dark) then I would open them up a bit in post processing.
If you feel more light is needed, the steps I tend to follow are: raise ISO to 1600 first; if already at 1600 ISO, drop shutter to 1/50s - but this will risk more blurred shots; and finally, use P mode as you did and let the cam decide (although I set -1ev compensation to make sure highlights are not burnt.) The latter risks a lot of blur, as shutter speeds may get very low at times.
Hi Kim,
First of all a happy 2010! Thank you for your reply, I had the ISO fixed at 800, so next time I'll try 1600. It was a club setting, so the stage lighting wasn't anywhere near the usual rock arena sets.
In P mode the shutter times were indeed very low which caused the blurring in some pictures.
Rick
Kim,
Thank you for all the work you did in your first post, that you summarized nicely in MkII.
Your blog as well as your postings on dpreview were instrumental in me choosing the F70EXR to replace my aging Panny LX1. And ultimately serve as my carry-all when the Canon 50d kit is too much.
Your posts were some of the best places to see what the camera is capable of once properly set up, as opposed to the horrible resolution priority shots that get posted in flame posts everywhere.
It came down the F70 and the Panny ZR1 as they were both in my price range. and ultimately the low-light performance and 1 stop dynamic range was more important than the pure resolution of the Panny, as I would never print my compact shots over 8x10, thats what the 50d is for.
Once I get some free time, I will do a mini review over at Steve's where I moderate.
Thanks so much for the kind words Hards80. I have to say that I love the ZS3, especially for videos, but the F70EXR is king of the hill for long zoom high ISO ... for now at least.
Thank you for the article, Kim!
I just picked up the F70EXR today (well, the F72, but who’s counting), but I haven’t opened it yet, because I was looking for good information on the picture quality. I found your site, and it’s like drinking from a firehose! I have a few concerns based on using the camera in the store, and I wonder if you can help me…
1. I am worried that the ISO is always at least 400 on indoor shots, even when using the flash. For comparison, my current camera (Sony Cybershot) uses ISO100 when the flash is on, and bumps up the ISO to compensate if the flash is off. But when I tried the F70 in the store, the ISO was always at least 400. Should I be concerned about excessive noise in my pictures?
2. One feature that appealed to me was the “Natural + Flash” mode, where it will snap two pictures in quick succession with the flash on, and off. Is this something that you would recommend against using? I prefer the natural look of not having a flash, but I sometimes want the added detail of having a flash. Are there drawbacks to this mode? Are there some settings that are not available if I use this?
I will probably have more questions, but I haven’t brought myself to open the box yet, as I am still a little unsure about the ISO issue. A co-worker is recommending the Panasonic Lumix ZS3 (?), and it looks pretty comparable (though without the EXR features, natch). Thoughts? Is that a comparable camera?
I appreciate your time, and welcome any advice you can provide.
One more question: If I am shooting with the F70EXR is high-ISO situations, will I need to shoot in SN mode to get more detail and less chroma noise, or does the EXR handle that automatically (assuming I am shooting in 5MP)?
Andy -- ISO 400 and up is how the cam is designed to shoot in low light. This is actually an important advantage of Fuji cameras since the F10, and especially since the F30, which I think had the first iFlash implementation. Basically, the high ISO allows the weak flash top cover a decent distance, while also allowing a lot of the background in. The iFlash balances the two nicely. This avoids that dark background that is often called "in a cave." You can, of course, force ISO to 100, but you will find the results disappointing with a Fuji. I alwys allow the cam to choose 800 ISO indoors, and the results are pleasing to me.
As for natural + flash, I don;t use this mode at all, but some people like it. It has limitations, as do many of the special modes. I would use it only in lighting situations where it might be really useful, and I would probably try to capture one in P mode with appropriate compensation and / or flash as needed for insurance.
SN mode is another mode I never use. I state above that it is redundant because P mode at 5mp does everything just as well and is more flexible.
I noticed you didn't mention the pro-focus or pro-light modes. I've found using the pro-focus mode can be very difficult to generate the effect. I find myself doing a half shutter push, and praying I don't see "Cannot Create Effect." Did you find any use for either of these modes?
This is actually the first camera I've owned so there may be another way to use the camera (ie: exposure, aperture, iso settings) to create the pro-focus "blurred background" of which I am not aware. I previously would just use photoshop to create the desired effect.
Lastly, you're page has helped me take much better pictures with this camera. Thank you so much.
Tom, I will add a mention of these modes ... pro-focus seems useless to me as it rarely can work and when it can it screws up the edges. Pro low light is actually useful in my opinion ... when you need to do hand held macro and can braqce the cam a bit, you can get really sharp images with excellent details. Thanks.
hi,
I bought this camera based on your reviews... but I am not so happy with preformance - but have seen it can give GREAT shots.. so I know it is me..
I noticed you suggest to leave indoor shots at iso800 - but the pics are a little noisy and really don't print so nicely... as my old canon a40 - 2mp camera...
Why does it choose iso 800? What am I loosing by setting the iso lower - my canon chooses 200 or 100 with the flash...
The pics look GREAT in the camera but when I get them to the computer they look really not so sharp.. the daytime outdoor photos or when I turn down the iso to 200 or so are better but I don't want to have to constantly play with the settings to get good shots...
is this not the right camera for me?
Am I better off with a canon - I was looking at the sx200 or the samsung wb550... what are your thoughts?
nech: Indoor shots at 800 ISO allow more ambient light into the image. If you then light the subject with flash (slow synchro), you will get a nice image with great detail on the subject.
However, the F70EXR does tend to seem a tad softer-looking straight from the cam than other brands from what people have said. If you are very sensitive to that, then it is possible that you are more attuned to the Canon look.
I do process each image, although the processing is often not all that extensive. But tweaking sharpness is something I do when I downsize, as it is always needed. This is again an area where the higher sharpness of some other brands may be more pleasing for those who are sensitive to it and do not want to do any processing.
Thanks... I really gave the f70 a shot but think it is just too much work... for a point and shooter like myself.
The F70 is probably not for everyone. If you've been happy with Canon in the past there is little reason to switch.
The issue is that the canon is at best $350 and I got the fuji for $245 - so I was hoping that I could save the $100... maybe after PMA with the new announcements the prices will drop...
Hi Kim nice to meet you at the first time.
Do you have comment about swithing the image quality between NORMAL(defult) and FINE ?
FINE mode doubles the space required in the card. is it worth to use ?
Jun: Since I recommend 5mp mode for this camera, the size difference between NORMAL and FINE is very small in absolute terms, especially in an era of 2TB drives ... so I recommend that you shoot FINE. I was a big proponent of NORMAL with the F11 era cameras, but disk space is dirt cheap and I push my images harder now than I did then, so the extra quality is welcome. It can show up when boosting contrast in 8 bit mode, which creates banding in skies. Best to get the best quality you can from these cams.
Kim,
Thanks for posting your settings. I used the EXR DR setting for harsh sunlight recently and was bummed I couldn't use flash as fill for harsh shadows. The pics were of decent quality, but I always feel like this camera just barely misses my needs.
You are definitely right about several unneeded modes.
Jim
Thanks Jim. Although the F70EXR is flawed in some areas, notably the issue with too-low shutter speeds in blazing sunlight, the P setting certainly makes it extremely flexible (all modes work) while offering full performance of the EXR sensor at DR400, or so say all my tests.
Just so I can be clear, why do you recommend 5MP mode for this camera? Also: I've noticed a "grainy" look at anything above ISO400. Does this seem normal?
Thank you for your web-site. It's full of awesome tips. As someone else mentioned, it's like "drinking water from a firehose".
Ellis: 5mp setting in P mode forces the EXR sensor to use a form of binning of pixels to improve the noise signature at all ISOs. It also allows the dynamic range modes to use hardware as a result of this binning and their early cutoff exposure technology. I have compared the large and medium captures many times on this blog and found that the noise reduction required to smooth the large files tends to flatten fine details in areas like water, foliage, etc. I hate that look. So I recommend 5mp. And remember that 5mp is more than enough for a great 8x10. For web sizes, even 3mp is overkill. And thanks for the kind words about the blog.
Makes perfect sense. Thank you for taking the time to reply to my question, and thanks again for this great resource for this camera.
Ellis: You are quite welcome. I'm chomping at the bit myself for the F80EXR. My YouTube recording of the band Postdata at the Black Sheep Inn was all HD except the last part where I had to switch to the F70EXR. Next time I have to do that, I would like the F80EXR to give me more HD.
Got the F70 today and was really excited to start shooting :)
Since its night I started experimenting with the low light pics. ISO 1600 performance is impressive compared to my 7 year old Fuji S5100..lol but the flash could have been stronger or at least there should have been some setting provided to boost the flash strength similar to my old fuji. Well this is my fist compact cam and most of the compacts seem to have poor flash :/
One issue i have with the camera body is its bit slippery. I am so much used to the rubbery grip on my old cam that I could feel very confident even holding it with one hand. A rubber type grip feel would have been really nice.
Second I am bit too used to the holding style of superzoom camera where the right side of the cam is used to hold it mostly. Here I am most of the time blocking the flash while holding the cam.
Both the issues are not cam issues but something personal to me so time should heal those :)
Finally some questions to bug you :D
Kim is there anyway to switch off the DR in P mode when shooting with flash or in low light without flash? The reason being when I am shooting indoors I feel the DR may add bit noise? Just searched in your blog and couldn't find any detail if the the noise is more in DR when shooting in low light or low light with flash.
Archish: If there is a difference, it's pretty small. But you can always test it by shooting two images in a row ... one at DR400 and one at DR100, which effectively turns it off.
archish,
I've done the same thing (blocked the flash with my finger.) I *think* I've finally gotten past that. My old camera had the flash on the left side.
Hi Kim,
first thank you very much for useful information on your website.
I've bought Fuji F200 EXR and I would like to ask you which mode is the best for shooting landscapes according to your opinion. Is it landscapes (scene mode), EXR (DR ?) or P mode (and eventually in which settings) ? I think that Velvia mode looks for landscapes sometimes good but it isn't so real I think.
Can the pictures taken in DR400 or 800 have any disadvantages? Thank you very much for our answer. Rgds Michael.
May i know the concept behind iso, dr aperture and shuttle speed? I just got my first digi cam and i dont really know how to get a good shot at night
Michael: If by landscapes, you mean shots with a lot of distant foliage, then you have a bit of an experiment to run. Proponents of the F200EXR say that it retains decent detail at 12mp, I personally am not so sure. But you should test that to see how you feel about that cam on the kind of landscapes you shoot. You'll need to look for smearing of foliage in the distance. Shoot both 6mp (P mode DR400) and 12mp (DR200 max because that sets ISO 200 at 12mp) and then compare the largest print size you want to make.
DR400 and DR800 in 6mp modes will flatten the image tone curve somewhat, but this is generally a good thing, since landscapers are always trying to tame the big difference between the sky and the ground. They often use a graduated ND filter to do that, but with EXR technology, that should not be necessary.
Astley: That's a tall order for a comment on a blog, but here's a quick description. ISO is the sensitivity of the sensor's current setting. Shutter speed is the time the shutter remains open. And aperture is the size of the opening in the lens. Each of these determines the amount of light captured, which is measured in stops of light. And all three must be in balance to get a good exposure. Your light meter is going to try to make every exposure an average, which is a problem at night, since it will make the whole image too bright. Thus, you want to set compensation on your camera at -1 or even -1.3 or -1.7 in order to tell the camera that the scene is dark. This keeps the camera from blowing out the lights completely. I suggest that you pick up a copy of John Shaw's Field Guide to Nature Photography and Bryan Peterson's Understanding Exposure. These are great reads and you will learn a lot. Good luck.
Hi Kim,
My name is Andrew..i just got f72 from a friend of mine n i think this is a great all around camera compare from my old Olympus e500 and sony dsc-w120. There's a question for you...what is your recommendation setting for taking a photo in a nightclub?
Thanks
Andrew: Nightclub photos would be similar to photos in the bar or at a concert, depending on the light. Shooting a concert really well is an advanced topic, where you shoot in manual mode and edit the images later. This works only if the subject is very well lit. See the sidebar on my blog down the right side. For people in darek places, I would shoot at auto ISO 1600 and put on the flash in slow synchro mode. Or forced flash mode. That should do ok for you.
Thanks for this post Kim. I'll try them on my S200EXR and see how they work out.
Ron M.
Ron: These settings will work for sure, but the sensor is large enough that some others will work as well (e.g. L size might be ok in moderate light.) Let me know how you get along with these settings.
Kim,
After some exhaustive research, I took the plunge on a F72EXR and I'm quite pleased with it thus far. Your blog entries as well as your forum posts have really helped me make an informed decision. I just wanted to thank you for your well thought out, logical settings guide. They've been working great for me so far while I learn the camera's nuances. Keep up the good work and don't let the idiots on FTF get you down!
-Daniel
Daniel: Thanks for the kind words and let me know how you fare with the F72EXR. Still the best in its class and that does not look to change for years to come.
Kim I have been playing with my F70 a last in the last few days and also did a comparison with my old Fuji workhorse S5100 which has a nice F2.89(W) and F3.1(T) lens which amazes me more after I got F70. The settings mentioned in this blog have helped me a lot to get started with the cam.
Yesterday I did some 1:1 comparison of F70 and S5100 of building shots. ISO100, -1/3 EV cloudy well lit sky. The apartments window came out dark with F70 but S5100 managed to get in lot of detail in those windows with good visibility for the areas which were dark in the F70.
F70 was shot with DR400 and I had the understanding that DR would bring out more detail for the dark regions? I will try shooting again with DR off another time and check.
Archish: I can;t really comment without seeing the images. If you can post to an album somewhere I'd take a look.
S5100
http://www.imagebam.com/image/03389b78254940
F70:
http://www.imagebam.com/image/b59bb278251216
Both were in P mode with auto wb but the S5100 exif shows manual, not sure why :/
looking again F70 is underexposed or DR400 should have been off, will let your analysis take the call :)
Archish: The comparison was a bit unfair to the F70EXR. The main issue is that you shot both at their widest settings. This gives the F70EXR a fairly strong disadvantage in two ways: (1) It's magnification is about 22% less than that of the S5100, and (2) It's 10x zoom will be weaker at the edges than that of the S5100 at the full wide setting. Even after all that, once I crop them to matchm at web sizes I see no real difference. And at 100%, one can add sharpening to the F70 to bring it closer (I have always found S5000 and S51000 images to be heavily sharpened from the camera)
The exposure difference is just something you have to get used to . You did not shoot the same magnification and you did not frame them the same, which means you cannot expect them to expose identically, even if they had the same meter, which they do not.
http://letkeman.net/Photos/invisiblephotos/archish_compare.jpg
Hi Kim, Thanks so much for exploring this camera in so much depth. I read your blog before buying the camera and thought it looked like the camera for me with the effects I was looking for. Initial results have me blinding shooting in every mode I can think of to change and hoping for the best, I now have printed off thi post and will try out some of the settings tomorrow... here's hoping I'll get the results I'm after!
Cheers, Sheila :)
Sheila: I'm glad you found this article. These settings have worked well for a lot of people. And they are easy to use once set. After you are comfortable with these, you can branch out to try a few others, like manual mode for concerts - an advanced technique that can be quite fun.
I'll be honest, part of the reason I choose this camera was because of this blog post. Having a resource like this and having the opportunity to pick the brain of someone who's already done the heavy-lifting tipped the scales toward the F72EXR for me.
The settings described here have made noticeable improvements in my shots. I'm really looking forward to experimenting with the manual settings at a concert. (I still have quite a bit of reading / experimentation to do before I get there.)
Thanks Ellis. I'm really glad it has been useful to you.
Kim,
Any suggestions for shooting in bars or other low light situations where shots can't exactly be set-up and subjects are moving? I tried the natural & flash mode and it didn't come out that great. The natural ones were blurred and the flashed ones were overexposed.
Daniel: Bars are probably the least friendly environment in which to shoot. They have all sorts of lighting and people are often moving around. I have two suggestions. In both cases, you need to use the flash. It should not be over exposing. Method 1 involves shooting the camera as I suggest in this article. P mode, M4:3 or M3:2, auto ISO 1600 and DR400. Flash on slow synchro. *FACE DETECTION ON* ... this ensures that it knows you are shooting people and that it knows where they are. You should get decent backgrounds from the high ISO and you should see very nice exposure son the people. Method 2 is a variation. You switch to M mode with aperture set wide open and shutter speed set to around 1/60s in order to slow people's movement. Especially effective in really dark areas. If the area is fairly well lite, feel free to drop ISO from 1600 to 800. Again, face detection on and DR400 set. This may improve on method 1 in that you will see less blur behind the flash. Let me know if either of these work for you. Switch between them to see if one is better than the other. Thanks.
Hi, i followed your tip towards setting M mode for concerts. However if i set the shuttle speed to 100, the entire image is dark, could hardly see anything. Not to forget that i did not use flash. Increasing the iso to the max also doens't help but makes the image noiser
Hi Kim, first of all thanks for spending time to analyze the images. The image looks almost same after processing out the mistakes for comparison :)
I have been shooting all of last week and your small guide has helped me a lot to get get nice images without the highlight burns. This blog entry should be made available as link in the main page :)
Thanks Archish, glad it's working out for you. I have been meaning to add a popular links box at the top and your suggestion spurred me on. Thanks for that.
Astley: The problem with giving advice is that it does not always work. Concerts come in many varieties, with the lighting going from almost daylight levels to cave levels. The latter cannot be shot by any cam except perhaps the latest full-frame Nikons. The former can be shot at ISO 800 or lower with shutter at 1/100s with no problems at all. The issue is what you do in between. I suppose I need to write a separate article on concerts, because there are many options to try. You can lower shutter to 1/30s, but you will see more blur. You can raise ISO to 3200, but you will see more grain and chroma noise. It is a continuum and it takes many concerts to get used to the options you have and select the right one fairly quickly. And always remember that you should take many images because the number of keepers with a compact is going to be small no matter what you do. Processing skills after the fact can also make a really big difference. I'm sorry that I don't have any easy answers.
If you ever had time to write such an article, consider me someone who would read it in great detail.
Also: You mention "post processing skills". Obviously photoshop is a tool here, but for those of us who come from the film/dark room days I'd love to know exactly what skills or techniques you are referring to. You don't necessarily need to get into the "how" (I can Google) but knowing what I'm trying to research might be helpful.
Ellis: Thanks for the encouragement. In fact, I do want to start a couple of new series, one on post processing and one on concerts. I hope I can find the time.
Hi kim,
May be u could summarize camera setting for taking low light photography...since fuji f series (especially f31fd) is kinda powerful for low light photography.
Thanks
Andrew: I shoot my standard settings in P mode for low light. If I need flash, I add it. I don't do anything special.
Hi Kim. Thanks for all of your wonderful advice concerning the EXR series. A few quick questions. First, while shooting in "P mode", do you select "P-Program AE" or "A-Aperture Priority AE" in the shooting mode menu? Also, why not more discussion or testing of the S200EXR? This is the camera that really intrigues me, especially after you've talked me into buying my beloved F70! Thanks again. Keep up the good work.
Thanks for all of your great advice concerning the EXR series. Two questions. First, when shooting in "P mode", do you select "P-Program AE" or "A-Aperture Priority" in the shooting mode menu? Also, why do you not discuss/test the S200EXR more on your blog? This is the camera that really intrigues me, especially after you convinced me to buy my now beloved F70! Thanks again for your help.
Paul, I would quite enjoy testing that camera. Unfortunately, I don't have access to one right now. Perhaps I can snag one in the next few weeks ... we'll see. From what I have seen, it's output is excellent. Long zoom meets fairly large EXR sensor. Nice stuff.
When shooting in "P mode", do you select "P-Program AE" or "A-Aperture Priority" in the shooting mode menu? Are there times when you use either/both? Thanks!
Paul: I never use aperture priority. If I feel that I need more control, I go to manual mode and use the built in meter display. Works well.
Kim, thank you for such a great guide for Fuji EXR users. I read almost every posts about F70EXR in your blog, and recently bought a F75EXR, which is the Chinese version of F70EXR, instead of newer F85EXR, under the influence of your blog. :)
Then I decided to translate this particular post into Chinese on my blog to widely spread your experiences to Chinese audience. Sorry for not asking you for permission first.
The translated post: http://blog.oasisfeng.com/2010/05/08/fujifilm-f75-exr-shooting-guide/
Oasis Feng: I have no problems with that at all. You linked my original post at the top and that's all I would have asked for. Nice looking blog, although I cannot read a word :-)
I found that the L size (10M) was not completely useless, at least in one circumstance: long time exposure with tripod in dark environment.
I have tested that just now, and the larger size actually preserved more fine details without notable mangling by noise reduction.
Oasis Feng ... I suppose I'll have to test that one. Do you mean all details, including subtle ones that are just above the threshold of vision? Or the brighter details?
Oasis Feng: I tested the long exposure at 100 ISO and still found a slight advantage to an upsized M image over an L image. I blogged it, so you can see what I did.
A colleague of mine had bought the S200, bit pricey but nicely built :)
Got to play around with it for an hour and the slightly larger sensor does seem to produce little better low light pics and the fast F2.8 lens at wide angle helps a lot :)
I got so much hooked by it and the manual zoom ring that I felt I should get one but after an hour of usage I realized I needed a pocket cam as I cannot carry it all the places, plus the added weight did cause bit pain to my palm :)
Nice bridge cam if you are satisfied with 14x zoom :D
Forgot to add the S200 controls are really nice with ISO button for quickly changing and live histogram. The live histogram was really impressive feature :)
Archish: Yes, the bodies of Fuji's bridge cams are quite impressive and live histograms are really nice. Since Fuji are clearly avoiding the E series (advanced compact) market, they should seriously consider giving a live histogram in the F series. Of course, EXR sensors make it awfully easy to get good captures without a histogram, so maybe that doesn't really matter in this line. But they've signaled the intent to proceed with BiCMOS sensors by cancelling the S200EXR and keeping only the HS10 as their flagship bridge cam. So it is hard to tell what will happen in their compact lines next. Perhaps an F90EXR with the same sensor as the HS10? Need to tweak the lens though, as shipping a pocket cam that does not go below 30mm would be fatal in today's market. That's one thing that killed the S200EXR. People are simply not that dumb.
Kim,
Just wanted to say thanks for such great information on getting the best from the F70. Much appreciated!
Paul
Paul, you are most welcome.
KIm,
I come back here on a regular basis to check for updates.
The tiny F70 with its superb OOC white balance has eclipsed my F200EXR as my carry camera, according the an analysis of my images.
It has become one of my 2 favorite Fuji; the S6000fd and the F70EXR compliment one another nicely.
Gonna try your theater settings for some night work...
Kim,
I love your blog. Thanks for all the useful info about the Fuji F70 EXR. I bought a Fuji F72 EXR (same camera)and your advice has proved invaluable. I do find that keeping wb on shade all the time has improved the quality of my 10mp shots. And the long zoom is so easy to manage
Lili, Agimac: Thanks very much!
Hi Kim,
I just got the F72EXR. We chatted a few weeks ago on DP Forums, about how I wanted a camera for concerts, especially with the lighting conditions.
I'm reading through the basic guide now, and will soon get to your guide.
A question: What is the protocol for using flash at concerts? Is it generally allowed? Does it disturb the bands? Should I disable flash?
nuraman00: Good catch on the F72 ... glad you were able to find one. At any concert, you will see hundreds of flashes going off ... so don't worry too much about it. The huge lights in their eyes already have them half blinded.
But ... don't bother with flash unless you are fairly close, as it won't contribute much to the exposure anyway.
I have used flash to good effect when standing right in front of the performer ... here is a series of images shot of the Foo Fighters ... the close shots were from about 4 feet away from Dave Grohl ...
http://letkeman.net/Photos/foofighters
Good luck. Let us know how it went.
A few questions:
1. How exactly do I set the M size?
2. How do I set the aperture wide?
3. When at a concert, I think I'll start out with an ISO 1600 and a shutter speed of 1/50s, and then adjust accordingly.
BTW, in some of your stills of concerts, do you remember what your settings were, for some of the different lighting conditions?
Hi Kim,
I got a refurbished F72EXR ($140) from Newegg couple of weeks back. Though I craved for an SD90 but my budget was very limited. After searching the net for a low budget P&S with low light capabilities, I landed in your blog and learned a whole lot about F70. After I got the camera, I didn't even bother to read the manual, I started using the camera based on your settings. I am very happy so far with the results.
I just want to say a big Thank You for all the work you have done on this subject.
Best regards,
MK
(My full name is Meenakshi Krishnasamy, in blogger it appears in my native language - Tamil)
Meenakshi: Congrats on grabbing an F72 while they are still around. I still consider it the best thing since sliced bread. I shoot the F80 a lot lately because I want to give it a fair shot, but the F70 is better in low light for sure. Thanks very much for the kind words. Your blog looks really cool, despite the fact that cannot read word 1 :-)
Nuraman00:
Regarding how to set M size. Image Size is the second entry in the shooting menu, after ISO. Set M4:3 or M3:2, depending on the default size of prints you plan to make.
Regarding setting aperture wide, this is in Manual mode (M on the dial.) Here, you hit the up position on the 4-way dial and set shutter and aperture by clicking left/right and up/down ... you will see the numbers change. When you have selected what you want, click the ok button in the middle of the ring.
If the concert is brightly lit, you should start with 1600ISO and 1/100s.
Regarding EXIF for my images ... go into my gallery and find concerts. Then in each of the albums you can check EXIF yourself. I posted EXIF for some, but you will want to use an Explorer plugin like opanda. You right click any image and select view EXIF and you get a small dialog with all the settings.
Thanks, I got the plug-in.
Looking at your settings helps.
I can't wait to be able to get pictures, both like this:
http://letkeman.net/Photos/albums/album02/DSCF2412_billy.sized.jpg
and like this:
http://letkeman.net/Photos/rascalflatts/DSCF3315_drummer?full=1
nuraman00: I'm glad that you like them. I ruined many a concert before figuring out how to shoot them, and this takes a bit of practice to get used to. Remember to check the LCD after every shot and reshoot with a shutter speed adjustment if it looks wrong. Just in case. The LCD does not always give you the best indication. And slightly too dark is much better than too bright, since you can adjust brightness in any editor, but you cannot save burnt highlights at all. Best of luck.
Do you think that above picture I referenced, of Billy Bragg, is one of the best pictures you've seen taken, from a point-and-shoot camera in that price range, under low-light conditions?
Do you think that's an example of the F70exr standing out?
The Billy Bragg images at 3200 worked out very well, considering the very dark venue. Whether it is one of the best I've seen, I don't know. But a very few compact cameras could have duplicated those shots.
Hi,
1. For concerts, do you recommend f3.3 or 6.4?
2. I'm just taking some test pictures inside my walk-in clothes closet. I have the door partially open, so there's some light coming in.
What would you recommend, Manual or SP - Low Light?
I tried both.
I have a decent one with these settings (SP - Low Light), are there any changes you'd suggest?
* ISO 1600, exposure time 1/4, no flash
I don't think I can get a similar picture if I try these settings on Manual.
Using Manual mode, the image comes out very dark.
Thanks again for your help.
Concerts tend to be shot at high-ish ISO ... you can get light that is appropriate from 400ISO through 3200ISO. Which means there is never a need to go to a smaller aperture, as you always want to shed ISO if you can.
SP - low light shoots multiple images and combines them. It is entirely inappropriate for shooting people.
For concerts, you shoot M and start at 1/100s shutter, wide open aperture, and 800 ISO if brightly lit or 1600 if dim. Remember though, that the performer is always lit and it is easy to blwo out the performer while trying to retain some ambient light. So watch for that.
You cannot test in a closet because you have no stage lighting ... these experiments can only be run at live shows, and every venue is different.
As I mention in the article ... concert shooting is an advanced mode.
Kim
What would be your shooting settings for taking pictures of a person staying in the partial shade from the tree under harsh sunlight?
The problem is that spot-like shade from the leaves create really too much of a contrast. If I use the flash it solves the problem, however if staying further away (where flash cannot reach) even DR800% doesn't seem to help. Any suggestions from your experience? Spot metering maybe? Exposure adjustments?
Thank you
Andrew: Frankly, if there is dappled sunlight falling on a person, you will not find any settings that can save the image. The range is simply too high. And even if you handled the range without blowing highlights or blocking shadows, the dappled effect on the person's skin would look horrendous.
The only fix for dappled sunlight is to get out of it and find some shade with a nice background that is also in shade.
Kim:
I took some shots using your settings guide during a recent dance show. I am very satisfied with the results.
Thanks for all the background work you did on this little camera(F72EXR).
http://www.flickr.com/photos/shadowsketcher/sets/72157624336400449/show
All photos ran through Neat Image default noise settings once and levels adjustment in Photoshop. No other modifications.
Thanks,
Meenakshi
Meenakshi: Impressive! Some of those are simply stunning. Hard to maintain a fast enough shutter speed in that light ... gotta keep an eye on that. Can't say enough, though, about the strong impression these make.
Kim: I've been shooting my S200EXR using your recommendations here with much success. Thank you. Following your advice I read the Luminous Landscape article on exposure. I then used the recommendations there, exposing with the histogram "shifted to the right" with success. The S200's histogram display is conveniently active while setting exposure compensation. Please give me your thoughts on the benefits and downsides of using this histogram technique.
Many thanks.
Victor Pierce
Vic: The ETTR method espoused on that site helps to reduce noise in your shadow details. This, in turn, improves the look across the whole image, *so long as you don't go a step too far and blow the highlights.*
And there is the rub ... I shoot uni white balance because it makes my RGB histograms much more accurate ... on a bridge cam, I presume that the live histogram is monochrome, and of course it is what the camera sees after applying the tone curves and other settings. This means that you have to practice with your preferred settings in order to understand where that edge is between blowing highlights and saving them. And then ride the edge for the best exposures.
If you want to do advanced processing, consider shooting in RAW and really pushing that edge. You can set your converter to convert with softer curves and get a really nice balance, then carefully add contrast back with local contrast and curves. There are many options, but understanding ETTR is the first step to getting real control over the exposure.
Hi Kim,
Having read a few more of your posts, I'm beginning to think it's not all in my head....
Sorry, I'll explain! I just got the F80exr, being, like yourself, a big Fuji fan. It was either that, or the Sony H55 (I think that's the model, anyway), but got the F80exr as I got a great deal on it, and wanted to stay loyal! I've had a f410, 610, 810, f31fd... and currently the f100fd which I was going to sell on ebay...
However, after taking a few shots with the F80Exr, I started wondering if I had a camera fault, as the pictures are, for lack of a better term, a load of carp. (Sorry, trying to contain lots of anger and keep language clean!).
Take a look at the comparisons between the f80 and f100fd...
http://a03-b03.mypicturetown.com/P2PwebCmdController/share.jsp?cid=enGBSEMTRC&x=ZOUsd3HL-Cu1zGC_7tS%2AjQDM8oXZRR%2AA8xB-nJA2acN45FWnOyX5CE3X5IUZ%25hfttyc2avszjbGux%25uoIs%3D%26o%2A%264hTtorDSCpLd0Y%269K0Q_Vhh8
I hope you can see those pics, as it shows that even though the F80Exr seems to have better contrast (I think that's the word I'm after)... it loses so much detail!
When I "upgraded" from the f31fd to the f100fd, I did think that the older camera took slightly better images, but put it down to just being used to the older camera. Now I'm wondering if that really isn't the case!
Anyway... back to my current issue; both pictures were taken pretty much at the same time, one camera in each hand, both set to Auto mode, 5mp. The F80's results seem to be similar no matter what settings I use (EXR mode, Auto, etc etc)... so much noise!
Do you think it's a fault, or just the fact that the camera is rubbish? I sent the pics to fujifilm via email, they think it's a fault...
I'd appreciate any feedback you can give!
Your camera is fine. I think Fuji is full of crap, just placating you.
You are seeing two effects: (1) you shot the F80 at 400iso versus the F100 at 200iso, so yes, you will see more noise on the F80.
(2) The exposures are quite a bit different with the F80 being brighter (more to my taste by the way.) That makes everything more visible.
When I first opened them in photoshop, I wondered what you meant. The F80 shot was obviously superior. But then I zoomed to 100% and realized that the artifacts in shadow (near his chin and neck for example) are what you don't like. Well, that's the price of pixel binning and higher ISO. Things don't always look pretty at 100%.
But at normal print sizes, I think the F80 shot will look better. Have you printed these? Or downsized them for web? DO you not prefer the F80 shot at those sizes? Note that I look at these on a calibrated monitor, but even on my TN panel, the F80 looks better at normal sizes.
So I really cannot understand what you are seeing, unless you are pixel peeping and want the smoothness of the F100 images. But you should also then want the openness of the F80 images in the F100 images, that image is too dark for my taste.
Thank you Kim!
That's certainly given me food for thought... I agree, the f80's pictures do look brighter... I guess I'll have to get these pictures printed to see the real results.
You're right, I've been looking at the pictures at 100%... and things like hair seem to look pixilated etc... it seems that if I wanted to crop a pic and print, I'd get poorer results from the f80 than using the f100 and adjusting the image.
I think I might see if I can get a proper demonstration of the h55 from Sony, which seems to be of similar spec... any thoughts?
I guess I also need to think about what I want from the camera...
In any case, thanks for your advice! I'll have to read more of your guides so I can fully understand how to take better pictures using manual settings :)
Regarding different cams like the Sony ... the F80 is superior to most others (S90 and G11 excepted) based on high ISO shooting. If you have to shoot at 800 to get the shot, the F80 will destroy most other compacts.
But ... if you shoot low ISO (100, 200) most of the time, then the F100 is the sharper camera for sure. So is almost any other brand.
But note that the Fuji handles skies and other bright lights much better, so advantage to Fuji if that appeals to you.
It's always a trade off ... and everyone likes different things, so there will definitely be people who don;t like the EXR cams ...
There is an issue that I have with F70 which nobody has touched upon here. I get blurred shots of landscapes. The foreground seems OK but the background looks really bkurred and smeary. Focusing on the foreground does not change anything. Is this the fault of the camera? I am starting to regret buying it :(.
KONCERN: There are so many possibilities as to what is happening that I cannot comment until I see an original image that displays the issue you are concerned with. Please post a link or email me one of these images. I will do my best to figure out what is going one. Also let me know if you shoot tripod or not, and where you focused in the specific image. Thanks.
Hi Kim,
What do you think of these pictures, any feedback / comments? I tried to include a few that weren't the "best", just so you saw a proper sample of what I took.
http://tinypic.com/r/2mnri44/4
http://tinypic.com/r/1zvrfxs/4
http://tinypic.com/r/2qcgm80/4
http://tinypic.com/r/13z0e9w/4
http://tinypic.com/r/2j3me5g/4
http://tinypic.com/r/k1qd12/4
http://tinypic.com/r/jsonet/4
http://tinypic.com/r/13z4lkx/4
http://tinypic.com/r/1hf05c/4
Thanks again for your time.
Nuraman00: Absolutely excellent! Pretty much all shot at 270mm, all have excellent exposures (the drummer is a tad overexposed, but otherwise perfect) ... the highlights are perfectly held, and all are crisp and clear. Nothing but an F70 or F80 could have done this, as the reach was imperative.
Thanks. I was happy with how the shots turned out. And the zoom helped a lot, because I was in the 200s this time, instead of the 100 level seats.
And I agree, most shots had great exposures.
Kim,
I am a new owner of F80EXR. Thank you very much for giving very informative insights and hints. Can you explain why you set DR400 instead of using Auto DR selection? Is Auto DR better indoors?
Tim, I try to preserve maximum tones in all situations. That means DR400. Others may prefer to have a little stronger tone curves out of camera so that there is less to do in post processing. But some prefer the more open look of DR400 anyway. This is something only you can decide by testing the two modes in typical light. Note, though, that I found that DR AUTO often made bad decisions and used too little DR, blowing highlights unnecessarily.
Hi Kim,
About F70EXR:
Why do you always recommend us to use M-Size (5 Mpx) instead of L-Size (10 Mpx)?
Is this the best use of the matrix?
Gonzaki: You need to read both posts (this one and part 1 of my learning the F70EXR) to see why L mode sucks on the EXR cams. There are a number of other posts along the way that discuss that as well. Search my blog for L vs M. The bottom line is at 10mp (or worse, at 12mp on the F80) the sensor has a lot more noise reduction that really hurts fine low contrast detail (in shadows is especially bad.) To retain best detail, shoot EXR at half resolution and allow it to bin the pixels (larger photosites.)
Kim, thanks for the quick response ..
I obviously need to look carefully you blog.
But this would take quite some time because I do not understand English well :(
Thanks again!
Hi Kim, this is kind of a follow up to the posting by shazahmad. I have had the F200exr for a while now & have the same problem he does. Unfortunately I seem to have bought the wrong camera for my needs but can't get a new one for a while longer. So I was hoping you could recommend the best settings to use for pics like his, portrait shots of kids at home, usually lit by light bulbs.
Mine are a little older so I have them pose & stand still as possible but they are usually blurry at lower ISOs 100-200 or have the same noise/artifacts at 400 & up, which is still noticable even in 4X6 pics. I've also noticed that darker skin results in more noise/artifacts. Is there anything I can do to make my pictures sharper & brighter but with less noise/artifacts? Thanks alot!
laker: I just got back from a vacation in my home town and I was shooting a lot of images of my gorgeous grand niece inside and outside in late evening. The light in the house was horrid ... very low orange light or ugly fluorescent. To shoot with the F80, one absolutely must shoot with flash in this environment. And to be honest, the images almost have to be in black and white because of the mixed light between flash and incandescent or fluorescent. I ended up shooting the D700 and still had to resort to flash a lot of the time. There, I was able to set up a remote flash to light the room and use the built in to light the subject. I'll be blogging some of this fairly soon. I have concluded that small cameras indoors must have a fair amount of light to get good shots of people. And even then, they cannot retain a ton of detail unless supported by flash. This is a reality that drives people towards dSLRs for that kind of shooting.
laker: Part 2 of my comment would be that you will see nasty artifacts in any camera at 400 ISO and up in really poor light (far from daylight temperature and very low) ... but the shot cannot be had without jumping to a dSLR. So again I would suggest flash as the solution. Now, if the light is a bit better, say, daylight coming in from a window, you should be able to shoot at up to 1600 with reasonable success. I certainly have a lot of 1600 ISO images that I like from the F70.
Very helpfull and nice share kim. Keep the goodwork.
Thanks wildan.
Hi Kim, long time follower of you on dpreview, and owner of an f31fd and an f200exr.
I agree with you about always using the f200 in 6mp mode, and tend to have it always in EXR-DR800 mode when outside and P-DR400 when inside/low light. I have been intrigued by your comment that leaving the camera in DR800 can be dangerous, and plan to change my shooting habits accordingly.
The camera has been excellent, and I have printed many A2 size posters that have been of astounding quality for a P&S (I also have a 5D MkII to compare prints).
My question to you is this:
I have been frustrated by smeared backgrounds/trees/grass/water/hair:basically low contrast fine details. On very large prints, they are the things that far an away ruin the prints.
If I want the best possible fine details, how important is it to set my camera in:
- ISO 100
- DR 100/200/400/800 (how much do these settings muddy fine details? Can I safely leave my cam in ISO100/DR400 and still have the best fine details, or do I need to reduce it to ISO100/DR100?)
- HR/DR/SN modes. I know HR mode has too much per-pixel strangeness that causes the noise reduction to kick in overtime, but, perhaps not if shot at 6MP (as strange as that would be for 'HR').
Hear me out:
When set to 6MP and ISO100, which setting is best for low contrast fine details, HR, DR or SN? Importantly, is there any point to ever setting SN, or does Pmode 6MP DR400 do SN through binning at the same time anyway? I now know to save DR800 for when the shot absolutely needs it, but is there a difference between DR100/200/400 in the shadow details?
I am of course doing my own tests (and for the record, I scored a perfect 0 in that colour hue test you linked to!), but I would be fascinated by your opinion, especially when you receive your f300.
Cheers!
PS: Now I'm off to practice my ETTR techniques, thanks for the tip :)
koopa: since you are doing your own tests, I won;t bother suggesting it :-) ... what I have found is that many people see things differently from me. Meaning that they focus on other aspects of an image as important. Even 100% crops are rarely unequivocal. So you really need to shoot the kind of scene that matters to you from a tripod with IS off and see how you like the three levels of DR for detail retention.
Hi Kim,
Here are results from 3 more concerts:
1A: http://tinypic.com/r/f4qyav/7
1B: http://tinypic.com/r/2e5uyw1/7
1C: http://tinypic.com/r/34fmcdi/7
2A: http://tinypic.com/r/qq8y89/7
2B: http://tinypic.com/r/28mmnft/7
2C: http://tinypic.com/r/2dtyy2s/7
2D: http://tinypic.com/r/28hlfsm/7
3A: http://tinypic.com/r/ilbsll/7
3B: http://tinypic.com/r/2vxoiyt/7
Comments and suggestions?
For 2A and 2B, I found that using EXR D-range sunlight mode worked better for 2B than using Manual mode for 2A.
Overall I was happy with the shots. I'm also happy that I haven't seem to have needed much an adjustment period, trying to get the best shots. It's been pretty easy, thanks to your tips on your blog. It's been a relief, knowing I made the right purchase.
nuraman00: 1A is a tad dark and 1B is a tad blurred. 1A could have been a touch brighter by boosting ISO to 800 and leaving shutter where it is. 1B less blurred by boosting ISO to 800 and shooting at 1/150s. 1C seems the same as 1B.
2A is completely blown out. In sunlight, you can take it off manual and go with P mode since you will always get enough light for a fast shutter. Perhaps -2/3ev there. 2B is on auto but could use some -ev compensation. Nice though. 2C is a wicked shot. I'd have shot it twice ... one at 400ISO and one at 800 ISO ... then pick the nicest exposure. 2D ... awesome shot, but too much light. You need to use faster shutter .... 1/64 is risking movement anyway. 1/125s for that shot at least ...
3a, nice shot! Again, 1/64s is risky. Don't be afraid to underexpose slightly then pull exposure up in post process. Helps protect highlights. 3b, another great looking shot. Just a bit too much shake. Definitely lean towards 1/125s as your minimum at full zoom. 800ISO is very nice on the F70 so don't be afraid of it ...
Nice stuff in here. More practice will help to nail images without the shake. And every concert is a new challenge. I love it and it is frustrating, but great fun when you nail a shot here and there.
Kim, having read your exceptionally thorough breakdown of the F70, I was confident that this was the best travel zoom to replace my Ricoh R7 (this is a similar, flyweight 28-200 8mp zoom which was favourably reviewed when it came out around three years ago).
After setting up the Fuji according to your helpful recommendations, I took a number of comparison shots at equivalent settings. I was surprised to find that the R7's images were, on the whole, marginally superior. More significantly, the little Ricoh rendered shadow areas with far more detail than the F70 - very surprising given that this aspect is supposed to be one of the Fuji's great strengths.
I took a further series of fixed shots with the Fuji. Viewed on the computer screen with no processing, the overall results were more or less identical. There was no appreciable difference in shadow rendition between EXR, non EXR, Auto, 100% DR or 800% DR, and all points in between.
None of this makes my F70 a bad camera but, having read very favourable testimonies of it here and on DP, I was expecting rather more of it.
Based on the lack of shadow rendition and the lack of differentiation between various settings, do you think it possible that my particular camera is simply not performing properly?
Thanks
Alan.
Alan, can you post links to a couple of files? Or perhaps email them to me? I need to see the files to determine what is happening. It may be that the Ricoh has a tone curve that is more favorable to shadows.
Great job, Kim! Each "fujiman" must read it. Very useful, very interesting? very helpful. I personaly enjoied it. Thanks a lot
Lev
Thanks Lev!
Kim
Apologies for not getting back to you as suggested but my Mac is poorly and I can't access any of my files or backups until it has had some (expensive, as usual) TLC. As is fairly common here in the UK, there isn't currently enough sunlight to take some more comparative shots with a decent dynamic range.
Prior to computer shutdown I did manage to carry out a thorough review of all my recent images. It was very clear that EXR settings did not produce any visible change in the dynamic range of sequential images - all shadowed areas looked absolutely identical regardless of whether EXR was selected or not.
Unless I have misunderstood the situation, all reviews that I have seen tend to show quite significant changes whenever EXR settings are demonstrated. I therefore think it would perhaps be prudent to return my camera to check that all is well with it.
Thanks for your offer of help and for the helpful hints on your blog.
Dick, when you say "EXR settings", do you mean that you set the dial to EXR? In which case do you change the EXR DR amount from 100 to 400? Or to you shoot EXR AUTO? The reason I ask is that EXR AUTO mode makes a lot of decisions differently from how I would shoot a camera, and so might be leaving the cam at DR100 in which case you will see little difference between other modes and that. It all depends on the subject. If you shoot P mode settings as I recommend, and then switch from DR100 to DR400, you should see a definite difference in tone curve.
Hi,
Your posts were very helpful to me end I wish to thank you for them. Very nice work!
I olso have a few questions if you don't mind. First I have to admit that I'm just an amateur and have a lot of experimenting to do. :)
1. I like to shoot my F70EXR in 16:9 M mode. Can this mode affect picture quality with your recommendetions?
2. I can't get good indoor pictures.
I tried to shoot some pictures in a church, for a wedding, mainly groups of people.
P mode had no chance,a lot of noise and manual was to dark with black backgrounds, just in flash range.
The same problems in a restaurant, with no natural light. Very noisy pictures, in all modes...
Can you recommend some settings for those situations?
Best regards,
Andrei
Andrei,
As far as I can tell, 16:9 mode is a crop of 4:3 mode, so image quality is identical.
Indoor imagery is by far the most difficult. Churches are very dark for example. Not to our eyes of course, but to a sensor. So if you cannot get decent images at 1600 ISO in P mode, then there is really not enough light.
Now, if you are not shooting people, then what you want to do is find a place to set the camera down, set the camera to 100 or 200 ISO an M mode and then make sure that you dial the shutter speed setting down until the meter shows a middle reading. Use the self timer on 2 seconds to release and do not touch the camera while shooting. That's no good for people, but will get you lovely indoor images. You can compromise by setting to 800 ISO and bracing your arms on something like a pew. This takes practice, but it can be done.
Flash is good for short range portraits, but is not useful for lighting up large areas.
Kim, did you get the email I (Alan (Dick) - apologies for any confusion with names) sent on Oct 6 with some files illustrating the lack of differentiation I appeared to be experiencing with my EXR settings?
I included some of the different settings on the P mode that you suggested and which, to me, looked practically identical.
Greg - Sorry, I got distracted when I first got it. I don't like Image Shack and you mentioned I should not feel obligated to look and so on. So I forgot. I just looked them over and yes, the images have identical shadows and midtones with the primary difference being their highlights. DR100 blows things sky high and DR400 and DR800 save the highlights very nicely. Interestingly, I suspect that the effect we think of when we say that shadows and highlights are flattened comes from the fact that even with -1/3ev or -2/3ev we still get blown highlights at DR100 and we get blocked shadows. But at DR400 and DR800 we can shoot with less -ev and save the highlights while leaving the shadows open.
Thanks for the once over. Still a bit surprised at the sameness of all the shadow areas regardless of the DR setting, or even whether EXR is in use. EXR's enhanced shadow rendition has been pushed as the camera's USP, and its effect was quite noticeable in most reviews.
Do you have a suggestion for an Image Shack alternative? I've never used it before and picked it out at random.
All the best.
Greg.
Greg.
Post a Comment