This works because, at poster sizes it is possible to print with as low as 100 pixels per inch and still get a decent image when viewed at an appropriate distance (i.e. not with your eye inches away.) This is true for several reasons ... one is that your eye can only see so much detail from a distance, and the other is that many people cannot really distinguish between 150 and 300 ppi.
I like to take my images right up to the actual size of the print at the appropriate ppi for the output device, which for most inexpensive labs like Costco and WalMart is 300ppi -- the native resolution of the Frontier or Noritsu machines they use. I do this because I want to be able to sharpen correctly for the final output medium. This gives me the best sharpness possible without giving me the annoying digital look of sharpening halos and crispy edges.
I use three techniques to ensure quality large prints:
- A very sharp image. This cannot be emphasized enough.
- An excellent upsizing algorithm.
- An excellent sharpening algorithm.
My upsizing plugin of choice comes from Digital Outback Photo. It can be downloaded from their web site by scrolling to the bottom of this page. I won't pretend that I performed a full tests of all the methods. But I've looked at a lot of what has been published about upsizing, for example tests of bicubic versus fractal versus whatever. And I see similar excellent results from the very easy to use DOP Upsizer.
My sharpener of choice is PKSharpener from Pixel Genius. I bought this after reading Bruce Fraser's (r.i.p.) book Real World Image Sharpening. This is an excellent reference on all things related to sharpening, smoothing, noise removal, and related issues. He defines a three stage sharpening protocol:
- Capture sharpening, where you get rid of the softening effects of demosaicing and anti-aliasing.
- Creative sharpening, which actually includes selective sharpening, local contrast enhancement, smoothing, and noise removal.
- Output sharpening, which sharpens the entire image to compensate for the output device. Inks run and bleed, so the image usually needs to be sharper than you expect in order to remain sharp on paper.

This is a nice enough shot, but not all that dramatic. What is needed is a closer crop, so we'll cut out a small portion in the middle of the frame, which looks like this:

After cropping the image, we have a much more interesting presentation, but are left with only 0.8mp! This is pretty darned small ... but let's see how it goes anyway. To make it fair, we'll take the 0.8mp, which is less than 1/4 the size of the original 4.1mp and take it only as far as an 11 inch wide print. Still, that's larger than 1/4 of the 12x18 we originally were targeting, so if this works, we know a 12x18 is well within reach.


Capture Sharpen
As mentioned earlier, I use PKSharpener (PKS) to perform this step. But I will also show the step performed using Photoshop CS3's smart sharpener.
With PKS, I select the appropriate capture sharpen level from CS3's automation menu (PKS is bound in as automations, not filters ... same effect though.)

Medium seems like an appropriate level for this capture. You can run it in several flavours and compare them, but I know that medium will do the job. PKS always leaves your result in grouped layers so you can change or delete the effect.

You can actually tune the light halo and the dark halo separately to really hone the apparent sharpness and remove any digital look from the image. Very powerful.
It is also possible to do this using CS3's smart sharpening.
 The difference between these two is essentially non-existent in this case ...
The reason I like the PKSharpener tool is that I don't have to think about it and can easily switch between cameras. My D70s (6mp) needs medium resolution capture sharpening, and should I get a 10 or 12 mp cam later, I will need high resolution capture sharpening. This alleviates the need to watch the result carefully or to create my own actions. I also can choose the kind of subject in PKS ... fine, medium or coarse grained. It makes a subtle, but real difference in the long run.
Processing for Tone and Contrast
I did a bit of work on tone curves and fringing (I used Shay Stephens' manual fringe remover action):

The after version (not shown) has no colour fringe left at all. Perfect removal.
The s-curve I used to boost the contrast on this image has left the detail much better defined. But it can still be better if I boost local contrast a bit.
Creative Sharpening
The linked tutorial shows how to adjust local contrast across the whole frame, but I want it to be selective ... so I use PKS's creative sharpening brush called hazecutter bush medium edges. PKS always give you a layer on which you can adjust opacity to strengthen ot weaken the effect, but they also give you a mask with which you can paint the effect only onto specific areas. In my case, the only place that looks better with this adjustment is the dark areas. The result is quite noticeable:

This should certainly be enough detail for this image.
Upsizing
As mentioned previously, DOP Upsizer is a free plugin that is also easy to use. There may be better upsizers out there, but I doubt that they are vastly superior. This is not necessairly the right image for that sort of test ... people often use ultra close-ups of an eye, which can really show some fine detail.
So I upsized the image twice, first using the DOP plugin:

... and the second time using the recommended bicubic smoother method ...

I typed in the size of the image based on the numbers DOP Upsizer had used. The end result is pretty similar again, but with DOP Upsizer, I can see a hint of more detail and better contrast retention. Just a hint, but it is there.

And, as you can see above, DOP Upsizer is dead easy to use. You choose the width of the image, of course taking into account whether the image will be portrait or landscape, and you choose the pixels per inch, for which I always use 300 for continuous tone output (Costco, WalMart) or inkjet output (my Epson R340 photo printer.)
Output Sharpening
The last step is to sharpen for the output medium. When sending to the lab, you would normally use continous tone 300. So I'll use that option here ... again looking through the automate menu to find PKS's output sharpener.

Again, I duplicated the image and sharpened using smart sharpen with these settings:

The settings were to taste ... not too sharp, but sharp enough. The result is quite a bit different in this case:

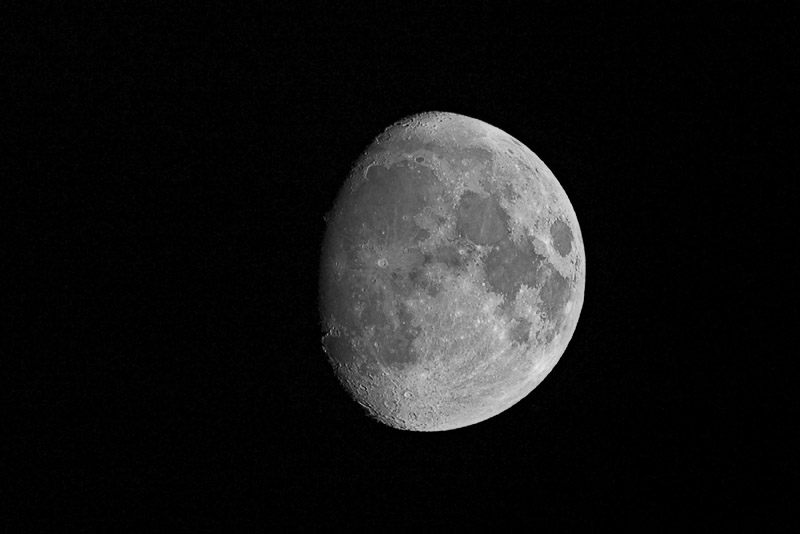
Now, in order to test these, I cut the moon out from both and pasted them into one 11 inch wide image for printing on my inkjet.

The final result is that the smart sharpened version is actually a bit more contrasty and is the one I would choose between these two ... but, of course, I should have used PKS output sharpen settings of inkjet 300, not contone 300 ... I was, after all, testing on the home printer and not the Costco lab I so often use for larger prints. Duh.
So there you have it ... I use techniques like this to get my prints quite large and must say that careful sharpening and upsizing will give you excellent results. I save the final image as jpeg at fairly high quality (9 typically), and the images come out quite stunning at 12x18. I've actually used this technique to double the resolution of an image for a stock agency, and they accepted it despite the rule of no upsizing.
Last Word
Since Costco only charges about 3 bucks for this size, I encourage you to just give it a try. Smaller sizes are even cheaper ... 8x10 and 8x12 about a buck and a half.
I shot the image using the Nikon D2Hs with the Nikon 300 F4 AF-S and the Nikon TC17e 1.7x teleconverter. I used the Feisol 3471 tripod with the Markins M20 ball head. I used long lens technique, as I learned on Moose Peterson's site. Note that I used mirror lock-up and released using a cable release.
Another image from this series is also online in my gallery, processed somewhat more aggressively. I think it also started very slightly sharper:
Updated on 11 October 2009: You should read Thom Hogan's excellent article on how big you can print, as it explains the relationship of your camera's resolution to print size ... the results will almost certainly surprise you.
3 comments:
Great article but I can't find the DOP Upsizer at the link you posted. Is it no longer available?
Maike
I also could not locate that plugin on the current page - but did retrieve it with the wayback machine on archive.org
Direct Link:
http://web.archive.org/web/20070717065646/http://www.outbackphoto.com/php_helpers/click.php?action=go&to=DOPupsizing
I had to repair the archive, but then it extracted just fine.
Yeah, it appears that they removed it. Bummer ... I quite like it. Now I'll have to go buy something else, but it'll have to be 64bit, as I'm slowly moving over to CS4 64bit ... I use 32bit right now just for plugin compatibility.
Post a Comment