Thursday, June 30, 2011

Light Pollution …

When was the last time you looked up in a completely dark location and saw the staggering beauty of the Milky Way slashing its way across the night sky?

A lot of people cannot remember the last time that they really looked closely at the sky from a dark location. Because you have to go a long way from any major city and then stop the car, get out and just look for this to really happen.

That’s pretty depressing as we are meant to have our rhythms vary from day to night and light to dark. Not day to night and light to a little less light … sheesh.

I am a dilettante when it comes to things astronomical … I never really got into it as a kid and I have developed the techie’s nerdy interest in something the requires a cool piece of equipment to do properly. I do love to look at images of the moon, planets and deep sky objects like nebulae and star clusters and so on. These really float my boat. And even the lesser images shot from back yards please me no end.

My own recent Saturn image lit a real fire in me to consider exploring this a bit further. We’ll see about that, but I’d like to share a rather amusing video that was posted to YouTube as a possible warning to the human race. We have lost our sense of place in the Universe because most of us cannot look up and see the vastness of all things … instead, there is an artificially created ceiling of grey caused by light pollution.

What many might not know is that it is actually possible to start changing this even within city boundaries. The International Dark Sky Association is campaigning world-wide for improved lighting that does not blast light sideways or upwards. The amount of light we bleed upwards into the sky amounts to billions of dollars of wasted energy every year. Who could possibly have thought that was a good idea?

The Ottawa Citizen reported three days ago that July 2nd will see an entire street go dark, probably for the first time since the great blackout of the east of a few years ago. The organizers had to pay $1200 to the city for the people to accomplish the task, but they went ahead anyway. Julian Avenue is only a block long, but the Royal Astronomical Society of Canada plans to hold a star party that night to celebrate the improved visibility of the sky. The article reads as if this is actually going to persist for a month, which sounds pretty amazing if I read that right.

I have a street lamp slashing across my back yard that really interferes with any attempt I make to shoot images to the north and east. Today I sent an email to the person in charge of street lighting in Ottawa, asking him if there is a way in which I can shield my yard from the excess light of this lamp. We’ll see where that goes …

Support the Dark Sky Association … they are doing a great thing by trying to give us back the beauty of the night sky.

Wednesday, June 29, 2011

Published!

The Ottawa Citizen made enquiries about an image of mine on Crombie McNeil’s web site a month or so ago (in the mentoring gallery) and Crombie passed that along to me, connecting me with Robbi Hay, the editor of the Our Town section.

I was asked for a high resolution version of one particular image and I reprocessed the image with ACR 6.4 (the newest) with more open shadows than the original. They are running it tomorrow, June 30 as the lead image in the section. It is heavily cropped, but they did a pretty good job of retaining the flavor.

To see a PDF of the section, click here.

I was also given my own listing in the August 11-14 section (not sure why they chose that location) with the particulars of the original blog article, which is here. You can see the original image in there near the bottom. I reproduce it here for your convenience.

A size-reduced version of what was sent to the Citizen follows.

Nikon D300 with Nikon 70-300VR @ 70mm
f/7.1  1/1250s   ISO500

_DSC7905_betsy_warren_sam_nils_800px

Left to right are Betsy, Warren, Sam and Nils who were hired for Crombie’s workshop from the modeling agency Barret Palmer Models. Everyone had a great time as you can plainly see by their faces :-)

The Actual Article

The Citizen did, in fact, have my image at the head of the Our Town section today (June 30, 2011), which was on the last page of the paper at the end of the Food Section.

You can see a large version here

Why should a photographer buy a multi-core computer?

Well, if you run Photoshop then you will have noticed that some of the filters take a great deal of time to apply. But many filters in Photoshop – for example, Smart Sharpen, are able to take advantage of extra cores to speeds things up.

This is what my machine looks like when I launch a Smart Sharpen …

Click through to see it in all its glory …

Tuesday, June 28, 2011

Bell Canada takes a beating, but maybe it is the CRTC that needs the spanking …

Bell Canada agreed today to pay a 10 million dollar fine for misleading advertising over these last many years. Of course, Bell is calling it an “administrative fee” which no doubt allows them to feel a little less criminal and all.

An excerpt from the article Bell Canada pays $10M over misleading ads - Business - CBC News

Bell 'disagrees' with findings

"When a price is offered to consumers, it must be accurate. Including a fine-print disclaimer is no licence to advertise prices that are not available."

In a release, Bell said it "fundamentally disagrees" with the Bureau's findings.

"Bell's advertising has always complied with all applicable laws and been comparable with common advertising practice past and present in the communications marketplace and other industries in Canada," it said.

"However, Bell has decided to immediately resolve the issue and move forward by paying an administrative amount of $10 million."

But frankly, Bell is not alone. All of our providers seem to manage to stick us with all these extra hidden fees for network connection, touch tone (in this day and age that is criminal), network access, and so one …

The CRTC regulates the telecommunications industry in Canada and we continue to have some of the highest fees in the world and some of the most restrictive and onerous policies. Heck, Netflix had to change the Canadian service to drop bandwidth on movies by 80% because people were blowing by their bandwidth caps after only a couple of movies!

Our government overlords have managed to ignore this for a long, long time. Perhaps it is they who need the spanking so they can get on with giving the consumer a fair shake by world standards.

Don’t get me wrong … I’m still a huge fan of Rogers’ technology. And Bell says that they are bringing fiber to the home for high bandwidth cable-like TV service, so all is not lost. But Bell has the old blinders on for anywhere that is not Toronto or Montreal so most of us will wait a long time. And Rogers has an evil tendency to shape our traffic into oblivion more often than they should. So the CRTC has lots of interesting things they could address if they felt the need to actually do something useful …

Monday, June 27, 2011

D7000 RAW – ACR or NX2?

This debate has been characterized on the Nikon consumer dSLR forum as a “holy war,” and it certainly seems that way to me. The debate is currently maintained by a few people who insist that NX2 is vastly better than ACR for D7000 files. They tend to site sharpness as the main issue, and I’ve had that explained by one of the more credible people as a tendency for ACR to put jagged edges on diagonal lines.

There was another issue but it is so minor as to be irrelevant. Some also cite color as a big difference, but of course ACR is infinitely variable and tunable and so is NX2. NX2 happens to default to camera settings, perfectly matching jpegs from the camera, and beginners especially find that appealing. Enough so that the more aggressive among them think that this feature is a decent substitute for an intelligent argument :-)

So anyway, I thought I would run a really quick test using the D7000 and a Sigma 105mm 2.8 Macro lens with Canon 500D achromat (i.e. high quality close up filter.) This combination shot a window screen that I have against a wall while I shoot moon and planets from my window sometimes.

The flash creates perfect brightness and sharpness and since I turned the camera to about 50 degrees, I also have lots of diagonals. Seems like a reasonable test to me.

ACR converted it with ease. Its sharpening controls are unbelievably effective. A high degree of control and a very fine grain to the adjustments make for amazing detail-pulling ability. I find capture sharpening in ACR to be extremely effective.

NX2, on the other hand, feels like a blunt instrument by comparison. Perhaps there are better ways of sharpening, but in examining the entire interface I found only the same camera controls for that purpose. So I set to the neutral picture control, the same one I use in ACR, then I set the sharpening to 6 out of 10, or just a little extra sharpness. I set contrast to 6 out of 10 as well. And that was that.

The result is that the ACR conversion is vastly sharper. And despite its dullness, the NX2 image has visible halos on the edges, no doubt the product of a very high radius on its sharpening. I sure hope that there is a more advanced sharpening control on this beast because this result just plain sucks.

If you want to tie that back to the real world, imagine how hair would look with each conversion. Closely examine the cobwebs to get a hint.

Caveat: I am an expert with ACR and a rank amateur with NX2, so take this with a grain of salt. But the interface is slow and blunt on NX2 and the work flow sucks. So even if it was better than ACR at sharpening, I would still dislike it.

Sunday, June 26, 2011

Hard Rain – D7000 video fun …

I was driving back from somewhere during a heck of a rain and thought it might be fun to cover the last mile or so with the D7000 shooting the Tamron 19-35 @19mm (28mm effective) … this lens has proven to be very sharp and have a fairly flat field of focus. I am very pleased with it.

The D7000 was in no particular setting and I simply pressed the live view switch and the record. Then drove the last short distance paying no particular attention to the camera.

I had Cat Power’s “Willie” playing quite loudly on the car stereo, an excellent Alpine iPod deck with a 10” subwoofer banging away, and that adds a nice backdrop to a drive as picked up by the built-in microphones of the D7000. For anything critical, I would use an external recorder like the Tascam DR-05.

Just some fun …

Tuesday, June 21, 2011

F550EXR – Shot to Shot Times Revisited

No, I’m not going to do some sort of major comparison between cards and timing of shot to shot times, I did a minor version of the in review part 19.

Instead, I am just going to compare the fastest card from that test (my A-Data Class 10) to my new super fast SanDisk Extreme Pro UHS-1?

DSC_7946_sd_cards

The A-Data is an 8GB card and was able to go shot to shot in RAW+JPEG in 6 seconds last time, as opposed to 7 seconds for the Lexar Platinum, a card that barely meets its Class 6 speed designation according to tests I have read online.

Today, I was consistently getting 5 second shot to shot times for R+J and I suspect that my settings today are generating smaller files, or the card has been better formatted since the original test. At any rate, today the time to beat is 5 seconds.

And how did the SanDisk Extreme Pro UHS-1 (a new speed class for ultra fast cards) fare? It kicked the snot out of the A-Data … 3 seconds consistently. That’s a very fast shot to shot time and brings RAW shooting into the realm of the convenient for Fuji. I suspect that HS20 owners should be experimenting with these cards as well. Wow!

Monday, June 20, 2011

F550EXR – Garden in JPEG

I often tout the F550’s RAW support as its killer feature, but in fact this camera shoots excellent jpeg images as well. I was in the garden today working on the pool and thought I would snap the last of my Hansa roses, a variety of native rose bush that blooms for a fair bit of time in June.

Here, I am shooting from a long way away at 360mm equivalent.

Not bad, but if you look closely there is a much better composition buried inside. So I step over the ServiceBerry branches and get closer for this shot.

I like that one. A lottle mood in the background with a brightly lit subject in the foreground. A ROT composition (rule of thirds) and it all hangs together nicely.

Back out and set to 24mm and we can get the ServiceBerry in the image …

Turn left to 45 degrees and photograph the lovely Purple Ninebark with the Burning Bush peeking out from underneath. The bright green in front and to the left are from usurpers that dropped into my garden quite literally inside bird droppings. I plan to cut them down as I don’t need trees interfering with the pool itself.

Step a bit past the Ninebark and I can catch the Silverleaf Dogwood just on the other side.

Here, the usurper is visible in all its glory. Just past it are a huge False Spirea and an even larger Yellowtwig Dogwood with a tiny Purple Sandcherry fighting for its life underneath.

Sunday, June 19, 2011

The North End of Winnipeg

Having been raised for the most part in the North End of Winnipeg, it’s history and future are near and dear to my heart. An interesting place that has gone through a lot of changes -- especially culturally -- over the years. It has always been and continues to be a melting pot.

For a fascinating yet poignant look at the North End, have a look at the following film. It was quite successful at the festivals form what I have read.

Here is an approximation of where the North End is situated, mainly north of the tracks.

image

Saturday, June 18, 2011

Green pools of, well, pools … Day 35 … continued success …

My pool has been sitting stagnant for a couple of months as we await the repair of the water main out to our town. But the neighbors are not so patient, or shall I say one particularly anal neighbor.

So the city sent me a registered letter telling me how wonderful it would be if they could see a clean pool when they next inspect it on July 11. And by the way they want me to replace the roof and fence while I am at it. So I called the city to fill me pool because I had insufficient water to run the pump, which is necessary to clean the pool.  This whole issue seems somehow incestuous.

Anyway, they gave me an appointment yesterday, which was a lead time of 4 days, not bad when you think that they are filling thousands of pools while the water main is running at 10% capacity.

Day 1

He arrived right on time and we dragged this humongous hose through a gap in my fence boards -- couldn't take it over the steel construction fence but luckily the rest of my fence is, shall we say, porous …

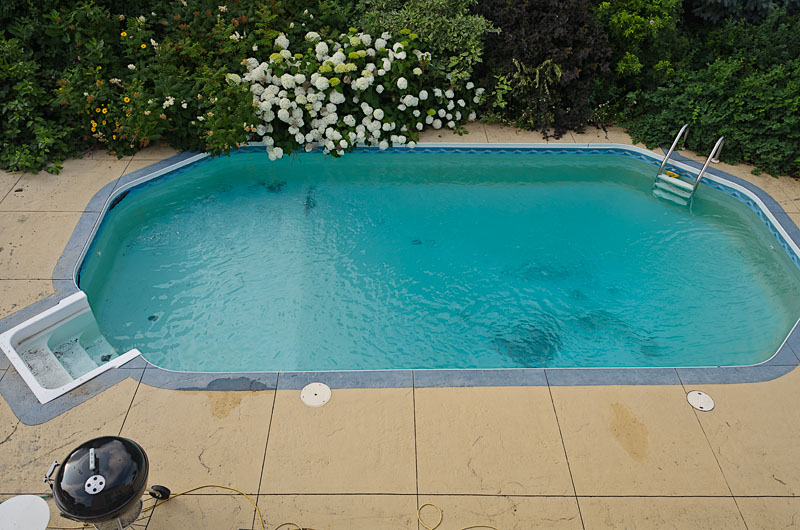
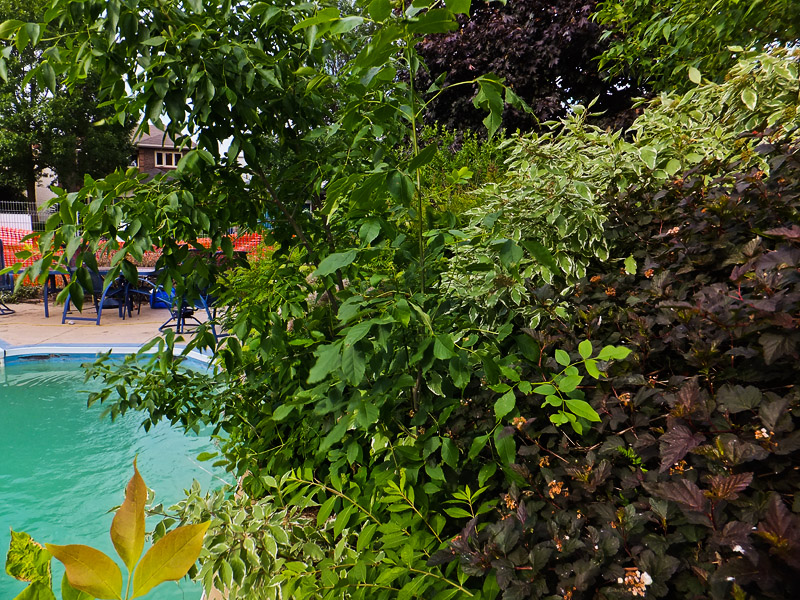
It took less than ten minutes to fill the pool right to the top (normally would have been a few hours) and this is what I saw a few minutes after starting up the pump.

Nikon D7000 Tamron 19-35

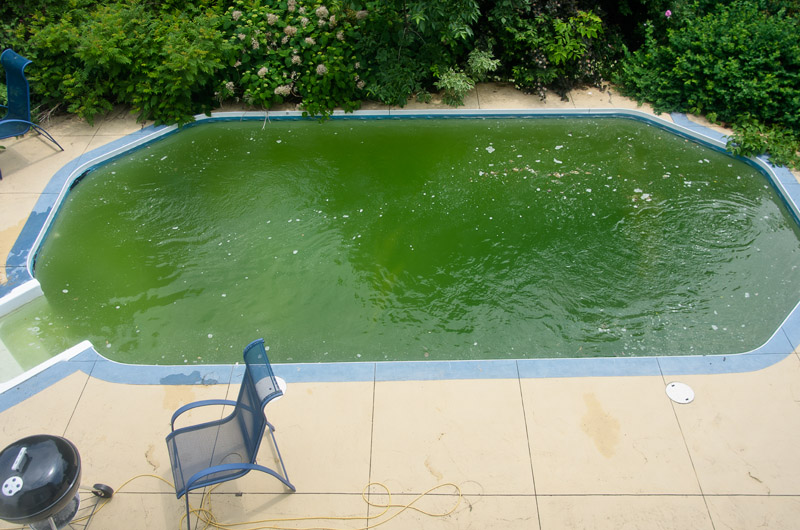
The white crap on top is left over form the huge cloud of white that came pouring out of the pipes when the pump got going. This was caused, of course, by the presence of RV (plumbing) anti-freeze, which has to be added to the intake and outflow pipes every fall to prevent destruction of said pipes over the winter. It’s worked for 13 years so far.

Day 2

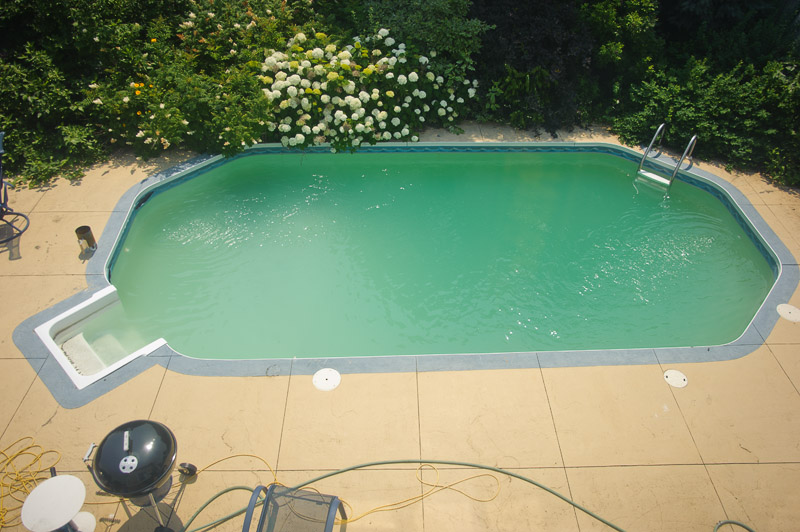
The pool is looking a lovely shade of emerald green today.

Fuji F550EXR

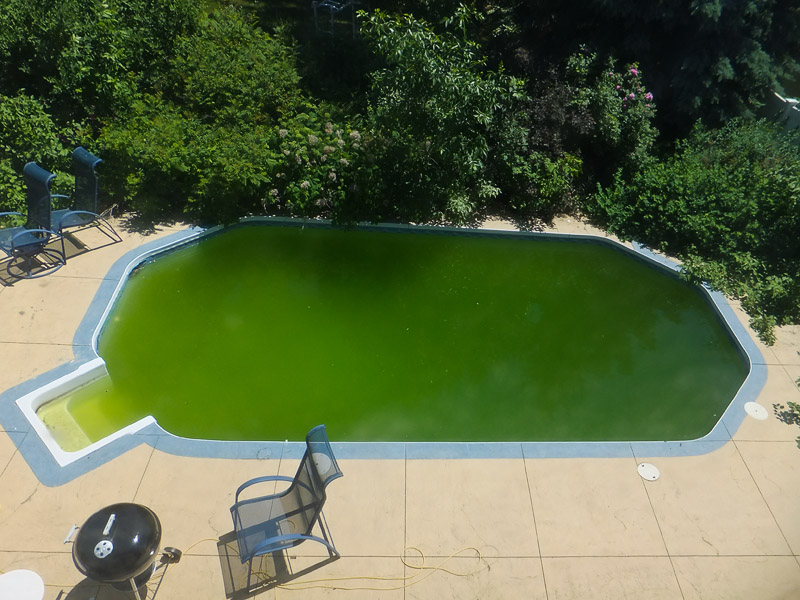
I added a couple of cups of baking soda on day 1 to start bringing the alkalinity up to snuff, and I added two+ cups of Borax on day 2 to work on raising the pH. These two parameters really determine how clear the pool can get once the chlorine pucks and a heavy shocking or two kick in. I like to run the pool at a slightly high pH … around 8. That feels nice on the skin. Acidic water feels, well, acidic :-)

Then I shocked it hard late on day 2 … about a pound of unstabilized chlorine. That will teach it to mess with me :-)

Day 3

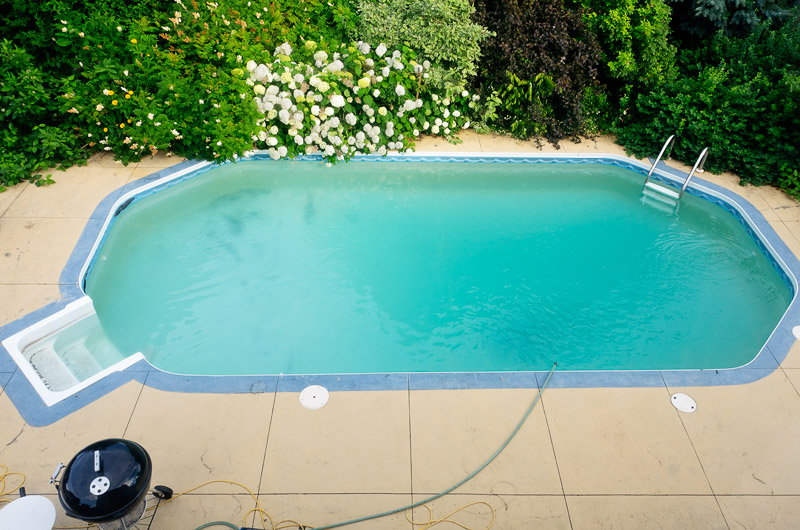
This morning, the pool is looking much improved. The filter and the chlorine have worked much magic in only a few days.

Nikon D7000 with 18-200VR
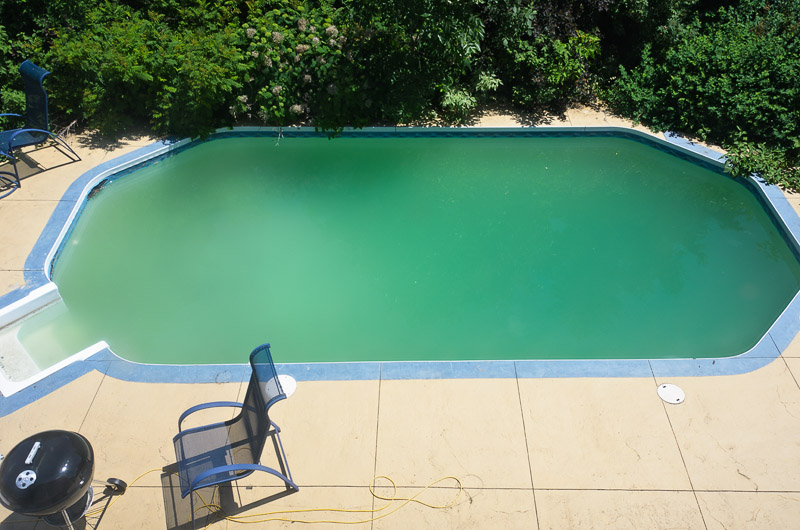
Day 4

After work, the pool has not improved much.

F550EXR   100ISO   f/7.1  1/450s

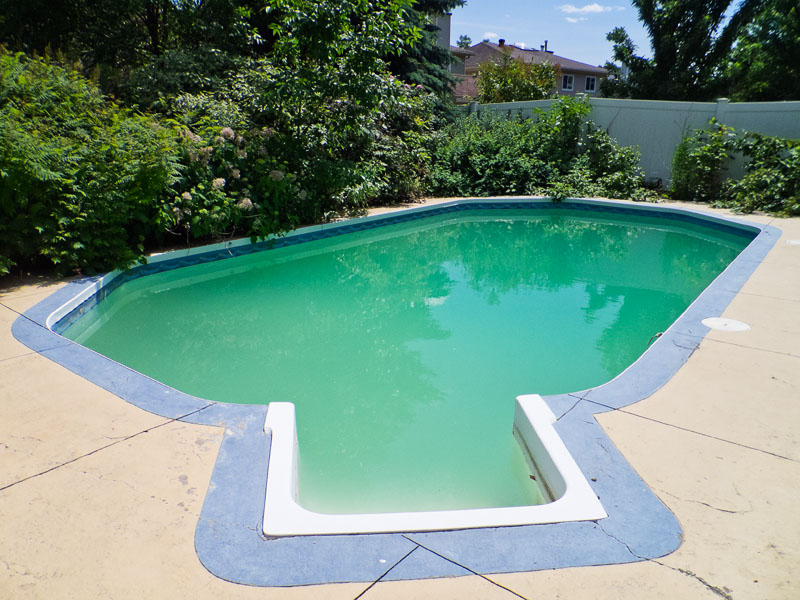
I stopped at ClearWater on the way home to pick up a test kit and the free chlorine was at zero. This is not good. The Alkalinity and pH were also very low.

So I dumped in a ton of Alkalinity Up (just expensive baking soda :-) and switche dthe chlorinator on (DUH) … also cleaned out the skimmer, which had clogged and slowed the flow to a crawl. We’ll see what it looks like tomorrow. I will be buying some shock for tomorrow evening and I think we should see some serious improvement for the weekend. Enough to swim I think …

I may have mentioned my liner issue at some point, but here are the two major issues on the eastern end of the pool. Basically where all the wind hits year in year out.

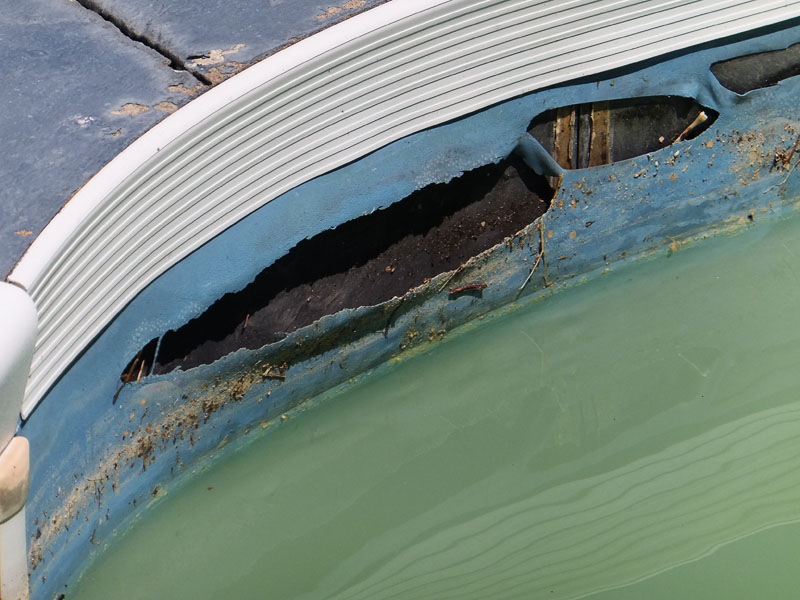
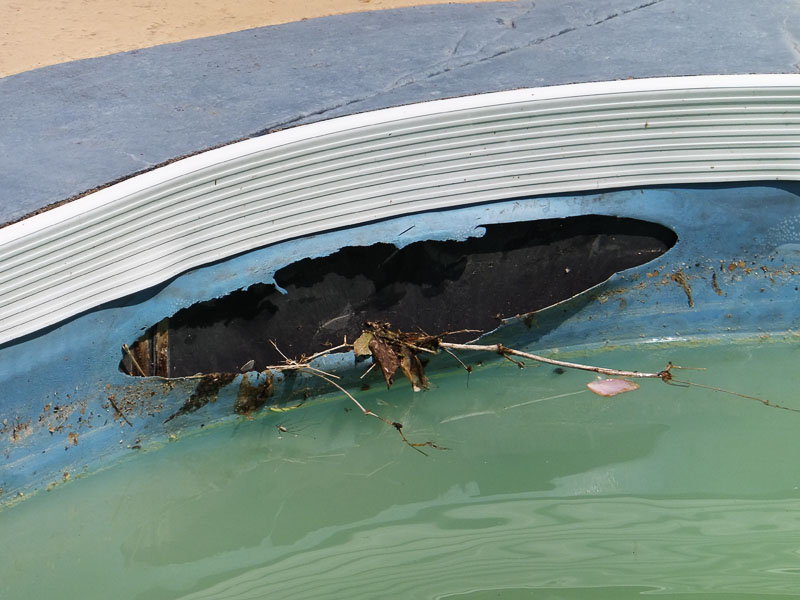
I had Mermaid Pools estimate the replacement of the liner (which should have lasted 10 years but is in year 14 and still holding water) and they say about $4500. This is consistent with what my boss recently paid for a slightly larger pool. But ClearWater says that they can do it for $2900 for a plain blue liner or $3200 for a full print liner. Not bad at all. Something to ponder for later on in the summer or for next summer.

Day 6

Slow progress. The chemical balance is getting better, the chlorine is pretty high for two days now, but the clarity has not arrived yet. There are thunder storms predicted for today and tomorrow and if we get a couple of ripping good storms then I can backwash again and see if that helps. The sand is new form last year, but that does not mean that it is uncloggable. Nice, soft light today as evening and the storms approach …

D7000 and Tamron 19-35 3.5-4.5 @ 19mm (28mm equivalent)
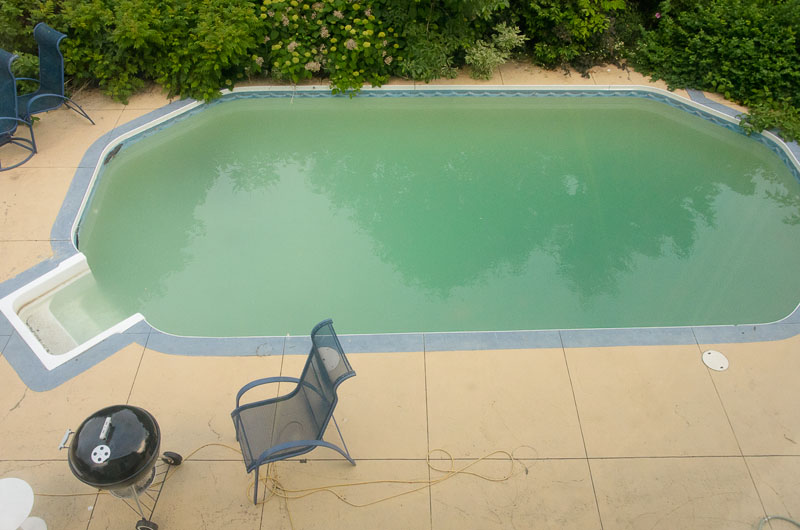
Day 10

The pool has been improving dramatically in the last few days.

Fuji F550EXR  f/3.8  1/420s  ISO100  30mm EFL

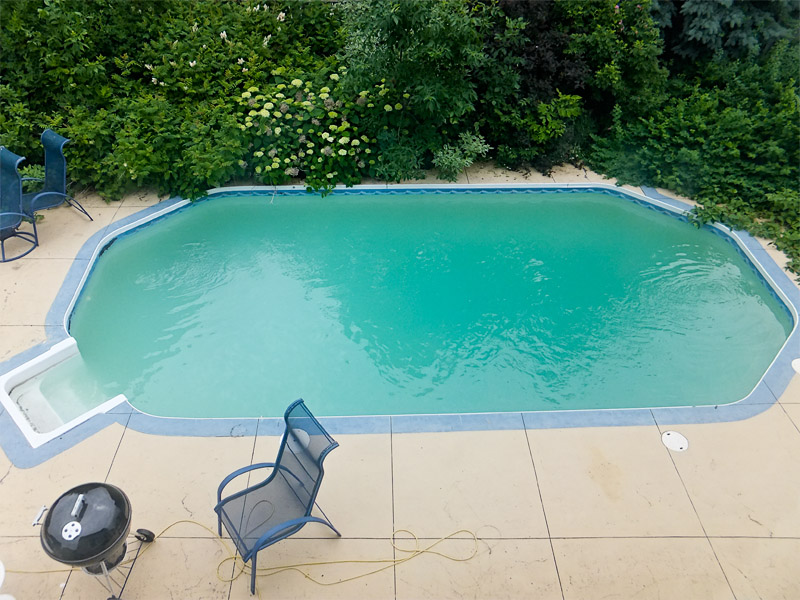
Although pH remains a tad low, everything else is inside the norms. Just need the clarity to improve before I can consider turning on the heater. It’s at 74 degrees right now, but that’s a tad cool for swimming in a backyard. I normally shoot for 84 degrees, but might drop that this year to 82.

Day 13

Nikon D700, Tamron 19-35 @21mm, f/5.6, 1/1250s, 1600ISO

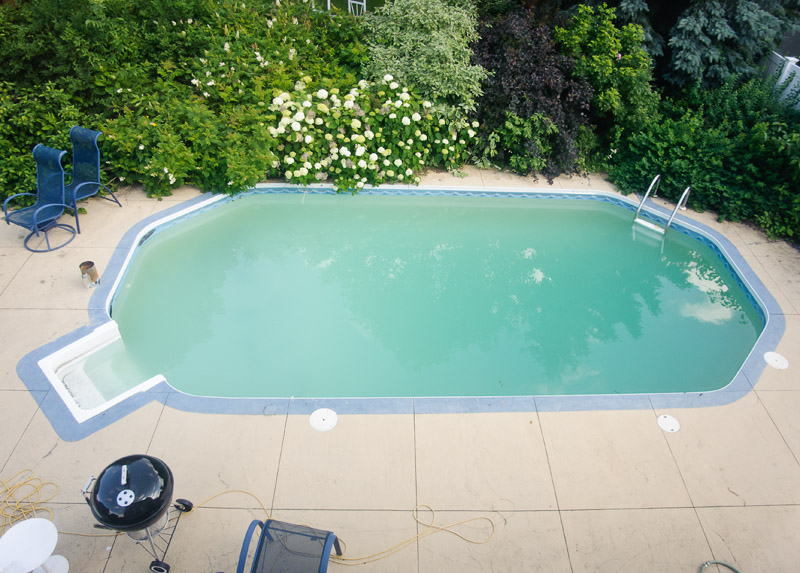
Well, Day 13 isn't looking much better. In fact, the pool remains the right color but very cloudy. And that's after pounding it with chlorine. So I need to raise the pH and pound it again I suppose. What else? I will take it for a professional reading if I have to, but water chemistry changes on the drive over, so it is not all that useful. *sigh*

Day 19

Still not ready … *sigh* … I processed this image with stronger contrast and richer color so it looks a lot worse than day 13 but in essence it is a bit better. Chemistry is ok now  and chlorine is high. I may try a clarifier next.

Day 20

I read a few web sites and realized that my problem is almost certainly a very fine mist of particulate that is too small to be caught by regular pool sand. So I popped over to WalMart just before closing and picked up some liquid clarifier, which is designed to clump the smaller particulates into something that the filter can catch and sure enough, I can now see the bottom. There is still some particulate in the water but this is a huge step forward.

Day 24

I swept the pool last night and gave it one more good shock and today it is clear to the bottom. You can follow the contour of the sculpted cement (or whatever it is they use under the liner) with ease. It just needs a vacuuming now …

F550EXR  f/3.5  1/320s  ISO100  -.67ev
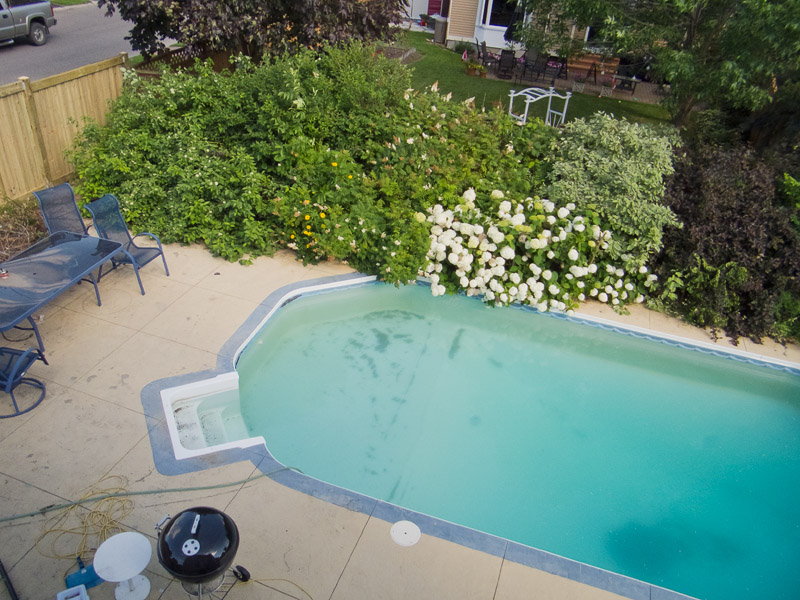
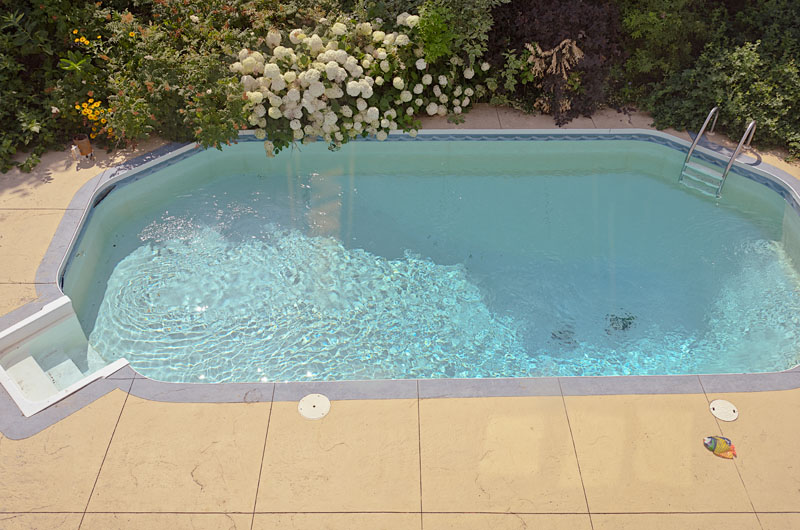
Day 26

Perfect crystal clarity. It looks even better in real life than in the image. Shot early morning, hence the subdued contrast …

I might pop the odd image into here as things progress over the summer … but here ends the sojourn for clarity with total success.

Day 35

Continued perfect clarity.

Friday, June 17, 2011

D7000 Moon Shot Mk II

A quickie here to show an image of the moon shot by the D7000 at 300mm using the 70-300VR with the Tamron 1.4x teleconverter. So that’s 300 * 1.5 * 1.4 for an effective focal length of 630mm.

The moon in its large form is now almost 800px on a side. We’ve come a long way baby …

The teleconverter softens the image somewhat, especially when used on a consumer zoom. Yet this image is not half bad. I think I need a 600mm prime with TC20eiii teleconverter … 10 grand will get me a pretty moon …

Of course, a $600 telescope will kick the stuffing out of this moon shot I think anyway … perhaps one day that will percolate to the top of my desired toy list :-)

Thursday, June 16, 2011

Why does higher resolution mean that you tend to get more blurry images?

I’ve generally just taken Thom Hogan’s word for it that higher pixel density requires more shot discipline in order to avoid blur. After all, it’s sort of intuitive that slight movements will be captured by finer grained pixels more easily than by coarser grained pixels. But the D7000’s woes on its forum at DPReview indicate that not everyone is a believer.

So I thought that it might be useful to explore the situation and find a plausible layman’s explanation for it. Bearing in mind that I am a layman and thus this is my way of explaining it to myself.

So let’s start with a single pixel.

image

Yes, that’s one big pixel. Pretend that it comes from the 4mp D2Hs, where the pixels were almost that big :-)

Now let’s add a detail that is going to be captured.

image

This detail will actually cause this pixel to change color to a blend of the two with proportionate contributions of the color. Or something like that. The demosaic algorithm will take care of it by interpolating the color from this pixel’s color and that of its neighbors.

Remember that each pixel is actually monochrome luminance that is filtered through one color in the Bayer mask for most sensors. That color with the neighboring colors allows the demosaic algorithm to make excellent guesses at the color of this pixel. And that algorithm repeats for every pixel, which is why we get a pretty decent level of color detail.

This fine detail is not really captured of course by the sensor since it is smaller than one pixel (one unit of quantization), so the image will not appear to perfectly match the scene at extreme magnification. But you have to go to pretty low resolution for that to matter much in a practical sense.

Let’s push on.

Now let’s move that pixel as the result of hand shake during capture.

image

No big deal. The detail is, after all, still within the bounds of the one pixel. Which means that there is not really enough movement to see a detail blurred.

Now let’s take this pixel and divide it into four pixels, which in fact is exactly what happens when you go from a D2Hs to a D7000. From 4mp to 16mp.

image

Hmmm … this little detail was mostly contained in the top left pixel before the blur. But when there is a bit of shake, it starts to make a more substantial contribution to all the pixels, and especially to the bottom right pixel, which will be 50% the wrong color now. That is probably going to be noticeable.

Same detail, same blur. Fairly different result.

Now here is the thing … if you were to take each image and downsize to 800px for Facebook, the blur will likely vanish. But if you were to take each pixel and upsize for a poster, each image responds differently.

  • The blur does not appear at all in the 4mp image, because individually coarse but sharp pixels are simply interpolated to fill the space on paper. It looks a little soft but from a distance it looks very sharp.
  • The 16mp image, on the other hand, looks outright blurry from any distance. The pixels are mushy at the borders and to go onto a poster, this gets magnified somewhat to fill the space. A large gallery image might be 40 inches on a side, which would require that the 4800-odd pixels on the long axis be almost tripled to 12000 for 300ppi. That’s a fair bit of magnification of all that blur.

So it turns out that shot discipline really does matter. And note that we’re talking tiny amounts of blur here. This is not the big blur that shows up on all your images when you try to shoot without VR inside a dark room. All cameras see that.

This is that microscopic blur that was never visible on your 4mp or 6mp dSLR but is always showing up on your 16mp or 18mp dSLR, driving you completely nuts. The kind of blur that you get from being lazy. Not bracing when you shoot hand held. Not using a tripod with a cable release or timer. Not using mirror up when shutter speeds fall in the danger zone. That kind of thing.

Just watch the forums for a while and you will see what this does to people until they realize that they need faster shutter speeds than before. Exactly twice the speed in this case, because the blur tolerance is exactly half the previous tolerance on both the X and the Y axis (i.e. horizontal and vertical shake.)

I hope that helped a bit …

Actually, I hope that’s fairly close to right Smile

Canucks lose cup (again) … city goes ape-shit (again) …

image

Wow … what a terrible loss last night. Yet another embarrassment for the Canucks, who looked good 3 out of 7 times but really, really bad the other 4 times on the way to losing the Stanely cup in the last game of the finals for the second time. It was absolutely painful to watch … I was communicating with my eldest in England in real time and they were getting very upset. So much so that they felt compelled to drink the celebratory champagne anyway :-)

But what happened after was quite something. Vancouver rioted after the game back in 1994, and they did so again last night. But as with anything in the second decade of the 21st century, it was really amped up.

image

image

image

image

They even called out the cavalry …

image

Apparently, the looting was rampant. People running into electronics stores and coming out with armloads of stuff. 

From the CBC report here:

Vancouver Mayor Gregor Robertson said the city was dealing with a small number of troublemakers, and "they will be held accountable.

"It's absolutely disgraceful and shameful and by no means represents the city of Vancouver," he said. "We've had a great run in the playoffs here, great celebrations, and what's happened tonight is despicable."

My question is, if this is not representative of Vancouver after a Stanley Cup loss, then which city would he like to pin this on?

What he probably means is that this is not a typical drunken brawl on a weekend evening. Well … no kidding. It’s not every year a team chokes out in the 7th game of the cup final …

Wednesday, June 15, 2011

D7000 and 70-300VR Shoot the Moon and Saturn

Yes, it was inevitable. Every new camera has a rite of passage through the moon and planets gig … and the D7000 has enough resolution to make things very interesting, so I have been waiting for the right moment from the moment I acquired the camera.

Tonight was the night. Beautiful clear sky, full moon, no serious humidity to muck with the clarity. It was all good.

I shot a mere 7 images this evening. Four of the moon, with two completely overexposed as I left the camera in A priority mode like an idiot (the meter cannot help but be fooled by the vast expanse of dark sky next to the moon.) The other two were fine and I processed them differently to see how I preferred the images. They are of very similar original sharpness.

D7000 with 70-300VR @300mm  f/11, 1/100s, 100ISO


Click through to see the image at 100% … i.e. pixel for pixel of what the sensor captured. Sharp, sharp, sharp.

The next image was captured at the same exposure and was processed to lower the noise quite a bit. But as always happens, it also lowers the feeling of acuity.

And then I tried for Saturn and found my first image looked distinctly round. Hmmm … I checked the Planets application on my iPhone (written by a friend – Dana Peters -- who is very talented and gives this application away for free … you absolutely must download it like the other 5+ million people :-) … and what I found was that there might be another dot along the plane on which the planets all travel.

Sure enough, I walked closer to the pool and there was a brighter entity just above the roof of my neighbor’s house. So I opened a second leg of my tripod (only open what you must and then only from the top so that the thinnest segments are not used if possible) to help clear the roofline and I shot one image of Saturn, which as you will see, turned out magnificently. Sheesh … what a fluke :-)

I don’t know about you, but I am blown away that I can capture that image of Saturn from my back yard on a moonlit night with a consumer zoom worth 400 bucks …

Go Nikon :-)

Sunday, June 12, 2011

D700 versus D7000 – A low light ISO ladder in very balanced light …

My previous article shot the D700 against the D7000 in some pretty awful light. The results showed that the D700 retained a lead of perhaps one stop, but that the D7000 was very competitive. Sports shooters in gyms might find it acceptable with the right glass. Not quite as good as the D700, but more than serviceable.

So now we should be wondering if that prowess is going to carry over to the more balanced light of gyms with windows or perhaps outdoors in shade or in the evening. Admittedly, temperature does cool off, but that’s probably better than the crazy warmth of the last ISO ladder.

In the last test, I almost crippled the D700 by shooting the same lens on both from the same position. This time, I shot the D700 with the Nuikon 85mm 1.8D and the D7000 with the 50mm 1.8D from the same position. This puts the field of view (FOV) very close and takes care of the equalization that hurt the D700 last time.

But the equalization in pixel dimensions still has to happen. So, presuming that we are shooting for sports posters, and since we are in pretty good light (low, but somewhat well balanced) I upsize the D700 to match the D7000 pixel dimensions. It’s not that far to go from about 4200px to about 5000px, about 20% or so … and that’s hardly anything to a camera like the D700.

Methodology this time was AF on each image, self timer from tripod … the usual. Distance was the same, which equalized FOV well enough. Both lenses were set at f/5.6 which maximized sharpness and simulates a kit lens wide open to make this more interesting for the majority of readers.

Since that is is 5590 pixels across, you really want to click through and make sure you tell your browser to display it full size (if you see a cursor with a plus, click again.)

Some observations:

  • It appears that the D7000 with 50mm has a slight back focus issue (about one crayon diameter.) But the wool is in focus and so is the coin. So ignore this.
  • Looking at background noise on the left side of the wool, you can see about 1.5 to 2 stops of difference. The D700 is an older generation sensor, which shows more in bad light than in good. Here, the huge photo sites can really stretch their legs and deliver a bit of a spanking to the baby brother.
  • Mid-tone noise (look at the crayons) is pronounced on the D7000 by 1600 ISO. Still well within acceptable limits for enlargements, but obvious at 100%. Again, the D700 shows similar noise at about 6400 ISO. Note, though, that Nikon has made the noise even finer than with the D300 and D700, which was one reason that they were such a revelation in low light. So the D7000 noise is very easy to deal with.
  • Bottom left corner of the wool – the frizzy part retains excellent detail to 1600 ISO on the D7000. It starts to lose definition quite dramatically at 3200 and is really soft by 6400. The D700 retains that detail right up to 12800, which is close to 3 stops of difference. Clearly, the D7000 cannot really replace the D700 as an evening sports camera outdoors.
  • Tiny details on the crayons (e.g. the first fully visible crayon on the left) are essentially suppressed by noise at 1600 ISO. So they are really good up to 800. On the D700, they are still somewhat visible at 6400 ISO. Again a three stop difference.
  • Saturation is excellent throughout for both cameras.

I think it is pretty obvious that the larger photo sites are able to assert themselves in well balanced light, despite the disadvantage of being an older generation of sensor. This should not be a surprise to anyone, but I’ll bet that it will be. Especially for those who think that they have an FX-lite in the D7000. Well, they don’t.

So what does this all mean? It means that you will start losing definition in hair and skin texture as ISO is forced to rise. If you shoot the D700, you will be able to retain these details up to three stops higher, and that’s a pretty big advantage.

But in a more practical sense, the D7000 is pretty good at 3200 ISO if you know how to process noise. If you have the D7000, then you really need to think about maximizing the speed of the lenses you shoot. Forget the 70-300VR and grab a used 80-200 2.8, the push-pull variety often goes for 500 bucks. And that is two stops faster than these tests used. That is a huge shutter speed advantage in the field. Or try the 85mm 1.8D, which is razor sharp as early as f/2 … that’s a three stop advantage.

And if you do this with the D700, then you will be getting some wicked imagery with super high shutter speeds.

Anyway, good luck. I hope you enjoyed this pair of articles. I always like to be surprised and the bad light prowess of the D7000 is a great thing. Even in this ISO ladder, the images are not half bad at extreme ISOs.

As I demonstrated in the last article, a little processing can go a long way. So here are two images at 25,600 ISO. Yes, you read that right. Even the D7000 can shoot there and the results can be usable after processing. No kidding …

D7000

D700

The D700 was a bit easier to process, but both worked out very well. For snapshots for the web, this extreme ISO can actually be used, even on DX. Wow …

D700 versus D7000 – A low light ISO Ladder in very bad light …

First, let me define really bad light: old halogen lamps dialed down with a dimmer so they glow bright orange from behind and above the subject, ugly compact fluorescent bulbs coming from another room in front of the subject. Total light giving an exposure of 2s at f/5.6 at ISO 100. That’s about 1/15s at 3200 ISO at 5.6, which is what you would be using with a kit lens indoors in a typical living room at night.

On with the show … one thing that has impressed me since getting the D7000 is how good it is at 6400 ISO. The D300 was a revelation when I first got it and I put images at 6400 ISO on my blog. But they were a little dodgy and certainly required massive effort to process.

Not so with the D7000. It has only one real flaw, which is shared by the D700 by the way, and that’s the tendency to turn shadows blue when correcting white balance shot in RAW at higher ISOs. I have always found that the smaller the photosites, the more pronounced the effect.

I have speculated that the absence of blue light in the original image makes the neutrals with little info in the first place (i.e.20,20,1) very vulnerable to the extreme blue channel push that occurs during white balance adjustment. At higher ISOs this is probably aggravated because the neutrals also have a lot of noise in them, so some photosites in the dark neutrals contain false data that gets pumped up heavily by the blue channel shift and veritably glow blue.

You will see this effect in the following ISO ladder.

Obviously, you absolutely must click through to the full sized image, which is huge.

A comment on methodology. Obviously, I shot each of these from tripod. I shot from the same distance with the same lens, which gives the D7000 a 50% magnification advantage. I have to make that up by enlarging the D700 image to match field of view. The D7000 has another advantage (sort of), more pixels. To handle that, I downsize the D7000 to match the original dimensions of the D700. Then I crop to match for the ladder.

Now, these are all shot in RAW. I set the processing to match the 100 ISO (low 1) image in both cases. Then I used the same processing all along, which left the blue channel and noise without any response from me. This gives you an idea of what you must deal with when processing either camera.

My observations on the ISO ladder:

  • The D700 displays slightly higher acuity. That is likely a subtle difference in processing or in manual focus (it was an Ai lens, remember) so ignore it.
  • Details are finer on the D7000. That is a combination of the downsizing of the D7000 and the severe upsizing of the D700. Ignore it.
  • Both cameras retain excellent saturation all the way to 1600 ISO. The D7000 flags at 3200 and the D700 at 6400. One stop difference, and that should be no surprise.
  • Deep shadows are turning blue on both cameras starting at about 1600 ISO. The D7000 shows some tendency by 800, but it is not too bad yet. The cameras move in lock step, but the effect is always stronger on the D7000, which makes sense when you consider the photosite size difference.
  • Details on the face of the coin show some different. The arm is more visible at 1600 and 3200 ISO on the D7000 shot. This advantage again makes sense.
  • At the higher ISOs, I’d say that the saturation and 3 dimensionality is about one stop apart. Possibly a bit less. But the key here is that the results from both are quite usable at 6400 ISO if you know how to handle noise. So I’m really impressed that the D7000 can play in this league at all.

Now, to show what I mean about the 6400 ISO images being usable, here are the two of them processed for the web. I could probably make a decent 8x10 from them if pushed.

D7000

D700

Both look as good as a lot of Facebook snapshots I see at base ISO … these cameras have the chops for sure. And remember … this was some of the worst light in which you might consider shooting without flash.

Lexar … a company with *superb* customer service …

I like to bitch and moan when companies disappoint me in some significant way. Several have responded and restored my faith (e.g. CIBC) while others continue to disappoint me (Rogers, profoundly.)

So I think it important that I plug Lexar’s customer service, which went above and beyond the call of duty recently in replacing a defective dual slot card reader. To begin at the beginning, my eldest worked at Henrys Photo for about a year as one of their technicians and part time sales people. He actually did pretty well at it and I was always very interested in what he was selling. Pretty fascinating job.

For Christmas 2009, he purchased a Lexar Dual Slot Card Reader as a gift for me. This reader is reputed to be one of the faster ones out there. It turns out that this is quite true. You can read about it on Rob Galbraith’s superb flash memory testing page here.

Back to my story … I plugged the Lexar in on Christmas day and found that it would read SD cards with no problems (and very fast) but would not recognize CF cards at all. Since I was running Vista, I went and plugged it into my work laptop, which at that time was running XP. No dice on either. To shorten a painful story, I tried everything I could think of and burned a not small number of hours on the Internet trying to find answers.

I asked Nick to see about swapping it at Henrys for one that was not broken and they gave him some lame excuse about packaging being crushed, which it was. So it sat in his locker for months. I eventually told him to bring it back to me and it sat on my desk for many more months. When I got Windows 7 finally, I plugged it in again for SD reading and CF still did not work.

At some point 4 or 5 months ago, I figured I’d take a shot at Lexar support. They asked me for some data like the original purchase date, which we did not have, and I let it lie for more months. But I recently decided that I would fill out the email with my best guesses and send it in.

Well, they sent me a few more emails and then sent an RMA with labels for free shipping via UPS. I was flabbergasted (who says that any more?)

But that wasn’t the end … I was absolutely floored when, a few weeks later, UPS left a small box at my door containing a brand new Lexar reader with a new cable, which I had not sent in.

Wow … and this one works (does it ever!)

These numbers are from CrystalDiskMark (how many of you read CrystalDiskMeth or CrystalMethMark ;-) which is a different program from that used by Rob Galbraith in his tables. I bought the program he recommends and it ran the tests just fine, but this presentation is nicer for the blog. These numbers are a bit higher, but still in the ballpark so close enough for our purposes.

So the only flaw with the new reader is that it is not the newer USB 3 version, which would have at least doubled the speed I got with my new Sandisk Extreme Pro UHS-1 SD card. Oh well, that would have been a miracle …

Some observations on the cards you buy:

  • If you are shooting RAW, newer cameras like the D7000 will perform better with newer cards like the Sandisk Extreme Pro cards …. they meet the new UHS-1 standard and are wicked fast.
  • If you want super speeds from your reader to your PC along with the ability to read the UHS-1 cards at their highest speeds, then get yourself one of the new USB 3 card readers. Pretec and Lexar both make them and Rob has added them very recently to his tables. These are fast
  • Bigger cards read and write faster than smaller cards at the same speed class
  • Some cards barely meet the minimum specs and some beat them easily … thus, a better quality class 6 card can beat a low quality class 10 card now and again … read Rob’s table to be sure
  • Those readers in your printer or the cheap ones from WalMart etc are slow by comparison … the last line in my table above shows you that, but Rob’s table brings that out crystal clear

So buy your cards at 8GB or bigger (I will be trying to buy only 16GB or 32GB from now on) and shop around.

I paid about $91 including shipping for my 16GB Extreme Pro card from B&H Photo in the US. They are the only company I have seen to offer very inexpensive Purolator ground shipping to Canada … 8 bucks. And it takes less than a week. So don’t spend more than you have to on these cards. You could do a lot worse than B&H Photo.

One last thing … this very cool dual slot reader can run both cards at once …

image