Tuesday, September 30, 2014

Panasonic and Android users are both more attractive and more loyal …

You don’t have to believe me … you can believe this very well written and researched article.

http://blog.okcupid.com/index.php/dont-be-ugly-by-accident/

Here is the salient graph … I think you will agree that my staggeringly handsome face has to do with rubbing up against my GM1, GX1, G6 and GF3 quite frequently …

image

Note also that Android users apparently have fewer sexual partners than Blackberry users, which have fewer partners than iPhone users.

I submit that we are simply more loyal … Winking smile

Thursday, September 25, 2014

Fuji S1 versus HS50EXR – Review Part 27 – Low light video test versus Panasonic G6 and GM1 by the light of two candles …

Once again I shoot a video by the light of two candles … I think this embarrassingly bad Haiku sums things up nicely.

Two candles burning brightly
Big sensors, long strides
Small sensors stumbling blindly

Anyway, I set the four cameras up side by side on a tripod:

I set this tripod about 6 feet from the test subject, a maple chair with the candles lighting the setup I used for the ISO ladders. The video is pretty much self-explanatory as I show you the video and audio of each camera in turn, with a few adjustments along the way. Near the end, I turn on the studio lamp that was used for the good light test.

All in all, the Fujis do pretty poorly. This is expected for their small sensors as this is simply not a strength. I just wanted to see if the decent low light performance in the ISO ladders might translate to improved low light video. The answer is a ringing no!

Wednesday, September 24, 2014

Fuji S1 – Review Part 26 – Firmware Bug for Raw Images Shot with Shutter Speed Greater Than 10 Seconds – **** UPDATED!

User SnowPlow on the DPReview Fuji Talk Forum has found a firmware bug, and has isolated it to 10 seconds of shutter speed. This destroys a raw image, spiking the blue channel something wicked.

*** UPDATE: I was confused by the thread Snowplow created in which I thought a user posted that he sent his in and the firmware update they applied did not work. So I proceeded with the test and article below. He just posted that the firmware fix was never implied, so he did it and it did in fact work. So I am charging the battery overnight (always apply firmware with a full battery!!!) and will update the article with the confirmation that the fix works tomorrow.

And it worked!


Test with Firmware 1.01

Updating the firmware to 1.01 is trivial:

  • Download the new firmware
  • Format an SD card in the camera
  • Put the SD card in your card reader and copy the new firmware to the top level (I.e. just drag it onto the drive letter in explorer)
  • Put the card back into the camera
  • Make certain that the camera has a full battery, or is on AC power
  • Turn camera on while hold the disp/back button down
  • Follow the menus
  • Turn off the camera and turn it on normally

After that, 10s exposures work perfectly. As in:


Original Test with Firmware 1.00

I decided to put this in a permanent record in my tests, and to isolated the shutter speeds from 6.5s to 10s to see if there is any hint below 10s. There is not. And what one notices is that the dark frame subtraction appears to start at 10s, which is indicated by the image not coming up immediately, but rather showing a “processing: screen for about the same time as the shutter speed and then showing the image.

So it is clearly a bug. (At the time I wrote this, I was unaware that it was already fixed.)

I also isolated it to the raw in a jpeg + raw pair. The jpegs are fine. Go figure. This means that the Fuji is perfectly capable of rendering the jpeg from the raw, and then it destroys the raw. Love that firmware team :-)

The histograms for the jpeg and raw are:

image   image

Hmmm … I think that is clearly a screw up. But do note that the spike is also there in the jpeg. This comes from the presence of candles in the image. They throw heat, and Fuji sensors react by turning images magenta / purple. I proved that video is less sensitive in the S1 than in the HS50EXR, but it is not insensitive.

And it gets worse. If you look at the jpeg, you will not only see the rampant heat signature all over the candles, you will see also several flares in the image in that color. These might be lens flares or they might be hot spots on the sensor, but either way I am not that thrilled to see them. Remember that I shot the Centennial Flame and saw little of this behavior there. Perhaps the sensor was warmed up by the video test I ran just before shooting these. Who can say …

Note that this image was shot at 100 ISO and 10s shutter. It is a perfect exposure, showing 0ev on the meter in manual mode.

And the raw of course is utterly trashed.

Note that I coined the term sledge hammer noise reduction to describe the noise reduction we see in earlier F series EXR models. These cameras really smeared details, even at low ISO. And especially in HR mode. Things got better with the newer cameras, but then this appears in the noise reduction for long exposures. I think we need something bigger than a sledge hammer for this … perhaps wrecking ball.

Here is a matrix of a series of perfect exposures at 100 ISO and over exposures at 1600 ISO. The 10s issue appears in both. The shutter speeds are 6.5s, 8s and 10s. The issue definitely starts at 10s, when the wrecking ball hits.

Note also the stripe of devastation along the top in both 10s exposures in the raw image. What’s up with that?

Tuesday, September 23, 2014

Magic of Lanterns - my travel kit

I'm on a bus to Montreal to see the Magic of Lanterns display at the Chinese gardens in the Botanical gardens neat the Biodome. 

I decided to take a break from testing the Fuji cameras and instead brought the G6 with 14-140,  the GM1 with 12-32, the EPM2 with 45 1.8 and the GX1 with the Samyang 7.5 fisheye.

This all fits into a fairly small Lowepro case, the EX180.

This case hangs nicely from the shoulder and there is just enough room left over to fit the small Metz 36AF5 TTL flash.

The big benefit here is that I have 24 through 280 covered with 15mm fisheye and 90mm low light without swapping lenses in the field. And it is fairly light.

The Fuji S1 fits into the same location as the G6, but the HS50EXR is a very tight fit and unpleasant to carry in this case. So I'm not entirely sold on the bridge camera concept for travel. I would need larger sensor companions to assignment the smaller sensor. 

Still, the new FZ1000 and LX100 have certainly turned my head, as they could replace this entire kit with very similar image quality... And with space left over.

Fuji S1 versus HS50EXR – Review Part 25 – Purple Heat Syndrome

The Fuji EXR sensors all seem to react to heat sources by displaying an obnoxious bright purple instead of the yellow or red. Every one I’ve tested does it, and you will see that the HS50EXR does it too. The S1, on the other hand, has a new sensor … so what does it do?

See for yourself …

Monday, September 22, 2014

Fuji S1 versus HS50EXR – Review Part 24 – Flare when shooting lights at night …

I covered sun generated flare (both cams were epic fails) in part 23, so now I cover night time flare. Do the lights do what the sun did? I.e. wreak unholy terror on the image? Or is it better behaved?

Truth be told, I shot these images days ago. I was just waiting for the sunlight images to be available, and then I had so much fun playing with those images that they got published first.

Anyway, to the point … we know that the F series zooms – both the 360mm zooms and the 500mm zooms – have a terrible time shooting against bright lights. You get a kaleidoscopic halo that is a real turn off for most people. I am sure that the ensuing kerfuffle (apologies for my insistence on scientific purity of terms) cost Fuji more than a few sales.

I went downtown for some reason the other evening, and decided to bring the cameras and stop at Parliament Hill to shoot the building and the Centennial Flame. Since Wellington Street was right behind me I had the brilliant idea to shoot the flare test right then.

Maverick that I am, I started this test in A priority M size at DR400 (gasp!) so as to shake things up. I think the camera shot a rather nice image here.

I had the camera set to f/5.6 for no particular reason, but it was a happy accident since the lights were all star shaped … but if you look about an inch from the top and about 1 and then 2 inches from the right edge, you will see what I think is a mild pair of flares.

I then quickly shot an L sized image at DR100 before anyone noticed the switcheroo.

The flare is there again, so I think we can confirm its presence.

I did not stop the S1 down, sadly, so no pretty stars. But the lights look quite nice and I can spot no flare in the sky, or anywhere else.

Much later, I shot one with the GM1 from much closer to the flame … at these sizes and this ISO, you can’t really see any difference.


Moving on … I shot the street to see whether much larger and stronger lights would flare it up, so to speak. I color corrected pretty harshly and that has caused some blue to creep in, bur that might make flare easier to spot.

I only shot the HS50 in L size because there seems to be no difference in flare performance (as one would expect.)

HS50EXR f/2.8

Not bad. Some glare around the close light top left, and some flare from that light heading out of frame. The windmill shaped stars on the lights on the right are again kind of funky, but not really ugly. I think there is a hint of flare at the bottom of the middle of the left most post in the bottom right corner, but it is subtle enough to get away with.

HS50EXR f/8

Nothing subtle about that. The flare at the bottom of the post is confirmed, but overwhelmed by the light show around all the stars. Huge stars … and not that pretty top left. That cluster of lights looks like a real kaleidoscope. Not quite F-series worthy, but in some ways worse. And those dust reflections … wow. I just notices flare in the bottom left corner too. Wow … quite the show.

S1 f/2.8

Hmmm … what to say. A reasonable level of surrounding glare/flare … but some kind of weird half circles of stronger glare. Some big translucent dots in the sky and a very strong flare right beside the light top left. Basically, yuck.

S1 f/8

Stopping it down did not improve things. More flare spots everywhere in the sky and they are harsher. The stars are nice, though … much nicer than the HS50EXR can achieve. I was hoping for that sort of performance. The glare around the larger clusters is too much, though.

Two cameras and two fails. Flare remains Fuji’s enemy.

Fuji S1 versus HS50EXR – Review Part 23 – Flare and Dynamic Range when Shooting into the Sun

Now, I must say that I Sol-sourced this test.

Ba da bing!

Ok, that was funnier in my head. Meanwhile, some of you have asked for a test of the flare these two produce and of dynamic range. This will serve both purposes, although again I am not trying to get perfect images. I am getting more and more time limited and have to make do with what time I can spare for more tests.

So my extremely formal method was this:

  • Grab each cam and load and format an SD card.
  • Run outside with both around my neck.
  • Shoot A-prio at 0EV at 100 ISO at f/2.8 for the main scene, then shoot again at f/8
  • Switch cams, and repeat
  • Shoot a few more scenes at f/8, switching cams, rinsing, and repeating
  • Run inside
  • Have dinner (not kidding)
  • Run down to man cave
  • Dump cards and process
  • Write article for blog, maximizing hilarity if possible

Ah, the scientific method in action is such a thing of beauty …

HS50EXR  100 ISO  f/2.8  1/750

There is obviously no rocket science involved, so let’s just look at the first pair of images from the HS50EXR. The JPEG is fairly indicative of what the average photographer will get without any intervention.

The raw image tells us that the HS50EXR has rather a lot of dynamic range. I think the flare below the sun and all over the car on the right pretty much says that there are a lot of internal reflections. Pretty brutal, but flare is expected with the sun in frame. We do like it though, if the flare is pretty :-)

S1 100 ISO  f/2.8  1/220

Note the much longer exposure … 1.5 stops! What a tragic metering difference between these cams. Something we have come to expect is every Fuji cam having a different metering behavior. The firmware team needs a spanking … behind the barn … with a club. Ok, too far …

Cough … what sky?

One supposes that the massive difference in exposure negates the value of the dynamic range test. Bummer. I’ll have to repeat the test with manual exposures so the crappy meters don’t fight over who sucks more.

Well, the sun has a nice star pattern on it. Not bad for f/2.8. Kind of unusual in fact. There is flare that is only slightly more palatable than that from the HS50EXR, and it is in the same places. The tree below the sun and the car on the right.

Now to f/8 …

HS50EXR  100 ISO  f/8  1/90

The flare is more obvious and harsher. And what is with those dots near the sun? Dust on the sensor? In the lens?

The star pattern from the 6 bladed aperture is typical Fuji. It’s ok looking, but excessive here. I dislike the windmill look, preferring a true star.

S1  100 ISO  f/8 1/40

One fourtieth? Really?

Not very pretty flare around the sun … but the star shape is there, sort of.


There are several other views, showing more of the same. You can look at them all here:

http://letkeman.net/Gallery/miscimages/Fuji-S1-and-HS50EXR-Review-Images/DSCF9560_FinePix-HS50EXR_4_4-mm_ISO-100_1-750-sec-at-f-2_8-2

Meanwhile, I will leave you with the grandaddy of all the composites … here are all the images in a semblance of order. Enjoy …

The S1 would have done much better had I corrected its awful exposure errors. But such is life … lots of people will wonder why this camera is blowing so many highlights.

The HS50EXR is your camera if shooting into the sun floats your boat. Of course, I think it might be a better idea to get a large sensor camera with some serious dynamic range …

Sunday, September 21, 2014

Fuji S1 versus HS50EXR – Review Part 22 – ISO Ladder in bad light …

This is a direct follow on from part 21, which was the ISO ladder shot in good light. Of course, the ISO ladder never quite materialized on that one … meaning that I ended up posting a massive number of large crops and a large subset of full sized jpegs on my gallery and linking to that area. So while I am at it, here is the link to the start of the bad light images, which is actually a classic ISO ladder image:

http://letkeman.net/Gallery/miscimages/Fuji-S1-and-HS50EXR-Review-Images/raw_crops_badlight_ladder

The scene is exactly as shown in part 21, but with a much smaller (and rather worn out) warm compact fluorescent bulb. Thus, the light really falls off, and the challenge for the cameras is difficult. See part 21 for an explanation of the methodology, because all I did for the bad light scenario was to change the bulb and then repeat exactly the same process :-)

Again, with apologies for the 25600 ISO brain fart, here is how the setup looked for the bad lighting …


I won’t spend a lot of time on the jpegs this time … frankly, with sensors this small in really bad light, you will get horrid results.

Here are four full-sized jpegs at 3200 ISO.

HS50EXR L Size DR100

The first is L size and it stinks. Terrible issues of smearing and a serious amount of color shift with massive chroma blotching noise. You want to avoid L size when you don’t have a lot of light.

HS50EXR M Size DR400

Next we have the HS50 in M size DR400. And this is the best mode of the HS50EXR as it has always been. But even this mode has really poor saturation in the area of lowest light on the left.

HS50EXR L Size DR100

Next we have EXR SN mode, a mode that is touted to be the best mode for low light owing to its ability to bin pixels. Well, surprisingly, it really does not improve jpeg saturation on the left side at all. But it does smear more of the detail in the beard of the king on the bill on the right side. In fact, looking at the insignia next to his head on the right side and it is very soft and smeared in the EXR SN image while it is quite legible and sharp on the M DR400 image. A very surprising result.

S1

And then we have the S1, which one might expect to suffer even more than the HS50EXR L sized image. After all, it is a smaller sensor. But, the easy victory of the good light scenario plays out again. The image is far from perfect and does have some saturation issue, but no more than the others. What it does do well is detail. Lots of detail and very large, which means we can downsize it to match the excellent M size DR400 image and improve it by quite a bit more. So this is kind of like opening a can of whoopass on the HS50EXR … again.

GM1

And for completeness, I include the GM1 3200 ISO image. The saturation and contrast were left very high, as was sharpening -- it is how I shoot normally to help judge sharpness in camera since I never use the jpegs, and I simply forgot to set the jpegs up in a way that would be more conducive to a good comparison. The excessive saturation cranks up the chroma noise (yellow blotching) quite a bit, but otherwise you still get a good sense of the cleanliness of the saturation and the amount of detail that was retained.

So my conclusion is that the S1 easily beats the HS50EXR in very low light in JPEG.


But I prefer to shoot tiny sensors in raw, so let’s start the real comparison. As was the case with the previous comparison, the crops are used to normalize the same area of the image so that we have a fair comparison. Since I have already provided the link to which you can go and peruse the gallery images, let’s just cut to the chase again and drop in the mega image … a true ISO ladder containing every relevant image that I have.

That image is an absolute monster … and what it will show you is that the S1 is again the champion. So the hierarchy of cameras in this “bad light” comparison goes like this (and it applies to both raw and jpeg):

  1. GM1 (duh)
  2. S1
  3. HS50EXR M DR400 (my recommended settings since 2009 and as valid today as ever)
  4. EXR SN
  5. L size

Friday, September 19, 2014

Fuji S1 versus HS50EXR – Review Part 21 – ISO Ladder in good light

This is becoming something of a tradition in my reviews. At some point I shoot an ISO ladder in good light and then again in crappy light and see how each camera performs. Note that this post was originally intended to be the bad light ladder, that one is coming. This is the good light ladder.

How I Shot this Test

P1000026_DMC-GM1_17 mm_ISO 25600_1-16000 sec at f - 4.0

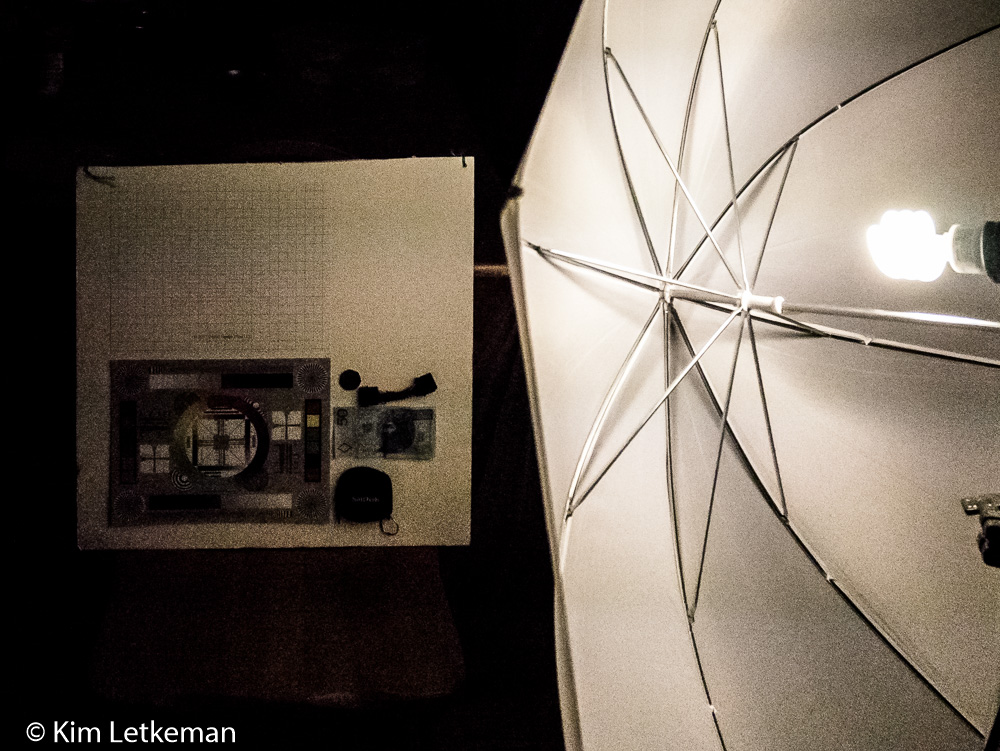
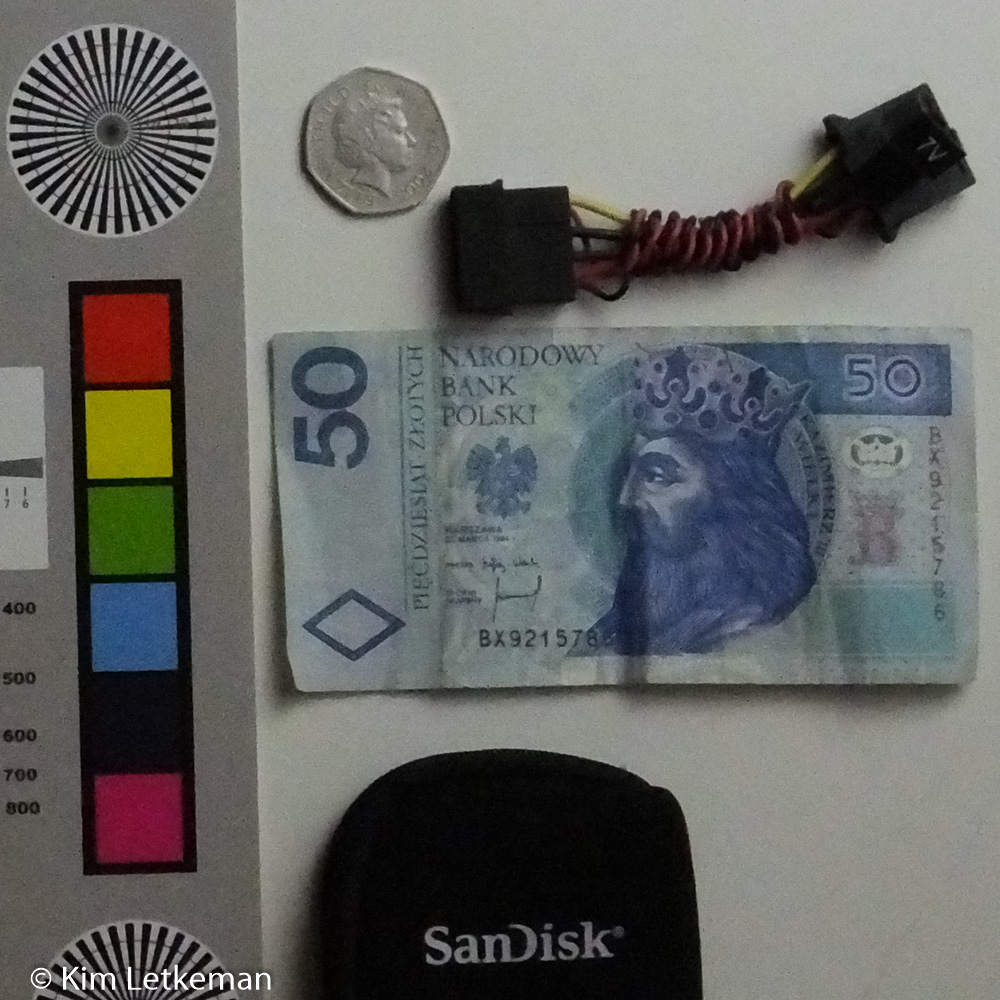
Forgive the rather awful quality of that image … I still had the GM1 set at 25600 …. sigh.

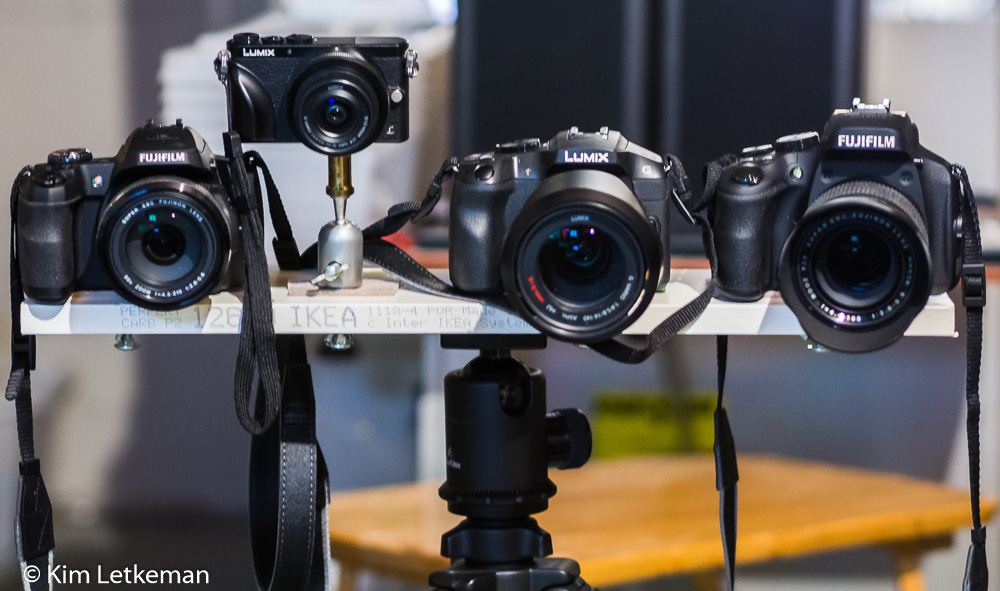
My best tripod at its lowest height with me sitting behind it in a chair. This eliminates any chance of the angle of view changing etc. White balance set in camera. Shoot through umbrella close to the right side … you can see the light falloff in the full sized jpegs that I link. A fairly powerful studio compact fluorescent (CF) daylight balanced bulb shot through a translucent umbrella. Two second timer release for every shot.

Metering was the camera’s choice as I used A prio across the board. You will note that the HS50EXR underexposed in all modes while the S1 did not. This too affects the performance of these cameras. Any good photographer compensates for the learned behaviour of the body he or she is shooting, but if you shoot blindly then you will be disappointed by the HS50EXR.

JPEGs untouched. Raws all processed to almost identical settings (white balance reset for each camera on the actual subject.) Noise reduction added starting at 800 for the HS50 (all modes) and 1600 for the S1 (800 is clean, wow.) Noise reduction slightly increased along with sharpening to compensate at 1600 and 3200. GM1 was added as a control subject, although I left the jpeg engine set harshly so the jpegs are comparable only for noise, unless of course you like your contrast curves harsh :-)

And finally, all of these are cropped to the same angle of view in Lightroom and then rendered to 1000px, normalizing them as equivalent to a crop of a large print. I.e. they are not all that far from being pixel for pixel at the large size.
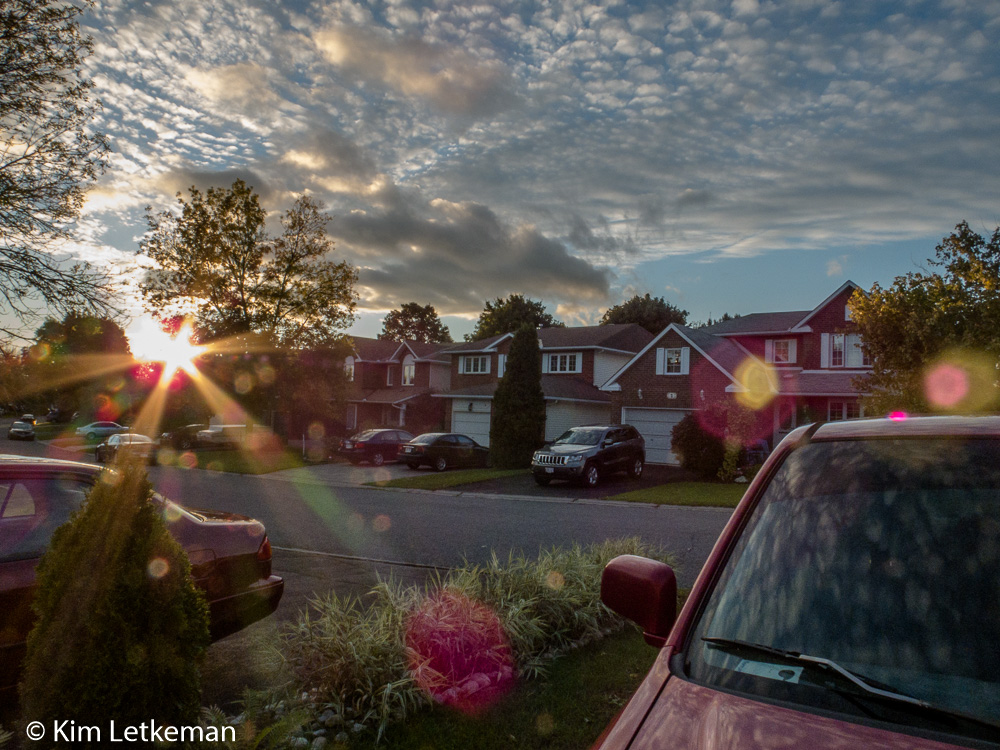
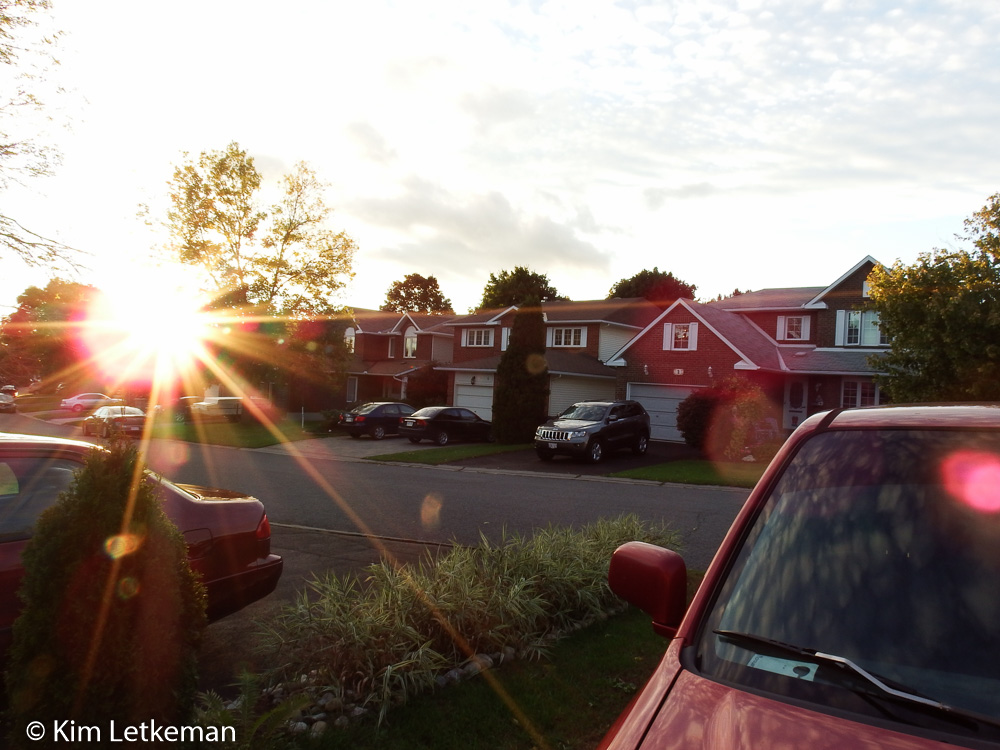
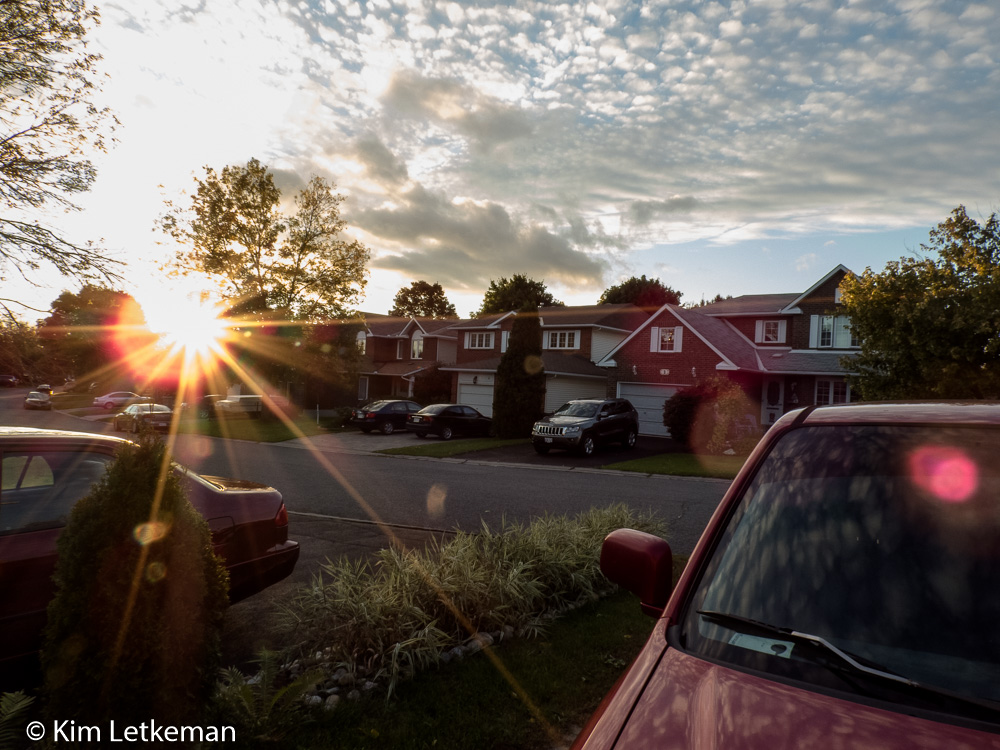

The Scene

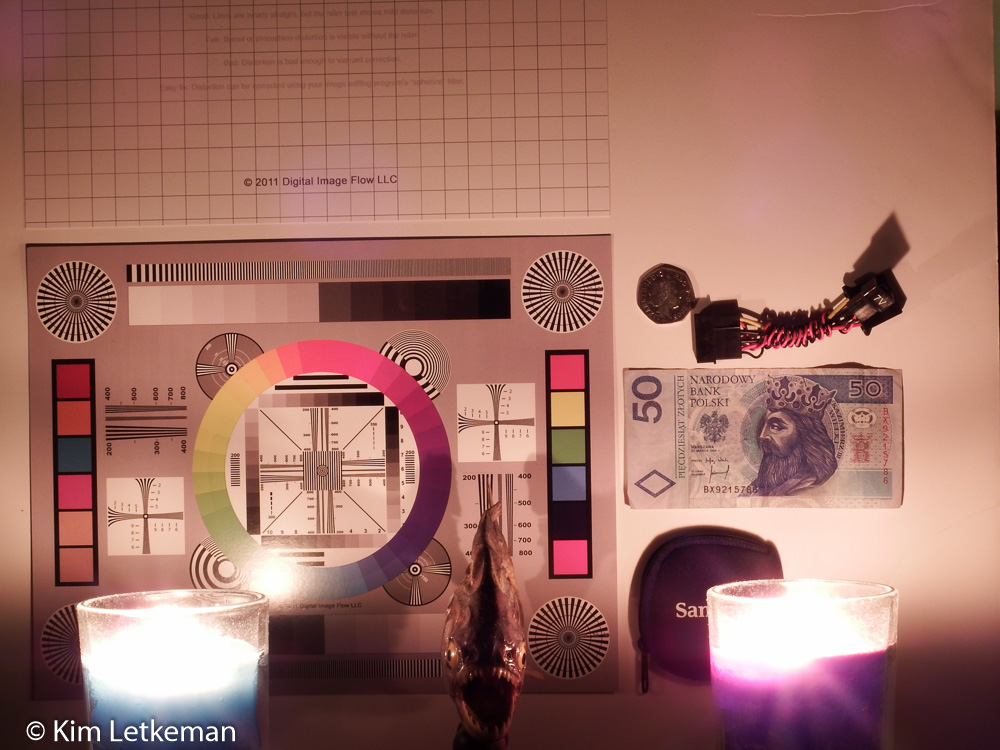
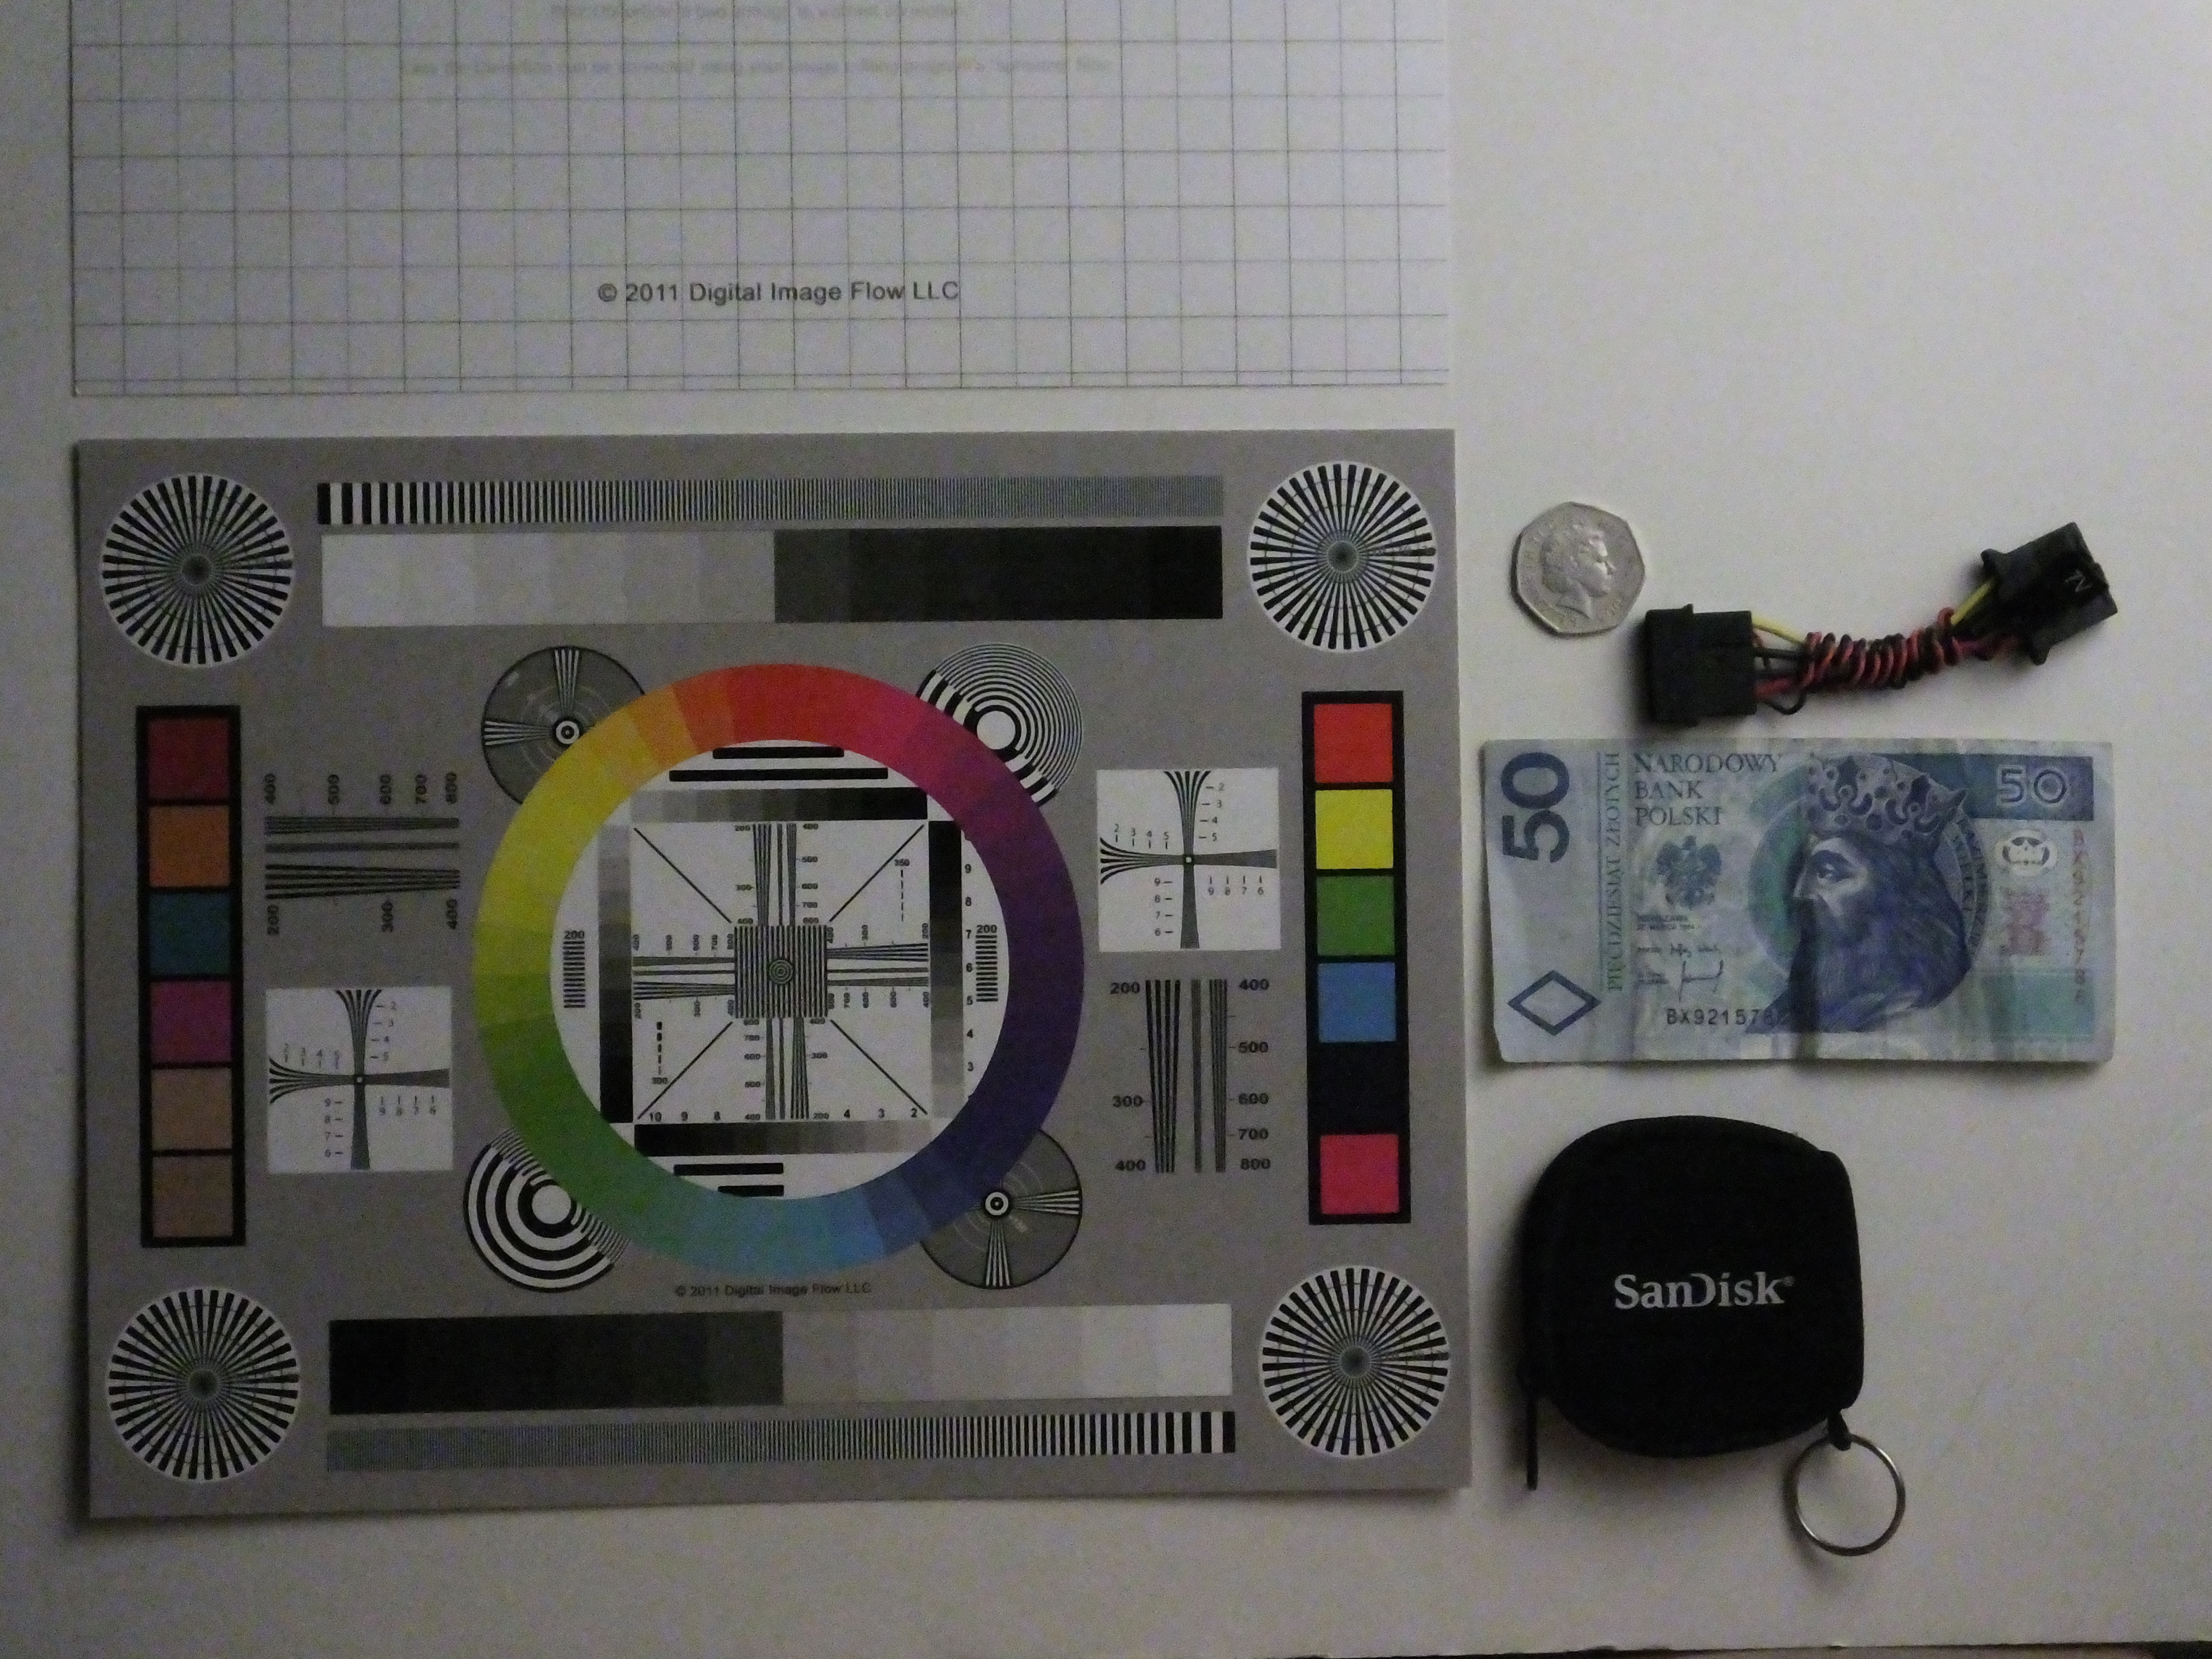
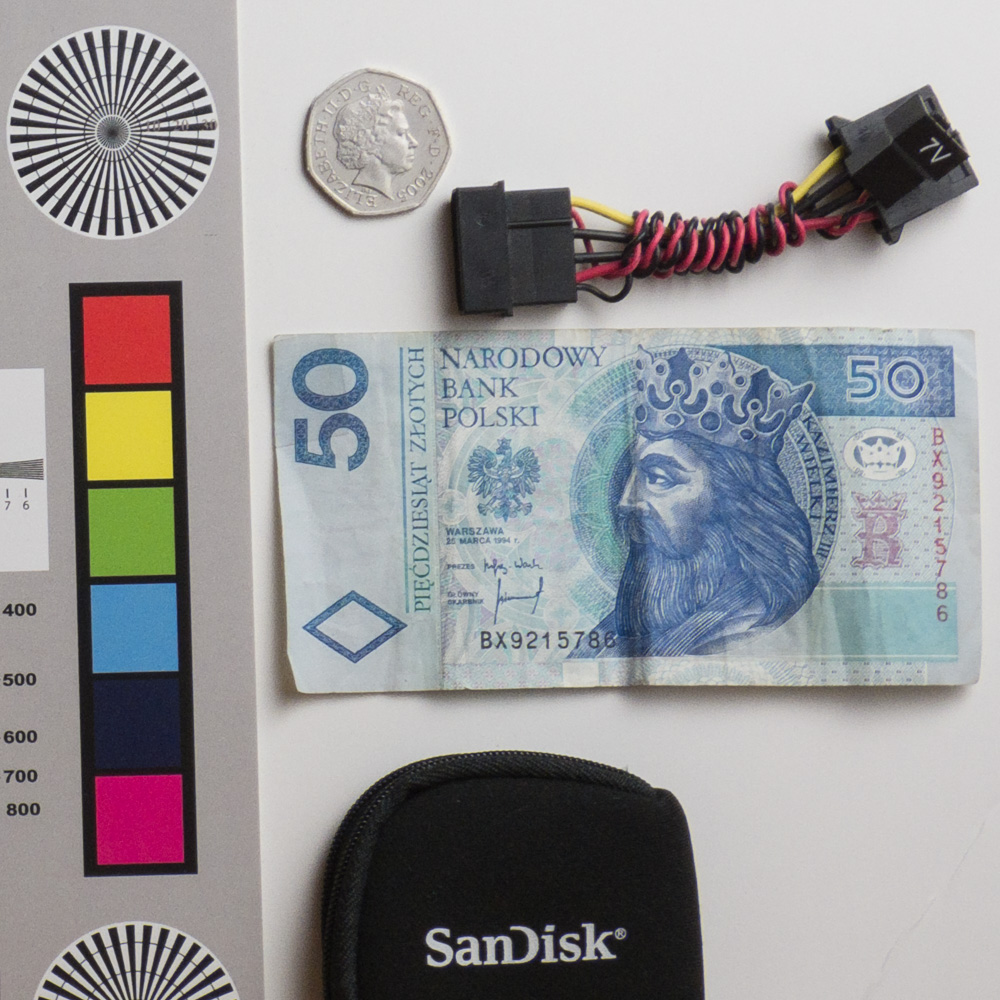
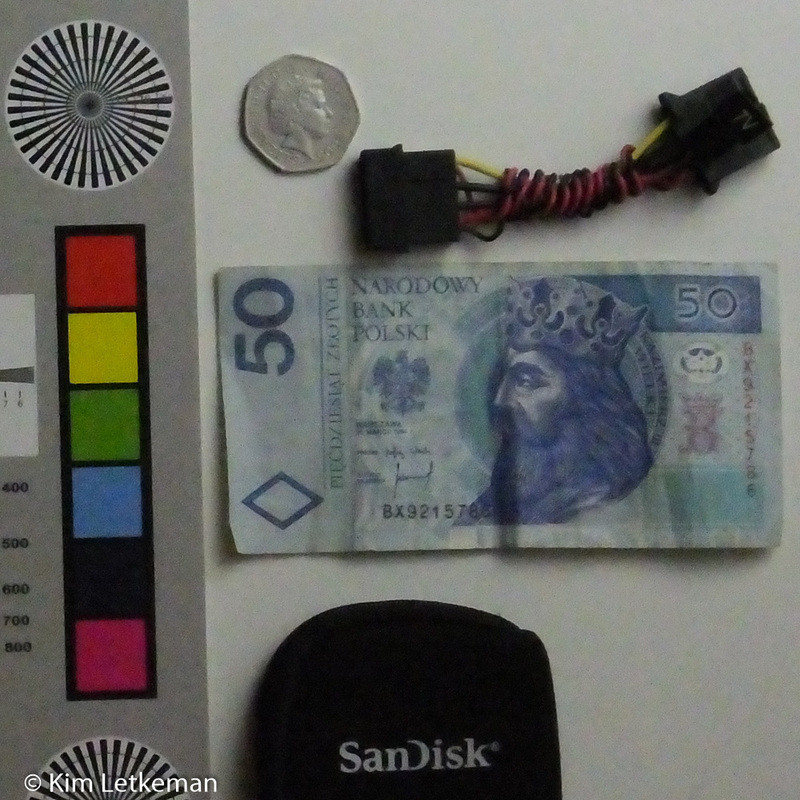
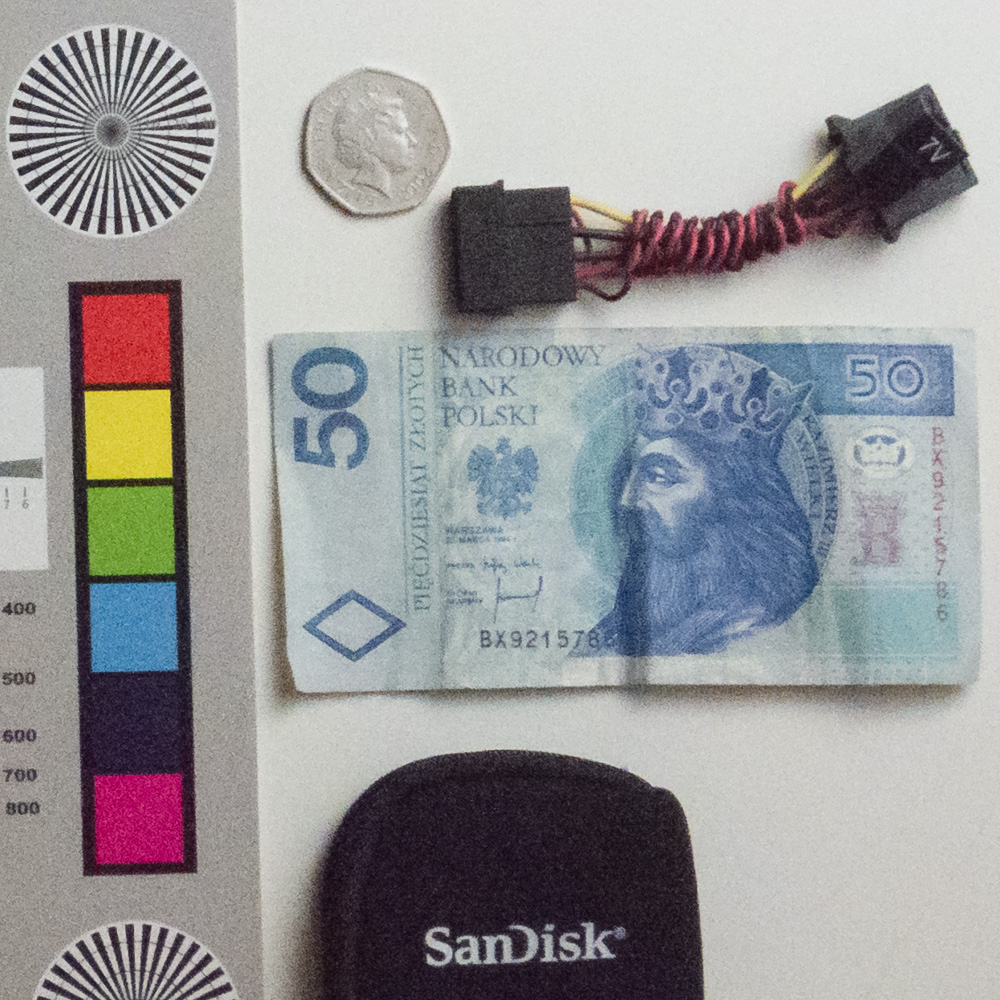
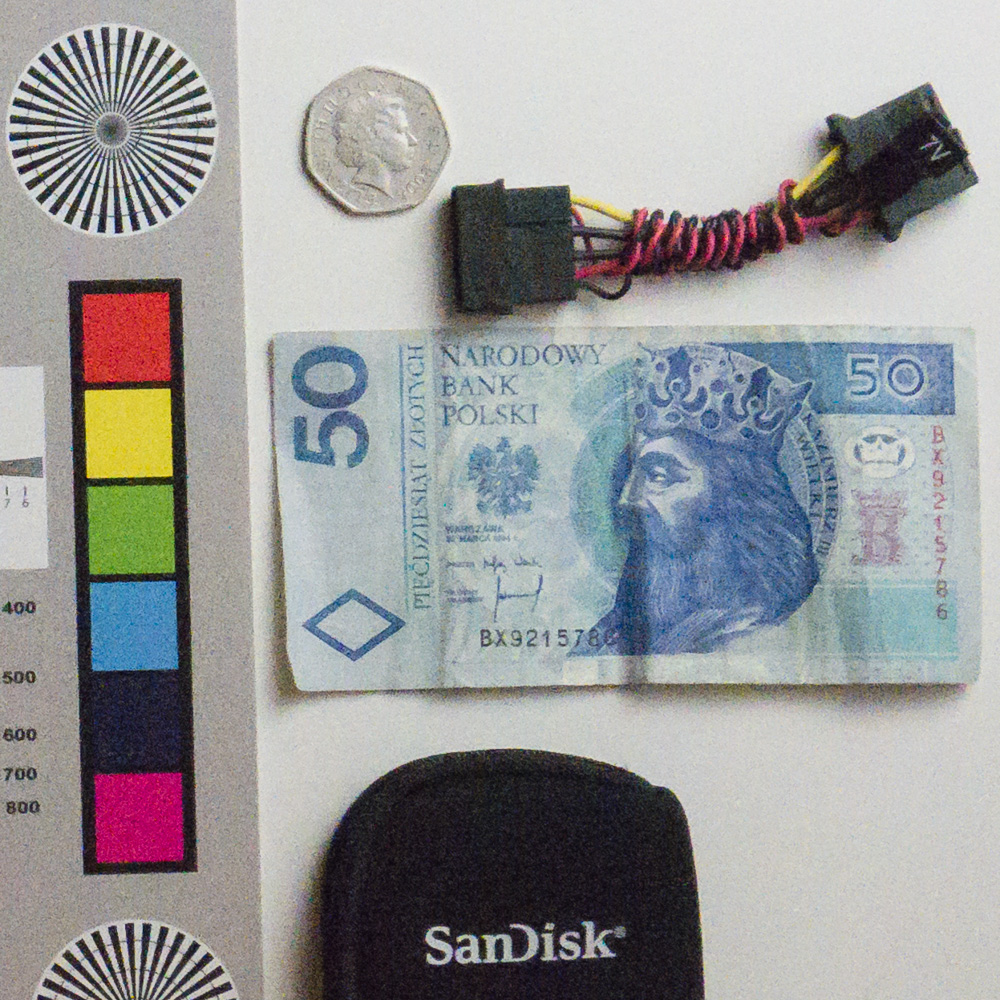
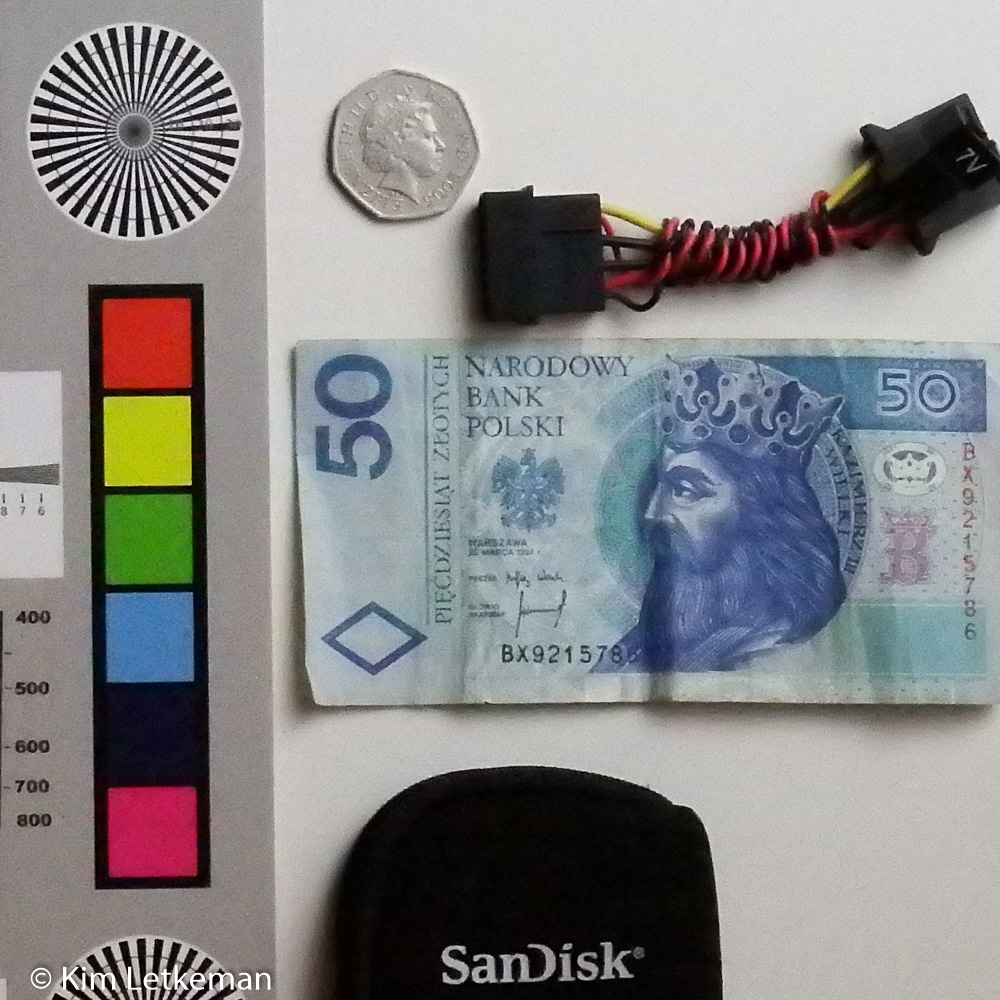
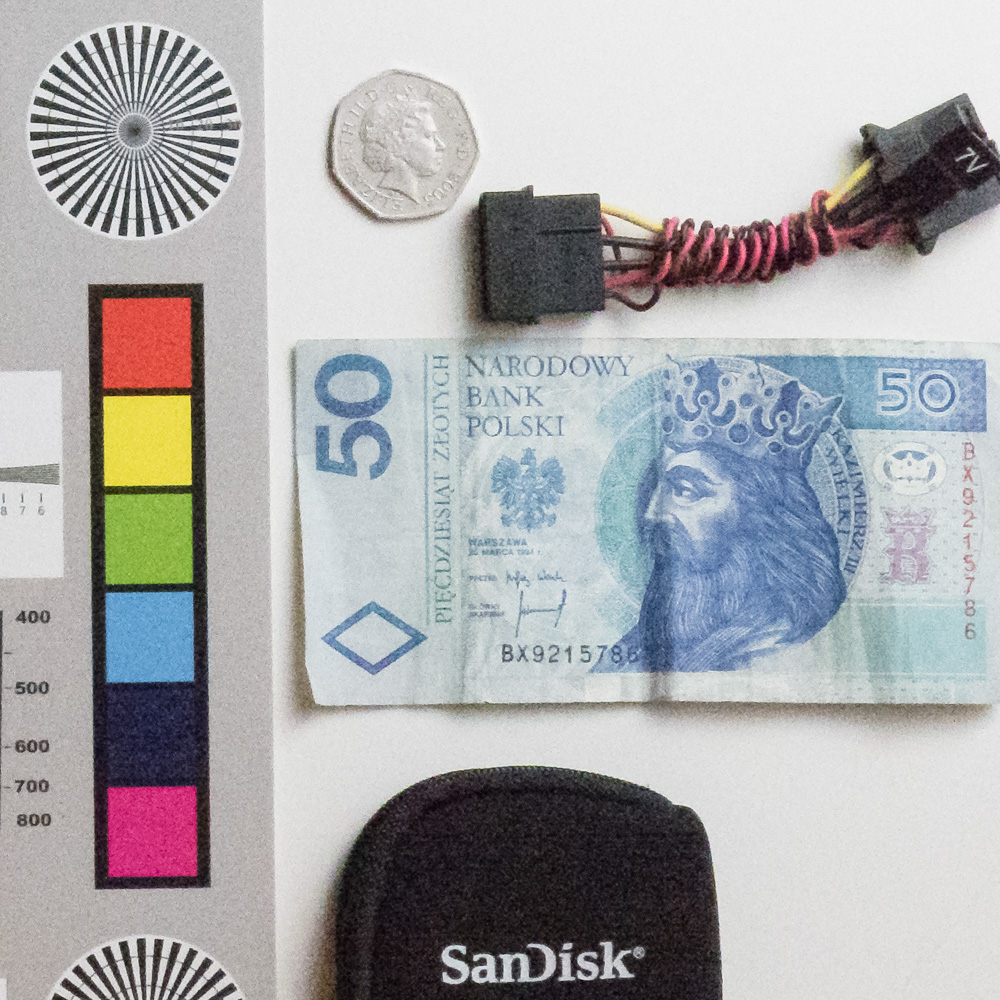
Here is the full scene at 100 ISO L size from the HS50EXR. This is a full-sized jpeg so you can of course click on it to open the whole thing in a new window, as you can with every referenced image. Note that the light falloff is very visible, which allows you to evaluate the level of saturation in the strong light on the right and the weaker light on the left. I crop from the right side to include the bill, a bit of the black SD card purse, and the coin and adapter to help judge edge detail as it pertains to 3 dimensionality …

All of the images shown in this article are available on my gallery starting here:

http://letkeman.net/Gallery/miscimages/Fuji-S1-and-HS50EXR-Review-Images/DSCF9521_FinePix-HS50EXR_20_1-mm_ISO-100_1-15-sec-at-f-4_5

That is the beginning of a long string of images in good light. I have added tags in the gallery for those images whose title does not quite illustrate what you are looking at. You can display the EXIF, and the order of the groups is: L size DR100, M size DR400, SN mode, S1, GM1. I have included full-sized jpegs at 100, 800 and 3200 ISO. Within each group, you will generally see the raw crop, the jpeg crop and for 100, 800, and 3200 iso you will see the full sized image next.

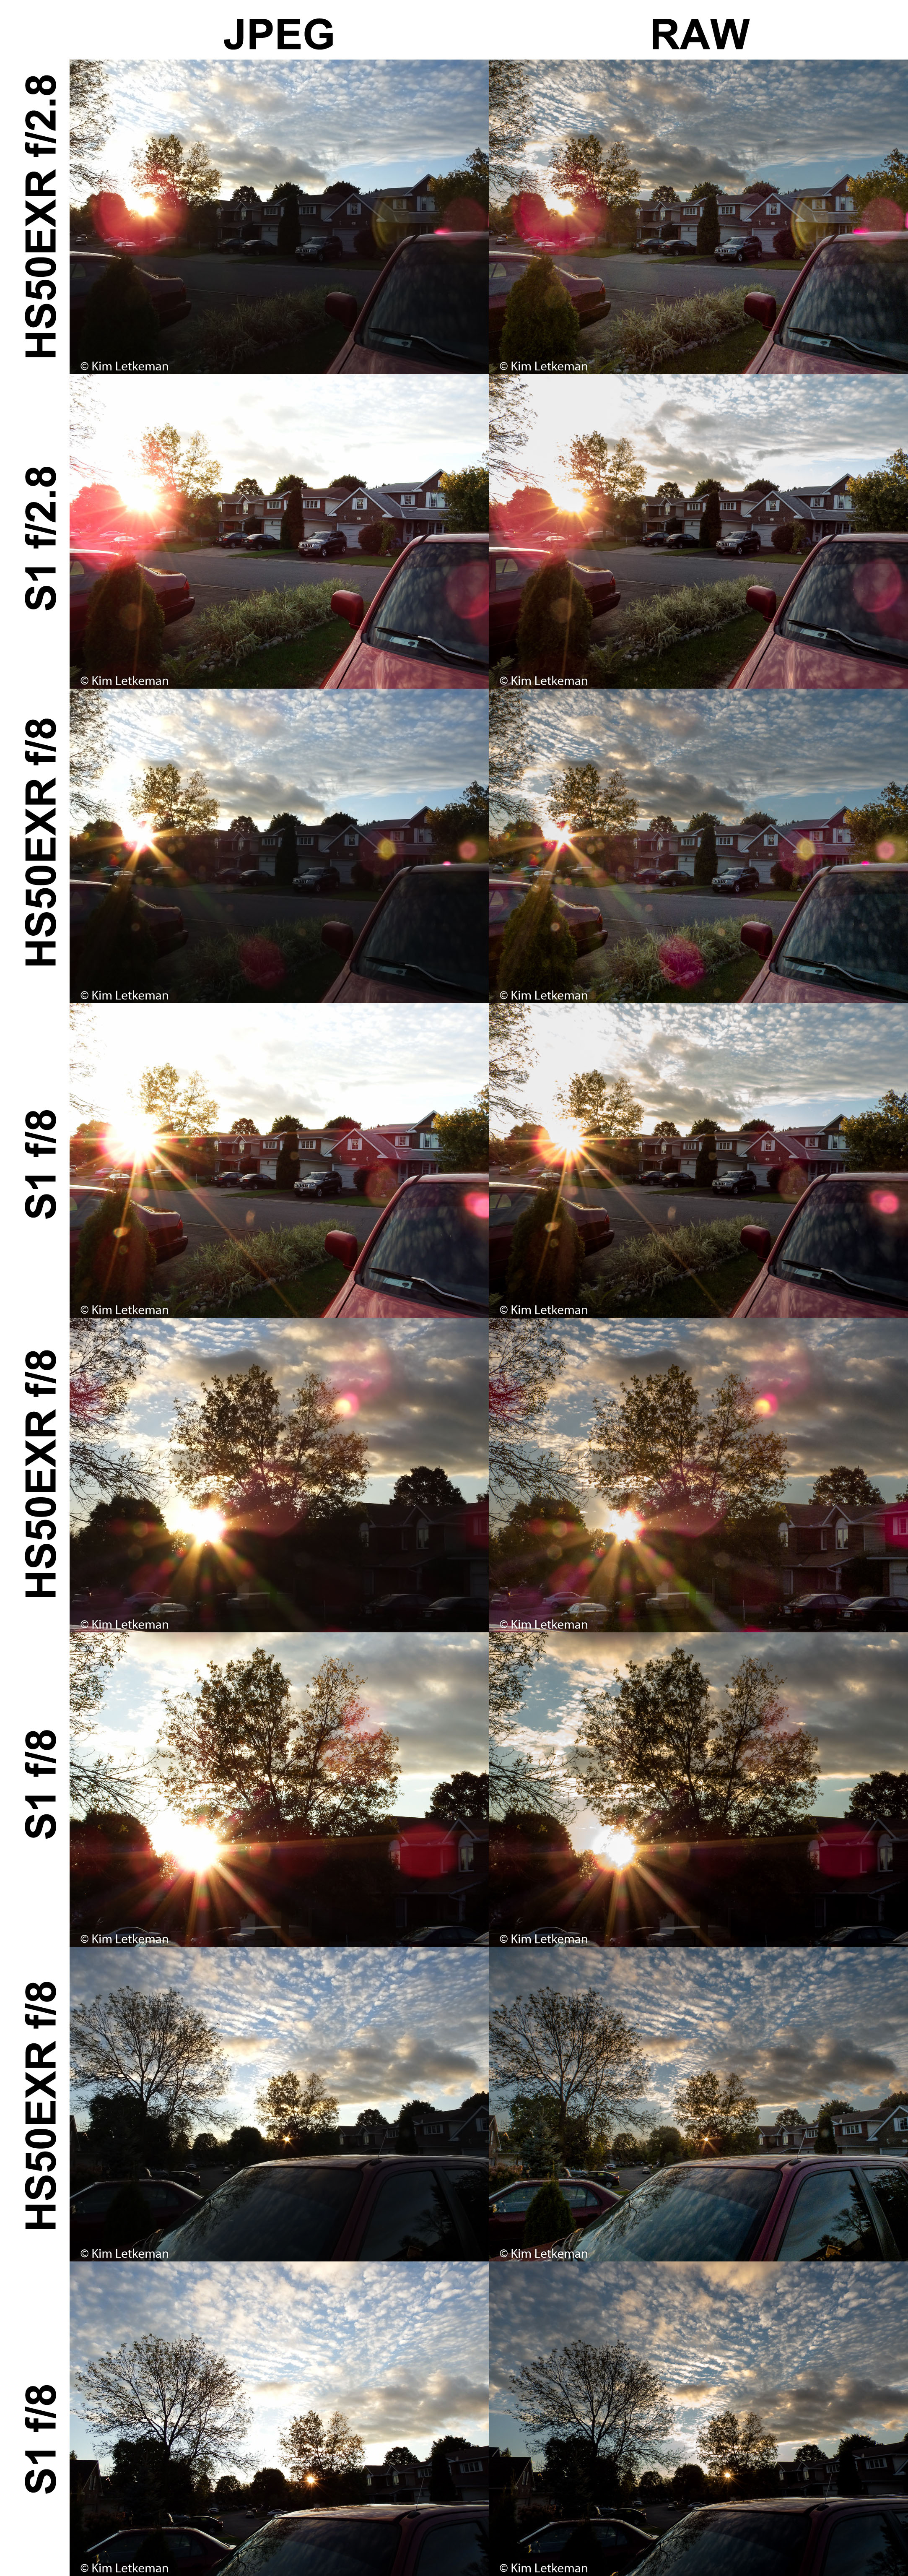
HS50EXR L Size DR100 – 100 ISO

I’m not a big fan of shooting jpeg on tiny sensors because it leaves so much on the table. The noise reduction alone is crushing as you get into lower light. But let’s start with 100 ISO to get our feet we. I think you will agree that this jpeg looks pretty decent, although I have it slightly underexposed.
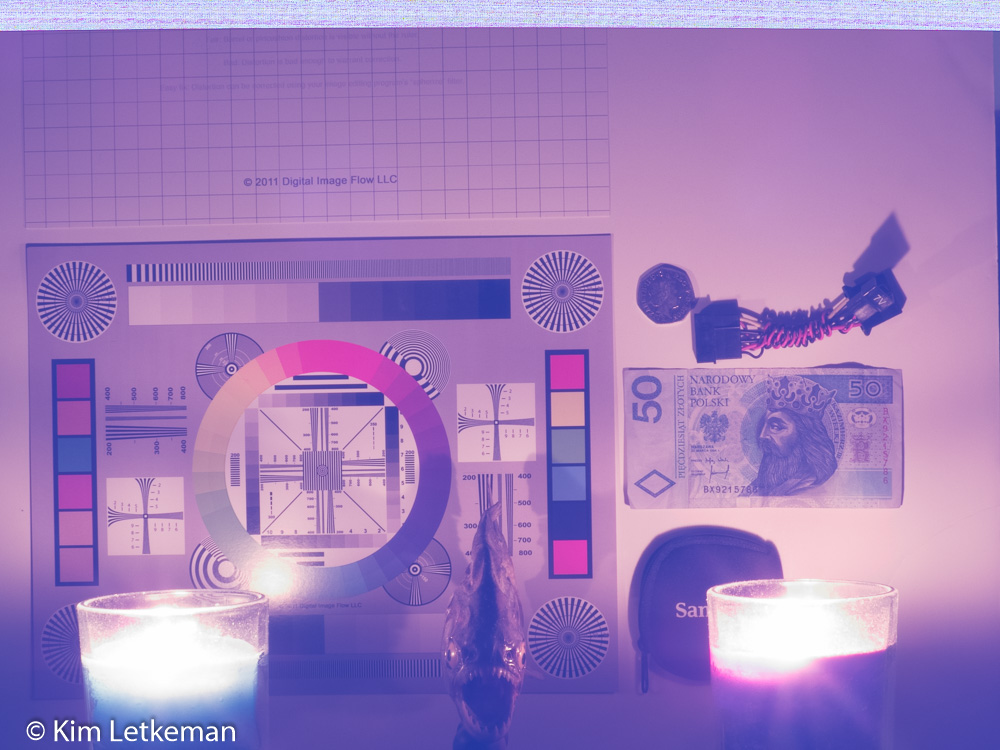
Here is the raw

HS50EXR M Size DR400 – 100 ISO

The jpeg has been upsized to match the physical size of the L sized jpeg, which itself was slightly downsized for normalization. This is a very fair test, as it is what you would see if you printed a fairly large image from any of these modes.

The raw look quite good of course, as did the L sized image.

I think you’ll agree that the level of detail shown is shockingly similar. I have always maintained that M DR400 is the best general mode because of the softer tone curves and I see nothing here to disabuse me of the notion.

HS50EXR EXR SN Mode – 100 ISO

And then there is SN mode. I was able to set EXR SN on the dial and then set ISO through the entire range. So here are those images. I’m not even quite sure what it does at low ISO, but let’s make an assumption that it either gives us half the sensor data or it bins. I suppose we’ll see how it behaves …. starting again with the jpeg.

And the raw …

Looks about the same … but if you look at the raws at full size and click between them (on separate tabs for example) you will find that the grain in the shadows is harsher on the SN mode image. This may very well indicate that SN raws contain only half the data at low ISO (I.e. when the hardware does not think it needs to bin?) The difference is subtle though and could easily go unnoticed. And I proved in an earlier article that SN is brutal in bright light anyway as it blows highlights with abandon. So this probably means nothing.
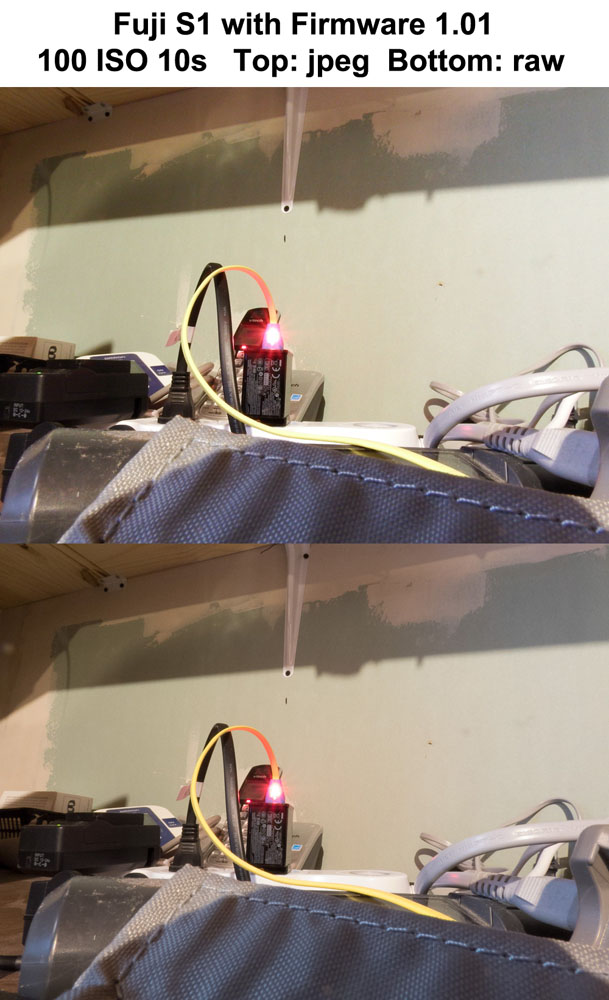
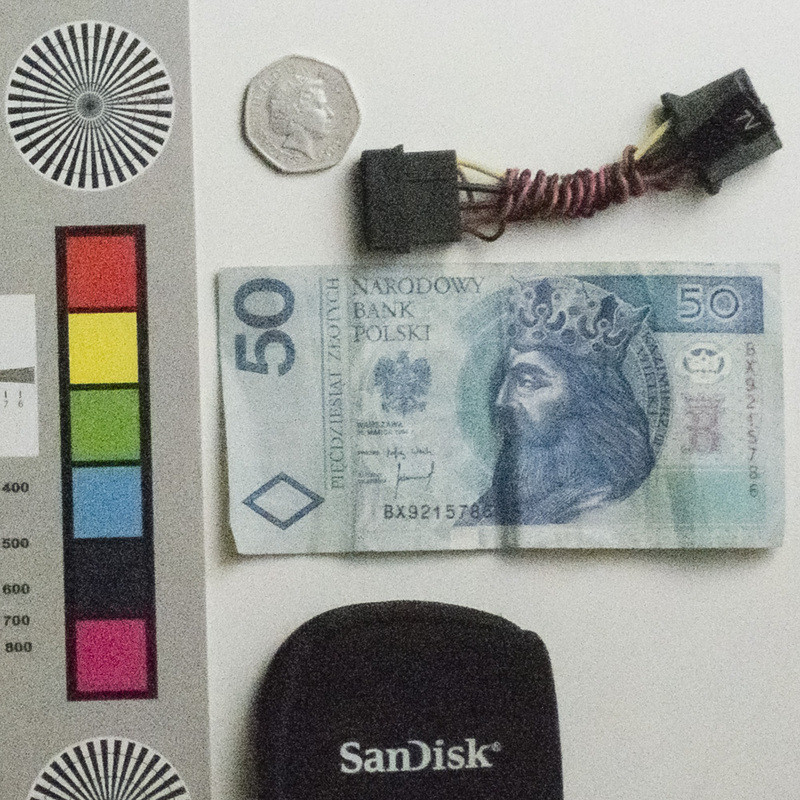
S1 – 100 ISO

Be prepared to be surprised … the 100 ISO image is cleaner and sharper than the HS50EXR. Well, given what I have been writing through this series, maybe that’s not such a surprise …

The jpeg …

I think it is pretty obvious that the S1 will retain its sharpness crown. It just seems more able to consistently render sharp images in good light at low to mid ISO. But how about higher ISO?


All ISOs are represented in the gallery at the link I provided, and to look at each separate ISO in jpeg would take massive space. Go through the gallery in as much depth as you want and compare the various cameras at whatever ISOs you consider important.

Meanwhile, here I cut to the chase. The highest usable ISO would be 3200 for any of these sensors. You will have some compromises, but with careful shooting and processing they actually do a half decent job.

HS50EXR L Size DR100 – 3200 ISO

Well, that’s kind of disgusting. Is there actually any detail in there? Let’s check the raw …

Well, that’s grainy, but the saturation is decent and even with open shadows the grain size if tolerable. Not too bad at all.

For those who still do not believe that jpeg on tiny sensor just does not cut it, here is an animation that makes it painfully clear … I hope:

Moving on, now here’s where the rubber meets the road … the two M sized versions should kill the L sized version above … no?

HS50EXR M Size DR400 – 3200 ISO

The jpeg is in fact not a whole lot better, although the smearing contains less chroma blotching I think.

The raw is again far better:

Note the very clean saturation on the left side, and the fine grain. But, of course, the star of the show is next … EXR SN mode and its binned pixels …

HS50EXR EXR SN Mode – 3200 ISO

Hmmm … there might be a slight improvement in saturation on the left, but let’s look at the raw.

WHOAH … that’s a blotchy mess. When I open the raw files in separate tabs and enlarge them by clicking on them, I can switch between them by clicking the tabs … and what I see is much clumpier grain on the SN image and much harsher details on the coin and everywhere else. The saturation remains a tad stronger than DR400 M size but the price is bad grain and chroma noise. The chroma noise in the shadow under the bill is kind of shocking …

All in all, SN is not cutting it against M size DR400 or even against L size … although L size has some saturation issues and slight color bleeding, it has fine grain and excellent detail. M size beats both easily in this test in my opinion.

But … once you downsize a lot, you can shoot what you want. I just don’t see any reason to recommend either L or SN … although L size is obviously useful if the subject is pixel starved – the moon comes to mind.

But wait … we still have not seen the S1, have we? This little 1/2.3” sensor should be beaten up pretty badly at such high ISO, especially by M DR400 mode.

Yet …

A similar amount of smearing, but extremely clean edges and low grain. Strong tones, but impressive jpeg.

How about raw:

I think we have a winner!

Seriously, the grain is fine, the detail is excellent, the coin looks very clean, the shadows are clean. Wow. This is a great performance for such a tiny sensor. One presumes that this is BSI CMOS showing us what it can do in a traditional Bayer sensor … note that I opened the shadows quite a bit more it seems, yet it still looks better in my opinion.

At the very least, its performance in low light at high ISO is a pleasant surprise.


So remember to go to my gallery and explore all the images … full sized jpegs from 100, 800 and 1600 ISO for both cameras and all modes, plus crops from jpeg and raw for every ISO.

Going back to jpeg for a moment, here is an animation that will demonstrate the value of the larger sensor in something like the GM1 (or the LX100 or the FZ1000 or the G7x or the RX100 and so on …) Note, though, that I really screwed up the jpeg settings on the GM1, making very strong contrast images. Still, you can see the detail retention and saturation at the highest ISOs and the lack of smearing across the board …


Well, I hope that someone found this useful. To me, the S1 took the crown at all ISOs. A close second place to the HS50EXR at M size DR400. SN mode sucked. L mode was adequate, but saturation really suffers.